 09-05-2009, 01:01 AM
|
#46 |
|
Rotary Fanatic

Join Date: Mar 2008
Location: Brenham, TX
Posts: 335
Rep Power: 18  |
Wow i didn't know you were kicked off the other forum. I knew you made some different parts, i think a tranny brace? I think as much help and information alot of us bring to the forums that things like that shouldn't be such a big deal. It's not like its spam. But anyway thats why i'm trying to get more members over here.
I'm glad you got the sensors and hope they work out well for ya'll, i'm sure they will! Look forward to hearing the results.
__________________
500+ HP thanks to:  Fast reacting IAT sensor thread! Mechanical Pre-turbo Water Injection Thread Dual Stock fuel pumps Thread T2 differential swap! Last edited by dudemaaan; 09-05-2009 at 01:04 AM. |

|

|
|
09-05-2009, 04:37 AM
|
#47 |
|
RCC Contributor

Join Date: Mar 2008
Posts: 535
Rep Power: 18 |
No tranny braces but an engine torque brace plus other things .See the vender section under Garfinkles Motor Works . I to like to see and know what others are doing ,making and finding to improve the cars .The other forum is just money hungery
|
|
|
|
|
09-06-2009, 01:38 PM
|
#48 |
|
Rotary Fanatic
Join Date: Mar 2008
Location: Brenham, TX
Posts: 335
Rep Power: 18 |
I had to take my UIM off to do a few things so I decided to add some pics with a small writeup of installing the sensor. I also redid the wiring to add a bosch protective boot to the IAT wiring. Basically cut the old connector off, solder or butt connect the new wires in place. Shrink wrap or tape the connections. I finished mine off with the protective boot and wire loom. My wiring was already extended from when I relocated my stock sensor so I left the wiring long. You can see where the new sensor goes on the 3rd intake runner. That's pretty much it, not much to it.
Be careful not to over-tighten the sensor, and if you can point the sensor so the air flows through the "cage" that is ideal. See pics for the prefered sensor rotation. I also used teflon tape to seal and add a slight heat barrier between the metal and sensor. 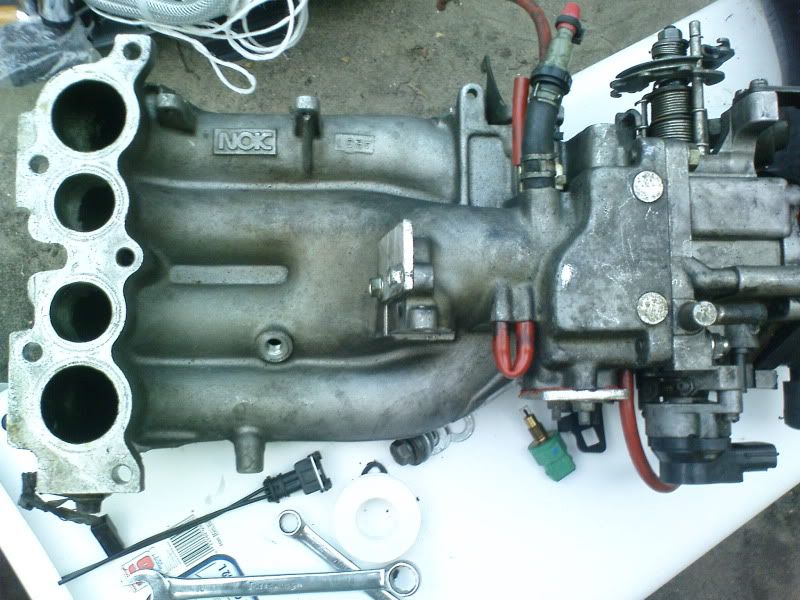 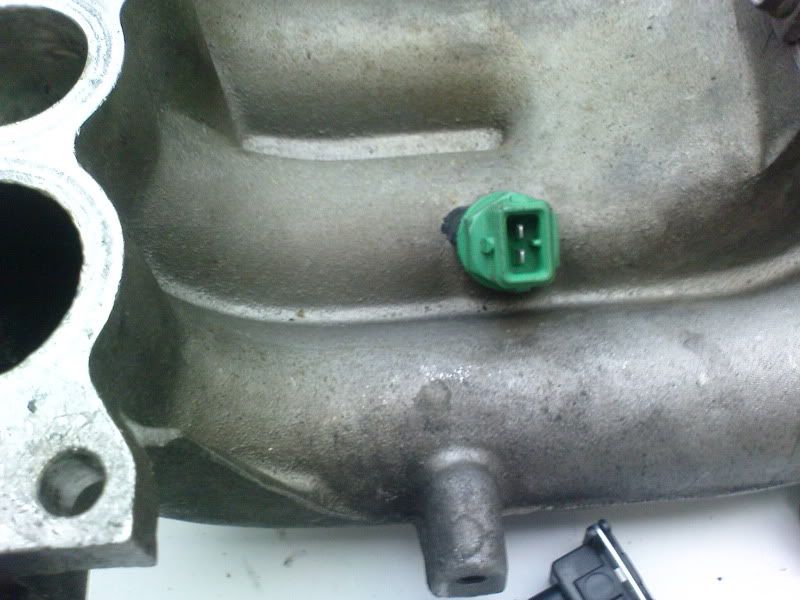  
__________________
500+ HP thanks to: Fast reacting IAT sensor thread! Mechanical Pre-turbo Water Injection Thread Dual Stock fuel pumps Thread T2 differential swap! Last edited by dudemaaan; 09-06-2009 at 01:42 PM. |
|
|
|
|
09-06-2009, 03:29 PM
|
#49 |
|
レーサー

Join Date: Sep 2008
Location: Columbus, Ohio
Posts: 190
Rep Power: 18 |
Nice Write Up! Thanks!
__________________
Thank God For Pistons! How else would we brake!  NASA Great Lakes Region TTD #53 Rx7 |
|
|
|
|
09-08-2009, 11:00 PM
|
#50 |
|
RCC Contributor
Join Date: Mar 2008
Posts: 535
Rep Power: 18 |
I put my air temp sensor in the injector bung on the elbow,The old ones came with two injector bungs , I cut one off and put one of my blow off valves there .I made a nylon plug to go in the bung and the sensor screwed in to the nylon .I made a new plug for the new sensor today and mounted it and soldered in the new connector . the black ring on the plug is an o-ring to seal the plug .And yes I painted it silver .
Last edited by Garfinkles Motor Works; 09-08-2009 at 11:04 PM. |
|
|
|
|
09-09-2009, 12:11 AM
|
#51 |
|
Rotary Fan in Training
Join Date: Feb 2008
Location: Bay Area CA
Posts: 91
Rep Power: 18 |
Dude - you got a new order
David and Brent - don't take it personally. Know that the community appreciates your efforts overall regardless of corporate ROI efforts.
__________________
93 Vintage Red R1 Power: Street Ported Motor, 99 Twins, V-mount, DP>SMB cat/MP> RB cat back, PFC, 1300cc secondaries, Fuel Pump, ACT clutch, RB lwfw, etc Steve Kan tuned - 310rwhp at 10PSI Suspension: Tripoint custom valved Koni + Ground Control coilovers, Eibach sway bars, SuperPro bushings, Corner Balanced and accurately aligned Brakes: RacingBrake 4 corner BBK SSR Integrale 17"x9" +45, Dunlop Star Specs 255/40 |
|
|
|
|
09-19-2009, 12:21 AM
|
#52 |
|
Rotary Fanatic
Join Date: Mar 2008
Location: Brenham, TX
Posts: 335
Rep Power: 18 |
Today I went to the fair here in Brenham, TX. I had the car pretty heat soaked from driving slow looking for a parking spot. Was at the fair for about 3 hrs. When I came back out the sensor was reading 48C, I backed out of my spot and in under 30 secs of slowly leaving the temp already dropped to 40c. Got on the highway and it quickly dropped to 33c and held there. I remember with my sanded down stock sensor relocated to the elbow, if it was heat soaked to 48c it would just stay like that. Low speeds would take 10 mins to come down. Highway would drop it faster but still took way too long. Nothing like this new sensor. I was also able to make the temps increase on the highway just by letting off the gas. In mere seconds it would go from 33c to 38c then drop back down as I got back on the gas. So glad I switched the sensor out.
__________________
500+ HP thanks to: Fast reacting IAT sensor thread! Mechanical Pre-turbo Water Injection Thread Dual Stock fuel pumps Thread T2 differential swap! |
|
|
|
|
09-19-2009, 11:59 AM
|
#53 |
|
Viable Fossil
Join Date: Mar 2008
Location: Mid-West
Posts: 199
Rep Power: 18 |
David,
As always your work looks clean and neat. And I like the touch of insulating the sensor from heatsoak through the use of the nylon. But it doesn't look like the sensor would be directly in the air stream. The difference may only be nominal, but ???
__________________
Jim VR R1 FD |
|
|
|
|
09-19-2009, 01:24 PM
|
#54 |
|
Rotary Fanatic
Join Date: Feb 2008
Location: HuntsVEGAS
Posts: 249
Rep Power: 18 |
1 question...
would it be possible to remove the wire and terminals from the OEM connector and insert them in the new connector? or maybe use molex terminals on the OEM wire and insert them in the new connector? I would like to avoid splicing the new connector. |
|
|
|
|
09-19-2009, 03:09 PM
|
#55 |
|
Rotary Fanatic
Join Date: Mar 2008
Location: Brenham, TX
Posts: 335
Rep Power: 18 |
I'm sure something like that could be done. If you find something that will plug into the stock connector you could use that. The sensor uses a bosch connector just like aftermarket injectors use to give you an idea of what you're working with. I'll look at my stock connector to see what options I can think of. Though I don't know why anyone would ever go back to a stock sensor after using the new one.
__________________
500+ HP thanks to: Fast reacting IAT sensor thread! Mechanical Pre-turbo Water Injection Thread Dual Stock fuel pumps Thread T2 differential swap! |
|
|
|
|
09-19-2009, 08:42 PM
|
#56 |
|
RCC Contributor
Join Date: Mar 2008
Posts: 535
Rep Power: 18 |
My nylon part is cut so the cage of the sensor is in the air stream .As Dude said the air should pass through the cage,I need to check that detail and turn it if needed .
|
|
|
|
|
09-20-2009, 09:22 AM
|
#57 | |
|
Rotary Fanatic
Join Date: Feb 2008
Location: HuntsVEGAS
Posts: 249
Rep Power: 18 |
Quote:
|
|
|
|
|
|
09-20-2009, 11:53 AM
|
#58 | |
|
Rotary Fanatic
Join Date: Mar 2008
Location: Brenham, TX
Posts: 335
Rep Power: 18 |
Quote:
__________________
500+ HP thanks to: Fast reacting IAT sensor thread! Mechanical Pre-turbo Water Injection Thread Dual Stock fuel pumps Thread T2 differential swap! |
|
|
|
|
|
09-20-2009, 02:47 PM
|
#59 |
|
Rotary Fanatic
Join Date: Feb 2008
Location: HuntsVEGAS
Posts: 249
Rep Power: 18 |
OK... so how do I obtain one?
|
|
|
|
|
09-20-2009, 04:42 PM
|
#60 |
|
Rotary Fanatic
Join Date: Mar 2008
Location: Brenham, TX
Posts: 335
Rep Power: 18 |
I'll send you a pm.
__________________
500+ HP thanks to: Fast reacting IAT sensor thread! Mechanical Pre-turbo Water Injection Thread Dual Stock fuel pumps Thread T2 differential swap! |
|
|
|
 |
| Bookmarks |
|
|


 Linear Mode

