Go Back   Rotary Car Club > Tech Discussion > 20B/3 Rotor Conversion..

20B/3 Rotor Conversion.. All things to do with 20B/3 rotor... Post pics, video, tech, etc..


Welcome to Rotary Car Club.

You are currently viewing our boards as a guest which gives you limited access to view most discussions and access our other features. By joining our free community you will have access to post topics, communicate privately with other members (PM), respond to polls, upload content and access many other special features. Registration is fast, simple and absolutely free so please, join our community today!

If you have any problems with the registration process or your account login, please contact contact us.

Reply
 
Thread Tools Display Modes
Old 02-22-2015, 12:23 PM   #31
lt1_fd3s
WNC Tour Guide
 
lt1_fd3s's Avatar
 
Join Date: Feb 2008
Location: WNC
iTrader: (3)
Posts: 780
Rep Power: 17
lt1_fd3s is on a distinguished road
Default

Quote:
Originally Posted by GySgtFrank View Post
Quit your whining and get your ass moving. If I can work in this crap out here, then I don't want to hear about how your female parts hurt in NC.
Aye Gunny!


__________________
WNC Tour Guide - Including the Tail of the Dragon - PM for details
lt1_fd3s is offline   Reply With Quote
Old 02-24-2015, 07:44 PM   #32
N.RotaryTech
Home-brew Rotary
 
N.RotaryTech's Avatar
 
Join Date: Feb 2008
Location: GooseCreek SC
iTrader: (0)
Posts: 552
Rep Power: 17
N.RotaryTech is on a distinguished road
Default

Been lurking.
Awesome that your doing this 20b project.
As far as the car goes, leave it multi colored. lol.
__________________
'89 RX7 GTU, half-Bridge-port S4/S5 NA, E6K, Full RB exhaust, weekend warrior.
'83 RX7, The "this might take awhile" project.
'87 RX7 GXL, Rest In Pieces.
'98 Subaru Impreza Outback-sport, rx7 rescue vehicle, down for repair.
'94 Ford Ranger, daily.
N.RotaryTech is offline   Reply With Quote
Old 02-24-2015, 11:30 PM   #33
lt1_fd3s
WNC Tour Guide
 
lt1_fd3s's Avatar
 
Join Date: Feb 2008
Location: WNC
iTrader: (3)
Posts: 780
Rep Power: 17
lt1_fd3s is on a distinguished road
Default

Quote:
Originally Posted by n.rotarytech View Post
been lurking.
Awesome that your doing this 20b project.
As far as the car goes, leave it multi colored. Lol.
toby!!!
__________________
WNC Tour Guide - Including the Tail of the Dragon - PM for details
lt1_fd3s is offline   Reply With Quote
Old 03-23-2015, 08:52 AM   #34
tomsn16
The Newbie
 
Join Date: Apr 2009
iTrader: (0)
Posts: 17
Rep Power: 0
tomsn16 is on a distinguished road
Default

Hey tray......hows the project going, anxious for an update.
Jim T
tomsn16 is offline   Reply With Quote
Old 03-23-2015, 09:26 AM   #35
t_g_farrell
Waffles - hmmm good
 
t_g_farrell's Avatar
 
Join Date: Aug 2008
Location: Huntersville, NC
iTrader: (0)
Posts: 757
Rep Power: 0
t_g_farrell is on a distinguished road
Default

Hey, slacker, is this coming to DGRR? Can it make the climb up the hill to the OGTA cabin?

I'll have cider!
__________________
1980 GS stockport, Fat Nikki, RB Dual Facetfuel pumps, Holley regulator, RB Street port exhaust, 2GDFIS, MR2 MK I electric fans, 2G strut bar, relayed fans, lights and fuel pump, LEDs

Project Fat Nikki Budget 12A rebuild Video setup < $30.00
t_g_farrell is offline   Reply With Quote
Old 03-23-2015, 05:22 PM   #36
lt1_fd3s
WNC Tour Guide
 
lt1_fd3s's Avatar
 
Join Date: Feb 2008
Location: WNC
iTrader: (3)
Posts: 780
Rep Power: 17
lt1_fd3s is on a distinguished road
Default

i'm waiting to hear back about when i can order some different motor mounts... and debating if/when i want to go talk to the paint and body guy about color changing the engine bay before i drop the engine in...
__________________
WNC Tour Guide - Including the Tail of the Dragon - PM for details
lt1_fd3s is offline   Reply With Quote
Old 04-04-2015, 08:56 AM   #37
lt1_fd3s
WNC Tour Guide
 
lt1_fd3s's Avatar
 
Join Date: Feb 2008
Location: WNC
iTrader: (3)
Posts: 780
Rep Power: 17
lt1_fd3s is on a distinguished road
Default

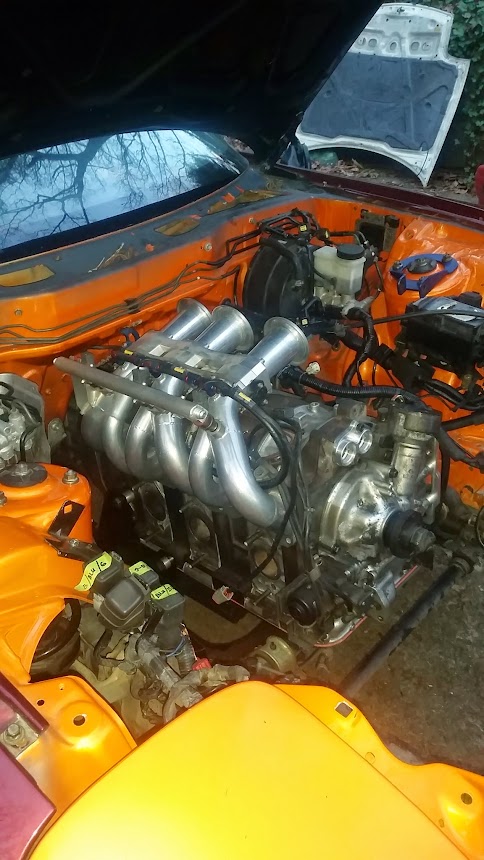
just a small update... I did a little test fitting of the engine + trans with the mounts and oil pan...
  • Mounts: Defined Auto brackets + 2.6" Xcessive Poly lower mounts
  • Xcessive 20B oil pan kit
I'm not comfortable with the angle of the engine + trans and the oil pan rests on the steering rack. The back of the trans is about 1'' or more lower than stock (estimate is based on trying to mount the Banzai Trans brace). Also, with the height of the engine, my front strut bar doesn't clear my #1 trumpet, but the trumpet does clear under the hood about the thickness of my index finger. So now i'm considering my options to allow me to tilt the engine more, lowering the front while raising the back of the trans... yes, i'm toying with the idea of a dry sump system...

I've since pulled it all back out and stripped down the bay as much as I can in prep for getting it painted.


5 pics added to the album
__________________
WNC Tour Guide - Including the Tail of the Dragon - PM for details
lt1_fd3s is offline   Reply With Quote
Old 04-04-2015, 02:41 PM   #38
tomsn16
The Newbie
 
Join Date: Apr 2009
iTrader: (0)
Posts: 17
Rep Power: 0
tomsn16 is on a distinguished road
Default

Anxious to see it painted....what color have you decided on?
Engine looks awesome.
tomsn16 is offline   Reply With Quote
Old 04-04-2015, 05:53 PM   #39
lt1_fd3s
WNC Tour Guide
 
lt1_fd3s's Avatar
 
Join Date: Feb 2008
Location: WNC
iTrader: (3)
Posts: 780
Rep Power: 17
lt1_fd3s is on a distinguished road
Default

I've settled on the "Spirit R Grey" aka Titanium Grey Metallic (Paint Code: 25G)

and after discussion options today with my brother, we have a few ideas about oil pan hitting the steering rack issue... ideas that don't cost $4500... and if we get one of those to work out, then yeah... i can pick up some other goodies i had to delay on.. heehee...
__________________
WNC Tour Guide - Including the Tail of the Dragon - PM for details
lt1_fd3s is offline   Reply With Quote
Old 07-03-2015, 08:22 PM   #40
tomsn16
The Newbie
 
Join Date: Apr 2009
iTrader: (0)
Posts: 17
Rep Power: 0
tomsn16 is on a distinguished road
Default

WELL.....how is the project going? Hope you are not as far behind as I am.
Jim T
tomsn16 is offline   Reply With Quote
Old 07-08-2015, 07:11 AM   #41
lt1_fd3s
WNC Tour Guide
 
lt1_fd3s's Avatar
 
Join Date: Feb 2008
Location: WNC
iTrader: (3)
Posts: 780
Rep Power: 17
lt1_fd3s is on a distinguished road
Default

hit a few delays... but hopefully will be back to this project soon...
__________________
WNC Tour Guide - Including the Tail of the Dragon - PM for details
lt1_fd3s is offline   Reply With Quote
Old 08-01-2015, 12:45 AM   #42
lt1_fd3s
WNC Tour Guide
 
lt1_fd3s's Avatar
 
Join Date: Feb 2008
Location: WNC
iTrader: (3)
Posts: 780
Rep Power: 17
lt1_fd3s is on a distinguished road
Default

Cliff notes:
New Super Pro bushings front and rear (ordered from J-Auto, who is a GREAT guy to buy from!!!)
New OEM Pillow balls (also ordered from Juan at J-Auto)
J-Auto Trailing arms and toe links
Suspension back on the car with the 4.3 diff installed as well... (hopefully by the end of the weekend)

well, after some delays and life happening...

i didn't originally plan to do this in the build but after checking out the suspension and swapping the '94/'95 subframe that was on my shell into my other FD, I ended up deciding to do new bushings all around, including the pillow balls.

The diff already had super pro bushings, which i only realized after i had ordered my first set from J-Auto (1st set was for my v8 fd). So about 2 wks after that order, I ordered another set of super pro's from Juan, along with his new rear trailing arms and toe links. And from my misreading his website the first time I ordered parts, I ended up with a set of OEM pillow balls w/ new dust covers.

Today I got all the old bushings pressed out and tomorrow I plan to install all the new ones and see about getting the suspension back on the car along with the 4.3 diff installed.

With this out of the way, i can motivate myself to clean and paint my depowered steering rack, re-assemble it and get back to test fitting the engine again, this time with the OEM oil pan.

Side note: I have a Xcessive 20B oil pan on the car right now but with the defined auto motor mounts, the front "hump" of the oil pan rests on the steering rack, raising the front of the engine and made it impossible to get the back of the transmission high enough to bolt in my banzai transmission mount as well as greatly effected the angle of the driveshaft.
__________________
WNC Tour Guide - Including the Tail of the Dragon - PM for details
lt1_fd3s is offline   Reply With Quote
Old 08-02-2015, 04:24 PM   #43
88turboii
destroy, rebuild, repeat
 
88turboii's Avatar
 
Join Date: Feb 2008
Location: Charleston, SC
iTrader: (0)
Posts: 395
Rep Power: 17
88turboii is on a distinguished road
Default

sledge hammer?
88turboii is offline   Reply With Quote
Old 08-03-2015, 08:20 AM   #44
lt1_fd3s
WNC Tour Guide
 
lt1_fd3s's Avatar
 
Join Date: Feb 2008
Location: WNC
iTrader: (3)
Posts: 780
Rep Power: 17
lt1_fd3s is on a distinguished road
Default

i would rather try to justify the cost of a dry sump setup... and the metal of the Xcessive pan is pretty steady, i did consider cutting and rewelding it, but just swapping oil pans is considerably less work
__________________
WNC Tour Guide - Including the Tail of the Dragon - PM for details
lt1_fd3s is offline   Reply With Quote
Old 08-03-2015, 09:26 AM   #45
88turboii
destroy, rebuild, repeat
 
88turboii's Avatar
 
Join Date: Feb 2008
Location: Charleston, SC
iTrader: (0)
Posts: 395
Rep Power: 17
88turboii is on a distinguished road
Default

doesnt defined auto make a oilpan that clears? or too pricey?
88turboii is offline   Reply With Quote
Reply

Bookmarks


Posting Rules
You may not post new threads
You may not post replies
You may not post attachments
You may not edit your posts

BB code is On
Smilies are On
[IMG] code is On
HTML code is Off

Forum Jump


All times are GMT -5. The time now is 08:32 AM.


Powered by vBulletin® Version 3.8.4
Copyright ©2000 - 2024, Jelsoft Enterprises Ltd.
Hosted by www.GotPlacement.com
Ad Management by RedTyger