Go Back   Rotary Car Club > Tech Discussion > Piston Engine Conversion

Piston Engine Conversion Have you replaced your rotary with a V8 or any other type of piston engine? Tell us about it!


Welcome to Rotary Car Club.

You are currently viewing our boards as a guest which gives you limited access to view most discussions and access our other features. By joining our free community you will have access to post topics, communicate privately with other members (PM), respond to polls, upload content and access many other special features. Registration is fast, simple and absolutely free so please, join our community today!

If you have any problems with the registration process or your account login, please contact contact us.

Reply
 
Thread Tools Display Modes
Old 02-25-2013, 02:01 AM   #31
StephenSheppard
Rotary Fan in Training
 
Join Date: Nov 2012
iTrader: (0)
Posts: 58
Rep Power: 12
StephenSheppard is on a distinguished road
Default

Here's what it looks like on the inside of the firewall in case you were wondering. The bulkheads are 90 degree jams. In this picture they are not pointed in the right direction though. Yes there's tons of clearance to any moving parts.


Before and after sand blasting the LCAs


I already had MMR's Delrin bushings in my control arms. They fit so well I had to rig up a bearing puller to get the dam things off so I could sand blast the arms lol. So if you ever wondered, yes they are very nice and fit almost a little to well. Good stuff though. I love the response these bushings add to the car.


When I was done I clearcoated the arms then reinstalled the bushings. Not sre how the clearcoat will hold up but figured it might be worth a shot.

Sexy!


Installed them with new stainless hardware.


Installed the wiper linkage with new hardware as well.


Hung the coilovers with new hardware..............I think you're beginning to notice the trend here.


Unbolted my single piston front brakes and tossed them in the trash, time to finally put the 4 piston factory brakes on again. For a low powered car as before though the single piston brakes worked perfectly fine. They would lock up at speeds above 60 mph if you really gave them hell.


Basically I tore down the wiper motor, cleaned it, sand blasted the body of it. Cleaned everything else and reassembled it. In the picture the top was still drying from repainting so here you can see the little electric motor parts.


I was going to rebuild a set and sand blast them since I have a few but I think I'm going to go with rebuilt units from a parts supplier to save me some time. They will probably be painted black but I don't care too much what color the calipers are honestly.


I may still rebuild them myself, I'll see how I feel about it later I guess when i get ready to get that done.


StephenSheppard is offline   Reply With Quote
Old 02-25-2013, 02:12 AM   #32
StephenSheppard
Rotary Fan in Training
 
Join Date: Nov 2012
iTrader: (0)
Posts: 58
Rep Power: 12
StephenSheppard is on a distinguished road
Default

I cleaned up the radiator a bunch since it's been in two cars over the last 5 years. Was starting to look a bit beat up and dirty. Installed the bracket after it got back from powdercoating.


Notice the mounting tabs changed to nuts and bolt for the diagonal square tubes. I used nylocs on the backsides of all these so it could be tight without crushing the tube.


Stuck the clutch master cylinder in there. Basically some of this stuff is being partially assembled for hardware purposes. A lot of it will be final assembled later on as the car comes together.


This guy turned out pretty good.


Engine cradle and steering rack brackets and hardware sorted.


One of my trans bracket factory holes had the threads pulled out of it a while back, which is super awesome so the back one in this pic is a stud and nut now.


Cut this terrible hole in the passenger floorboard to gain access to the backside so I could weld a bolt in there to fix the pulled thread issue. i'll fix up the hole and make a plate to cover it up later. For now it will look terrible.


Not sure but yeah there's something to look at lol.


Last edited by StephenSheppard; 02-25-2013 at 02:20 AM..
StephenSheppard is offline   Reply With Quote
Old 02-25-2013, 02:30 AM   #33
StephenSheppard
Rotary Fan in Training
 
Join Date: Nov 2012
iTrader: (0)
Posts: 58
Rep Power: 12
StephenSheppard is on a distinguished road
Default

Dat new new


Radiator clearance


Brakequip plug for the brake mastercylinder I was talkign about earlier. M10x1.0 inverted flare plug. (BQ18 part number I think it was)


There she is installed


I felt the need to have cool looking clamps for the brake lines. Also I'm pretty sure I hate money.


BOOM instant dopeness


Mounted the proportioning valve here at the lowest point under all the dash stuff so none of these lines will ever have to be removed unless they themselves need to be removed for some reason. Also I can easily reach the biasing valve knob to control the rear brake pressure for various different tire types and sizes. It's a Wilwood component, just flipped over on it's front, then I nerded it up by labeling the inputs and outputs on the backside to make my life easy. Bolted through the tunnel with ..........you guessed it brand new stainless hardware lol. Bent up some hardlines.


Closer! lol


Installed more clamps.

StephenSheppard is offline   Reply With Quote
Old 02-25-2013, 02:38 AM   #34
StephenSheppard
Rotary Fan in Training
 
Join Date: Nov 2012
iTrader: (0)
Posts: 58
Rep Power: 12
StephenSheppard is on a distinguished road
Default

Power steering cooler showed up from china. Still need to make some mounting stuff for this thing. It doesn't go there , but that gives you an idea of it's size at least.


Went back to my Honda roots for a minute and hit up Blox for this stainless coolant overflow tank. I love the 1/4 turn lid and the fact the hose fittings are on the bottom.


Made an aluminium bracket for the tank


I was talking to my uncle in Canada about the project and he mentioned he had a 87 Corvette TPI intake he didn't need anymore. Sent it to me for my birthday. Pretty cool deal. Lots of changes will be made to this so it will fit the project needs better. More on this guy later.


Rebuild kit for the steering rack. Need to tackle that still.


New hardware for the front calipers.


New steering rack bushings, my old ones were pretty trashed, heads up on these they cost about 45 bucks which is a terrible price in my opinion.


Last edited by StephenSheppard; 02-25-2013 at 02:41 AM..
StephenSheppard is offline   Reply With Quote
Old 02-28-2013, 01:08 AM   #35
StephenSheppard
Rotary Fan in Training
 
Join Date: Nov 2012
iTrader: (0)
Posts: 58
Rep Power: 12
StephenSheppard is on a distinguished road
Default

So I rebuilt my steering rack, then made a seperate post about it in the FC forum. Here's the internal link:


http://www.rotarycarclub.com/rotary_...d=1#post234794


That took a lot of time due to the picture taking

Didn't get much else done today.
StephenSheppard is offline   Reply With Quote
Old 03-01-2013, 09:12 PM   #36
StephenSheppard
Rotary Fan in Training
 
Join Date: Nov 2012
iTrader: (0)
Posts: 58
Rep Power: 12
StephenSheppard is on a distinguished road
Default

So moving forward after the steering rack rebuild.


Bought these dudes for spacing the hood hinges up away from the body. Normally they go on the bottom of the hood above the top hinge piece but since the FC hood is angled there it's far easier to just space it on the bottom then build a complicated piece that's offset for the hood. Then I just notch the fender for the clearance of the now taller assembly.


Changed my mind on the right side engine bay harness. Although I won't have 14 wires on that side I decided to use this Molex XRC bulkhead connector anyways. I had it left over from another project so instead of wasting money I decided to use it on my own car.

You can find that at the following link:

http://www.waytekwire.com/products/2...RC-Connectors/


There's still a couple more things to add to this harness but nothing much. The ignition coil wiring may end up on this side of the car, not sure yet on it's placement.


A little closer view. The pass through deals are for the alternator cable and the starter cable. Seperate for a reason we will get to at some point in the build.


I like details like the clip on this connector. Not technically the correct one but it works well anyways lol.

StephenSheppard is offline   Reply With Quote
Old 03-03-2013, 10:42 PM   #37
StephenSheppard
Rotary Fan in Training
 
Join Date: Nov 2012
iTrader: (0)
Posts: 58
Rep Power: 12
StephenSheppard is on a distinguished road
Default

After taking what felt like one million years to drain the tank I removed it and started on the surge tank and second fuel pump. I think there was 16 gallons in the car, seriously it took forever. Put all the fuel in my otehr two cars lol.

First I gatherered everything up and got an idea of what was needed as far as space goes. I wanted to preserve as much of the trunk space as possible. Cheap chinese surge tank, check. External Walbro loud ass pump, check. And some AN fittings.


My original layout idea.


It's so dirty under there. I still need to drop the rear end so I can remove the factory hardlines and build new 3/8" stainless stuff.


I cut a piece of steel to be tacked to the floor of the trunk to give myself a flat surface to build on, It is my hope when this is fully enclosed that should there be a minor fuel leak it will go out the bottom of the car along with any fire lol. Not sure how that's going to work out. Hopefully I'll never find out. The rason the plate doesn't extend to the blue line is that I felt it was too big for no reason.


This was option 1


Option 2


I'll more than likely go with option two. I'll also more than likely cut the angle stuff on a 45 at the corners. I'm hoping to find a piece of scrap aluminium somewhere to build the top out of so the enclosure doesn't weigh anymore than it needs to. Called it quits for the night after this cause I was tired of it to be honest. Also i need to order some fittings to get final clearances for the enclosure. For those not familiar with surge tanks, it goes like this. In tank pump keeps the the surge tank full. External pump takes fuel from the surge tank and sends it to the engine. Pretty simple way to get rid of the fuel pick up problem on FC chassis while turning left. There's pretty much no condition under which the main pump won't keep the surge tank full enough to keep the second pump feeding the engine.
StephenSheppard is offline   Reply With Quote
Old 03-05-2013, 09:05 PM   #38
StephenSheppard
Rotary Fan in Training
 
Join Date: Nov 2012
iTrader: (0)
Posts: 58
Rep Power: 12
StephenSheppard is on a distinguished road
Default

After getting off work today I took a couple minutes and dropped the rear end/suspension out of the car so I could remove the factory hardline deal that runs under the entire car. It's trapped above teh subframe and differential if anyone doesn't already know that lol.


Never let your caliper hang off your soft brake line. Always ziptie them up. When I remove the rear end as an entire assembly I leave the coilovers in and the brakes hooked up.

Also I'm going to be sellign the brake lines shown here and the front One's as well. Only the rears have ever been on the car, the front ones are brand new. I'll include the crush washers and banjo bolt as well. Say $50 shipped in the contenital USA? Just holler at me if your interested. I'm building new ones that are AN fitting types so that's the only reason I'm even selling them.


That needs to go


And here it is pulled out ready to go in the garbage.


I highly recommend MMR's Subframe and diff bushings. They are Delrin and super solid. I have yet to have any issues with these. Been in the car for a year or two.


Something that happens a lot on my car. I always seem to get tire shreds stuck in the brake assembly and wrapped around the hubs.


Another reason I recommend the MMR diff bushings. Since I installed them I have yet to break a front diff mount. It looks like there's a tiny crack but it's just the casting or whatever you call it for rubber stuff. I was only making probably 160lbft of torque but this mount has like 1000 clutch kicks on it at least. We will see how it does with the V8.


Waiting on a bunch of stuff to arrive from Summit Racing still, fittings, tube, hardware, bla bla bla
StephenSheppard is offline   Reply With Quote
Old 03-06-2013, 04:48 PM   #39
StephenSheppard
Rotary Fan in Training
 
Join Date: Nov 2012
iTrader: (0)
Posts: 58
Rep Power: 12
StephenSheppard is on a distinguished road
Default

So today's my day off and I decided to get some of the rear brake lines done while I'm just sitting around waiting on FedEx and UPS to bring me stuff.

I used -3AN straight bulkheads on each side through the factory brake line holders. Just flat washers, a lockwasher and nut. Bam done. Easiest thing on the whole damn car.


Bent up some more stainless tube for the right rear from the factory junction block to the holder. I'll put the nuts and sleeves on this after i have the fittings for the junction block, which is supposed to come today.


Same deal here.


Stuck the new line in the car to get an idea of where I want the new clamps. The factory plastic clamps do fit the 3/16" line just fine if anyone wanted to know. Mine are a bit beat so I'll use new aluminium clamps like the stuff in the front of the car, cause I hate money basically.


Dat fitment!


So damn many bends at the end of this thing. PITA to make.


Now if the delivery dudes will get here I can finish this up and build the fuel lines and stuff. Also have some misc stuff coming like a new oil pan and whatever else I bought I can't even remember lol.
StephenSheppard is offline   Reply With Quote
Old 03-06-2013, 05:28 PM   #40
GySgtFrank
Professional Stick Poker
 
GySgtFrank's Avatar
 
Join Date: Feb 2011
Location: Stafford, Ks.
iTrader: (0)
Posts: 1,005
Rep Power: 15
GySgtFrank will become famous soon enough
Default

Coming along nicely. Peace of mind with the new lines will be nice.
__________________
1979 SA22C (parts of one anyway)
http://rotarycarclub.com/rotary_foru...ad.php?t=15585

1975 MG Midget (building)
http://rotarycarclub.com/rotary_foru...ad.php?t=18681

1988 N/A SE model FC, dead stock and less than 85k on the clock. This one actually runs, so I don't fuck with it.
GySgtFrank is offline   Reply With Quote
Old 03-06-2013, 10:59 PM   #41
StephenSheppard
Rotary Fan in Training
 
Join Date: Nov 2012
iTrader: (0)
Posts: 58
Rep Power: 12
StephenSheppard is on a distinguished road
Default

Yep new stuff is always nice. I'm sure somethig will not get tightened the first go round and it'll leak on something lol.

I'm going to have to check every single nut and bolt on the car after assembly honestly. Some stuff I left hand tight on purpose, some stuff is tightend all the way.


So my some of my stuff arrived finally late in the day, got a bit more work done but then it started getting cold and I was hungry lol.

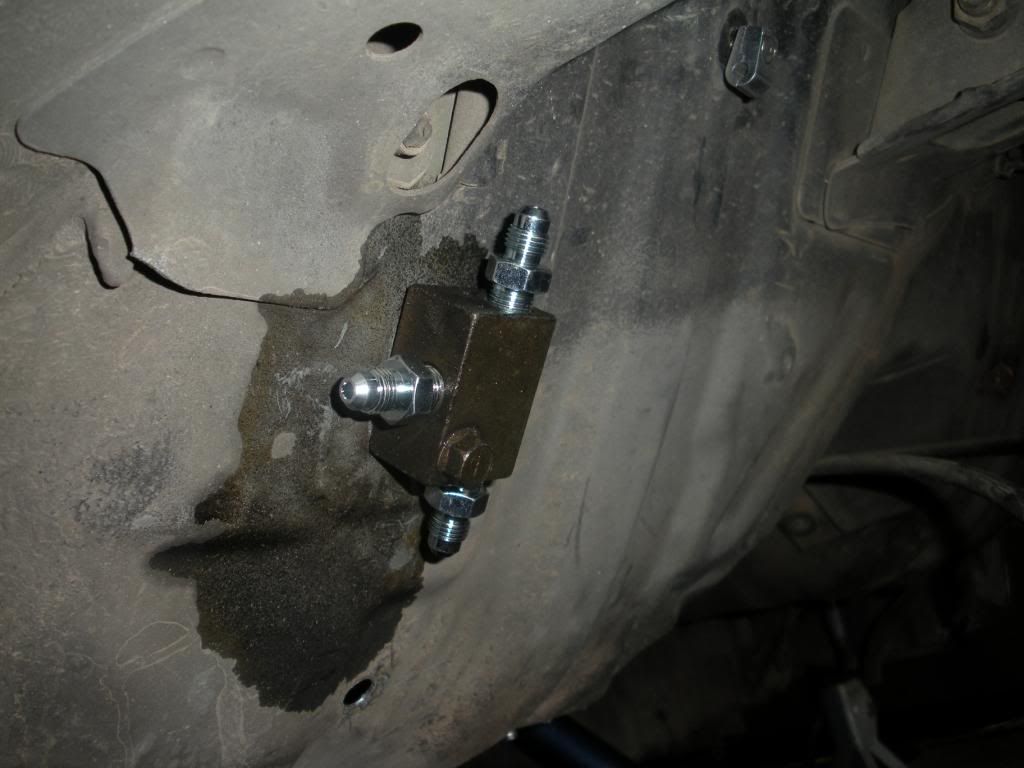
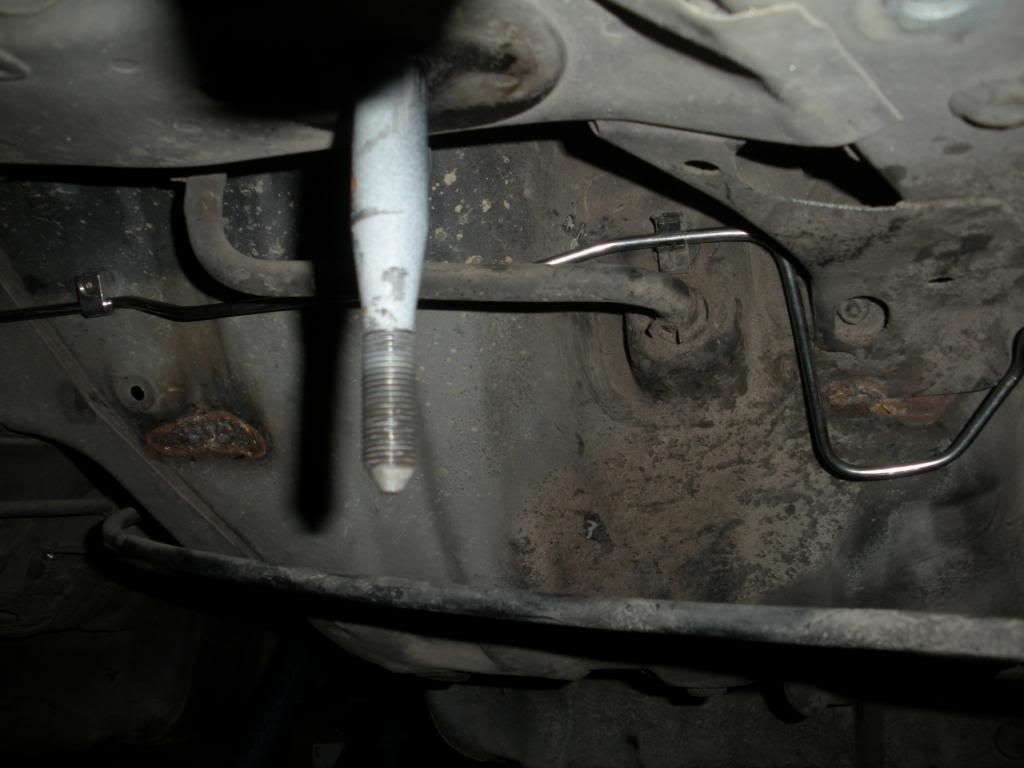
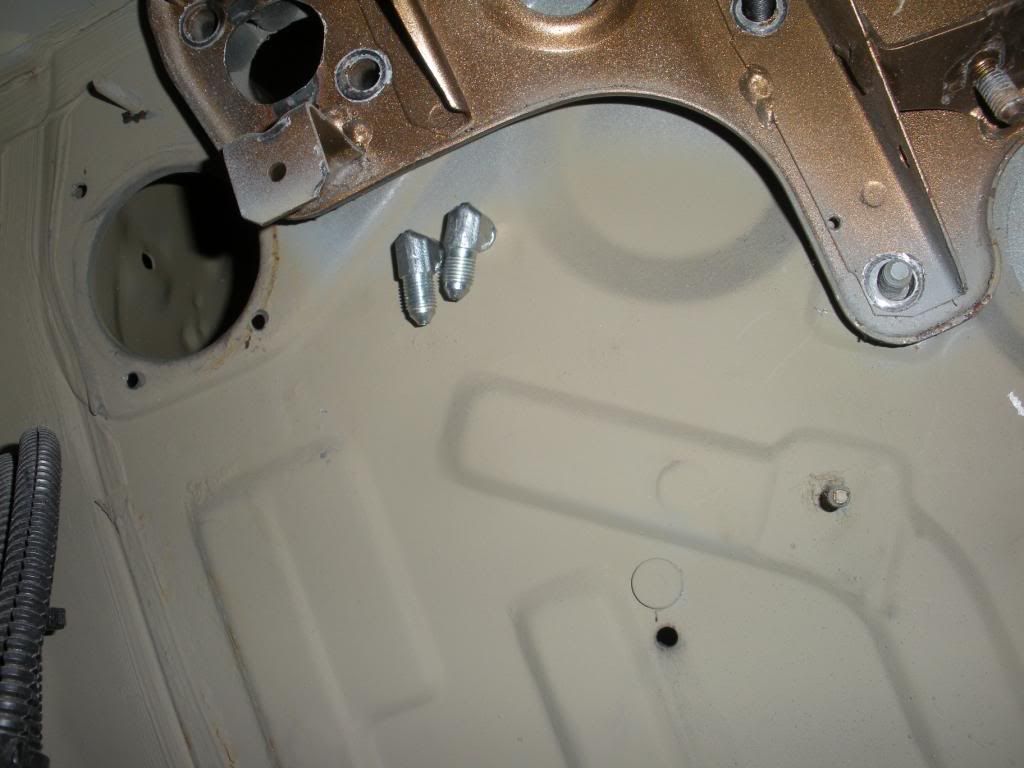
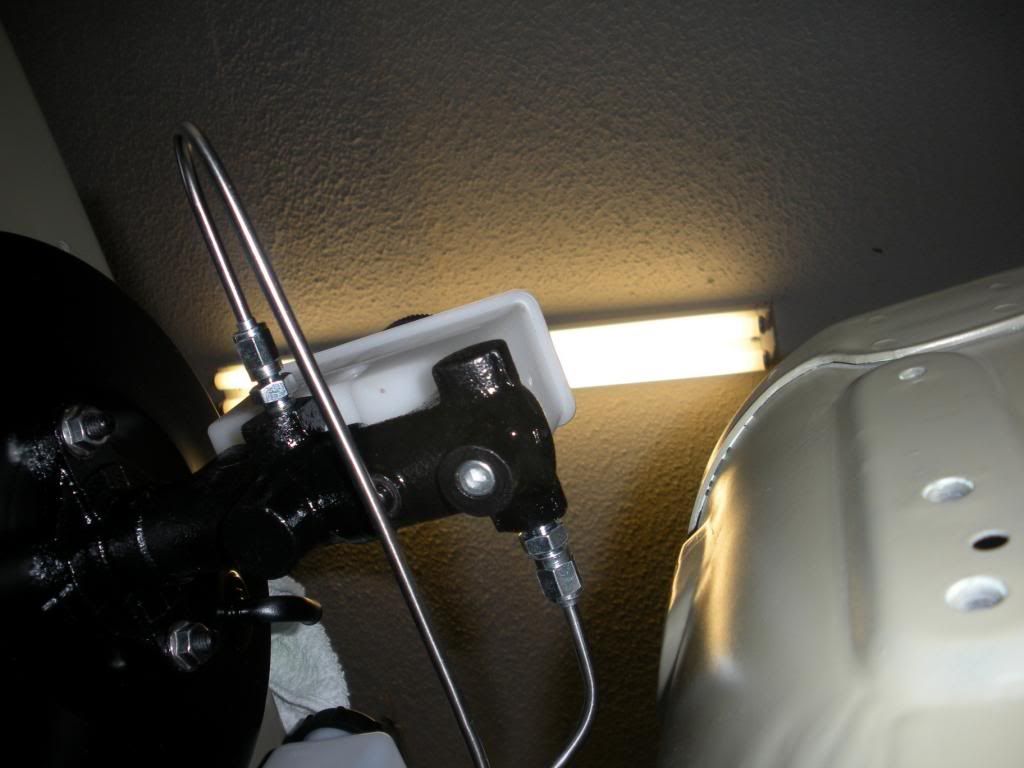
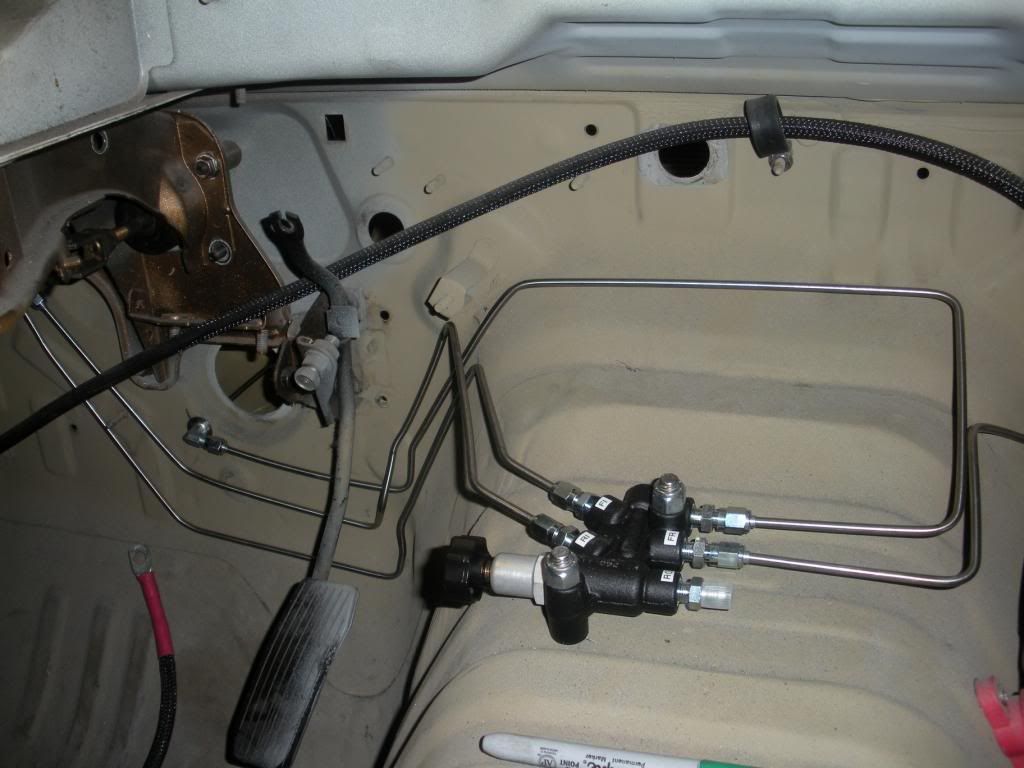
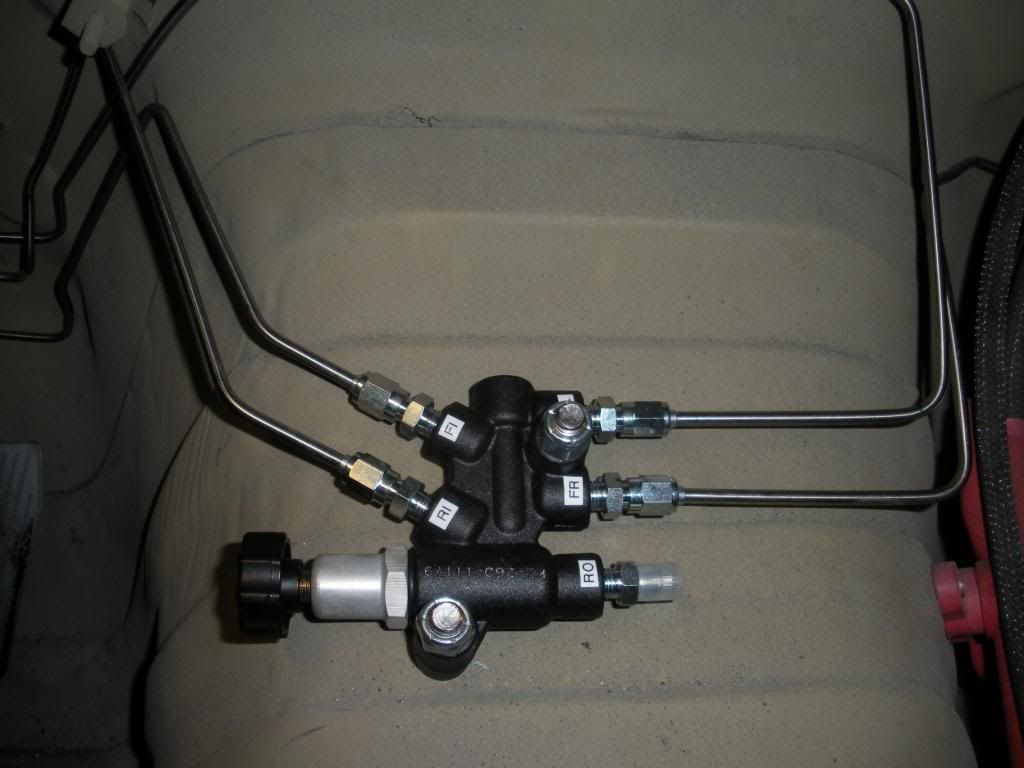
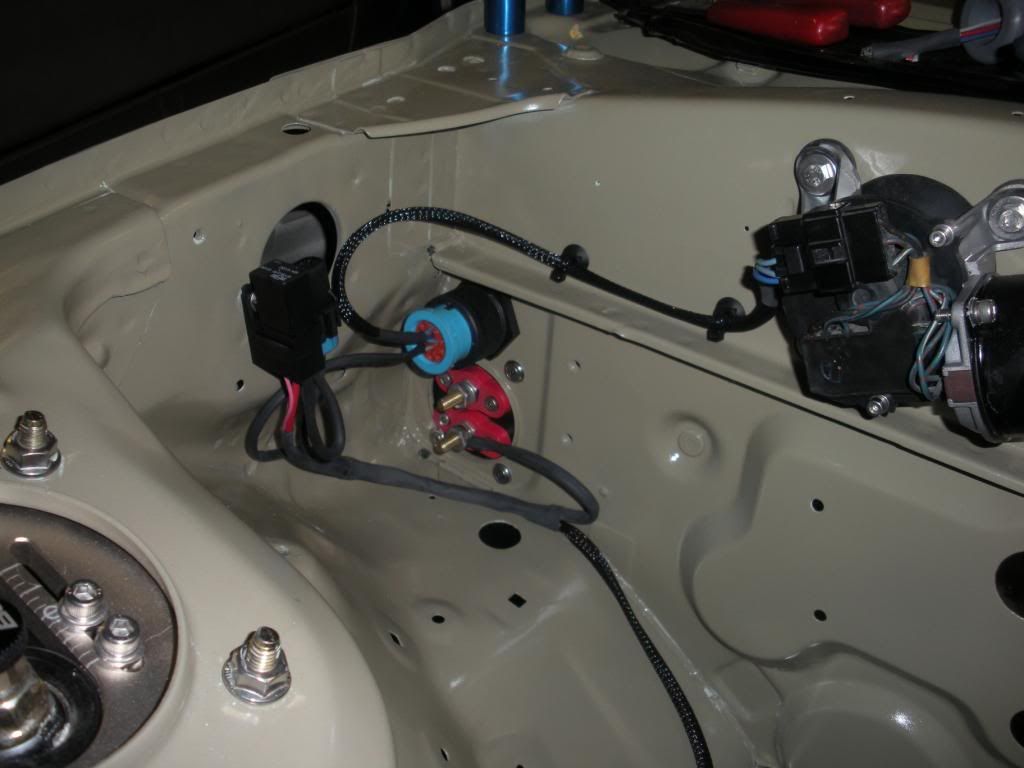
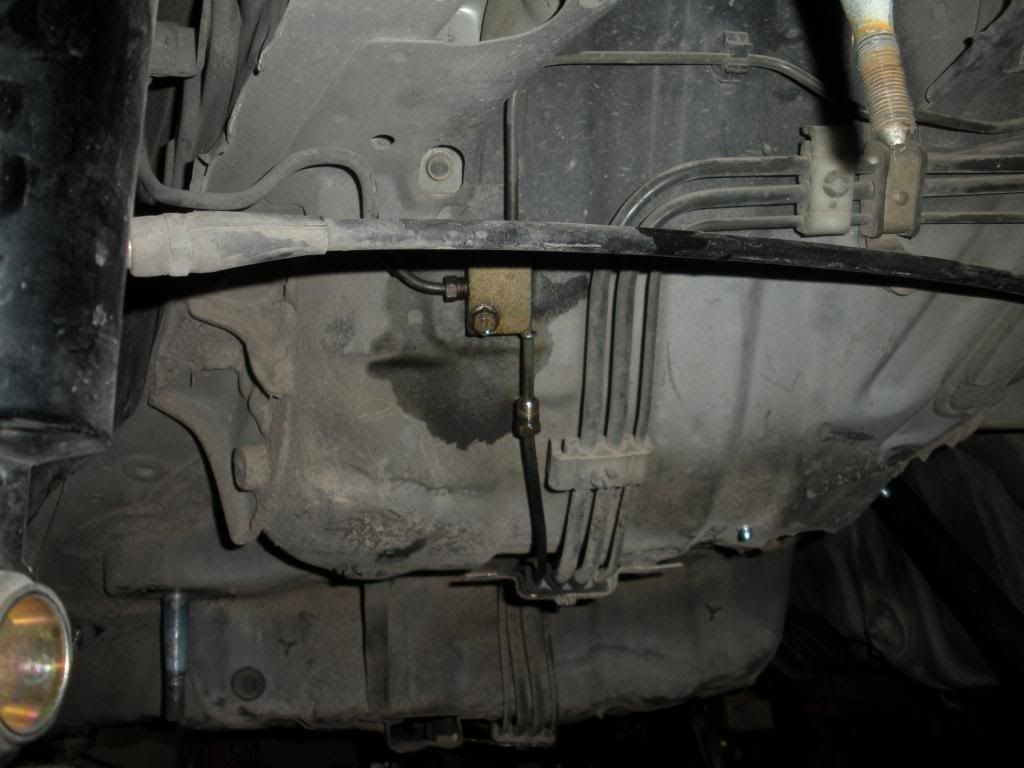
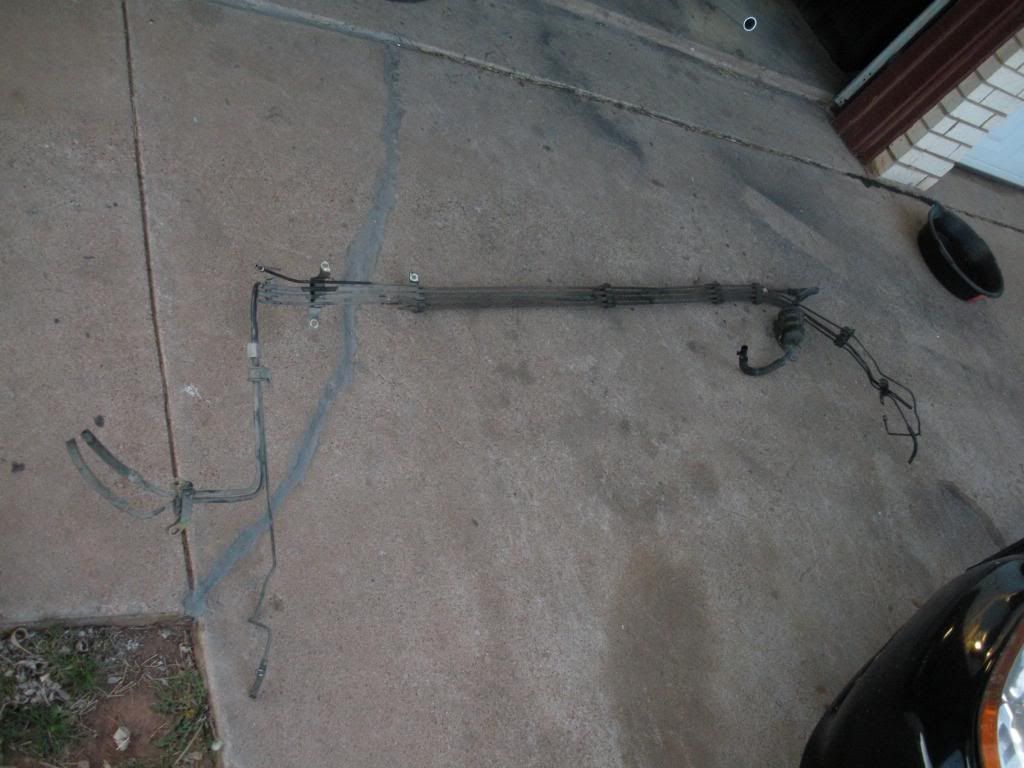
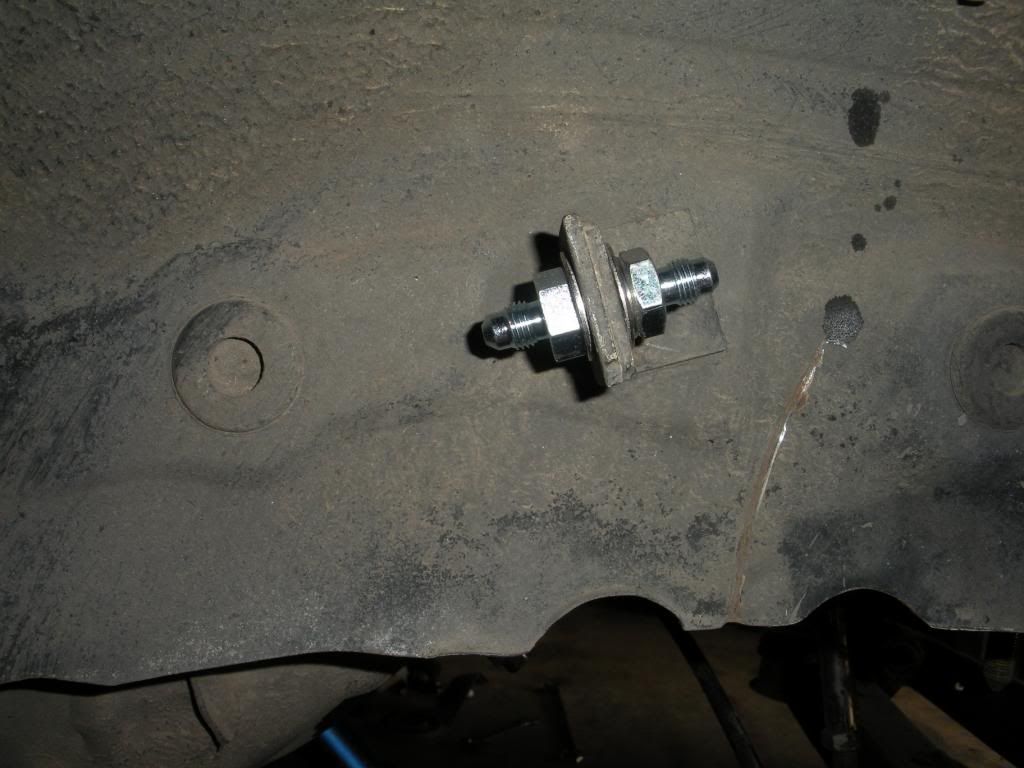
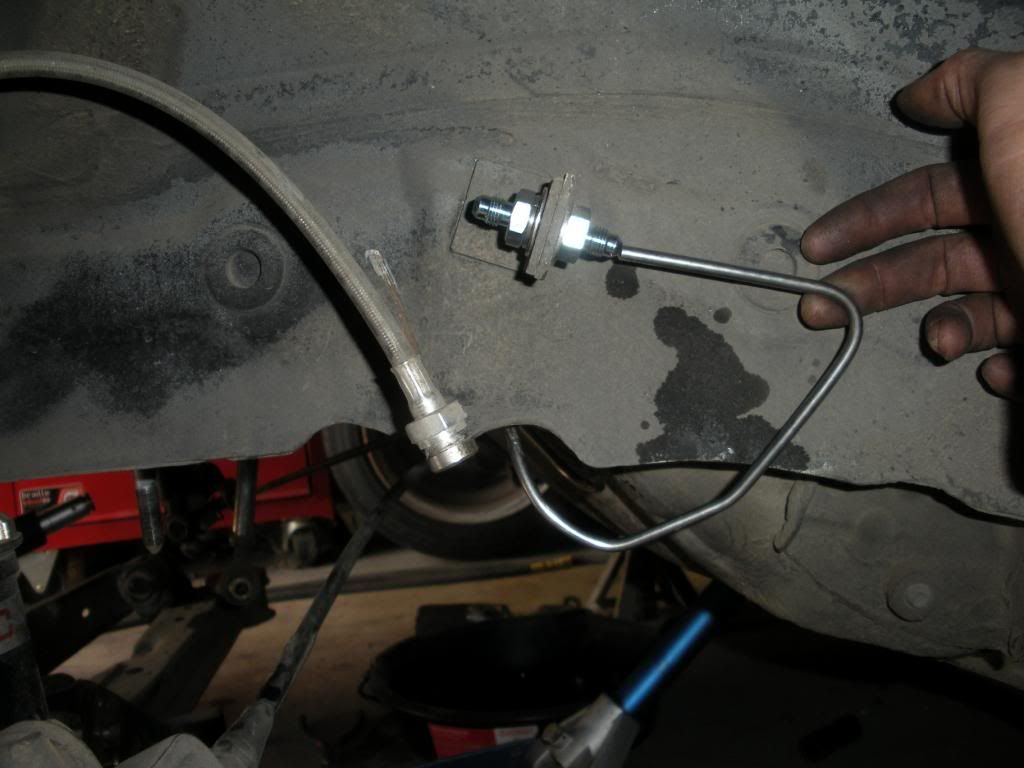
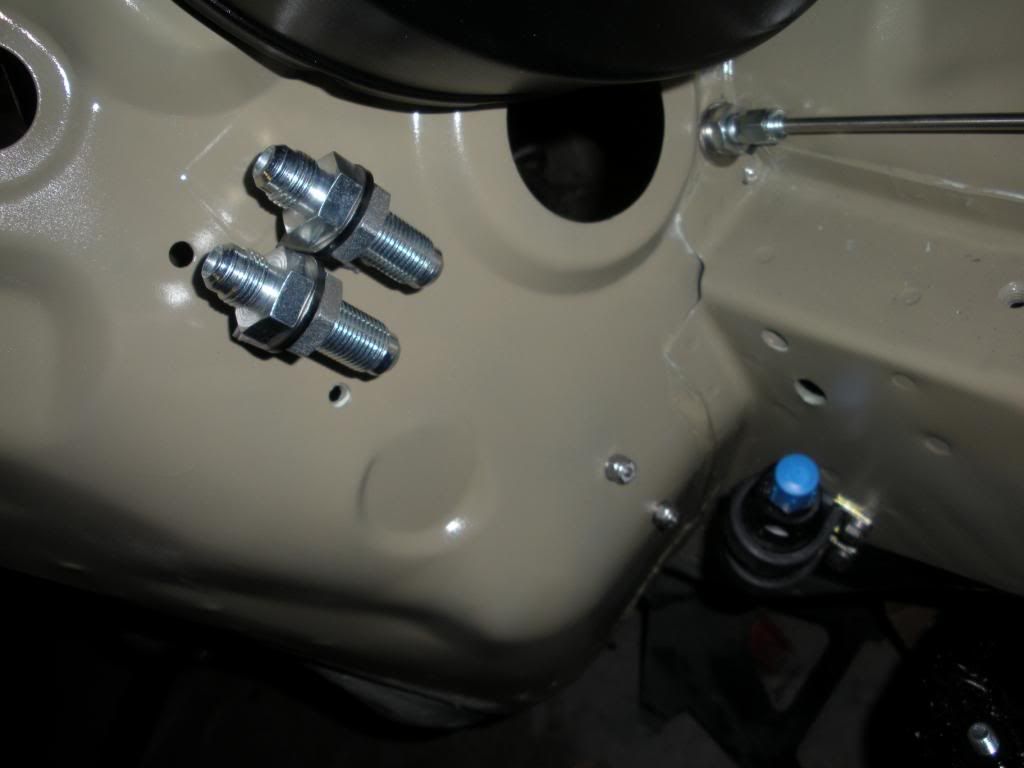
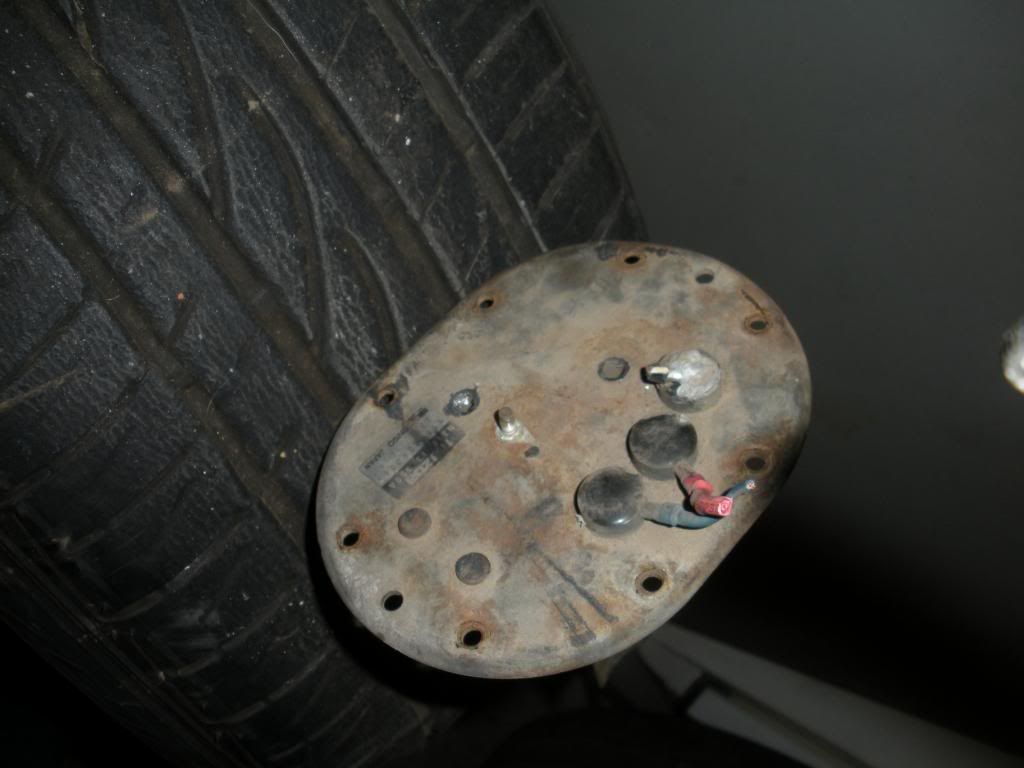
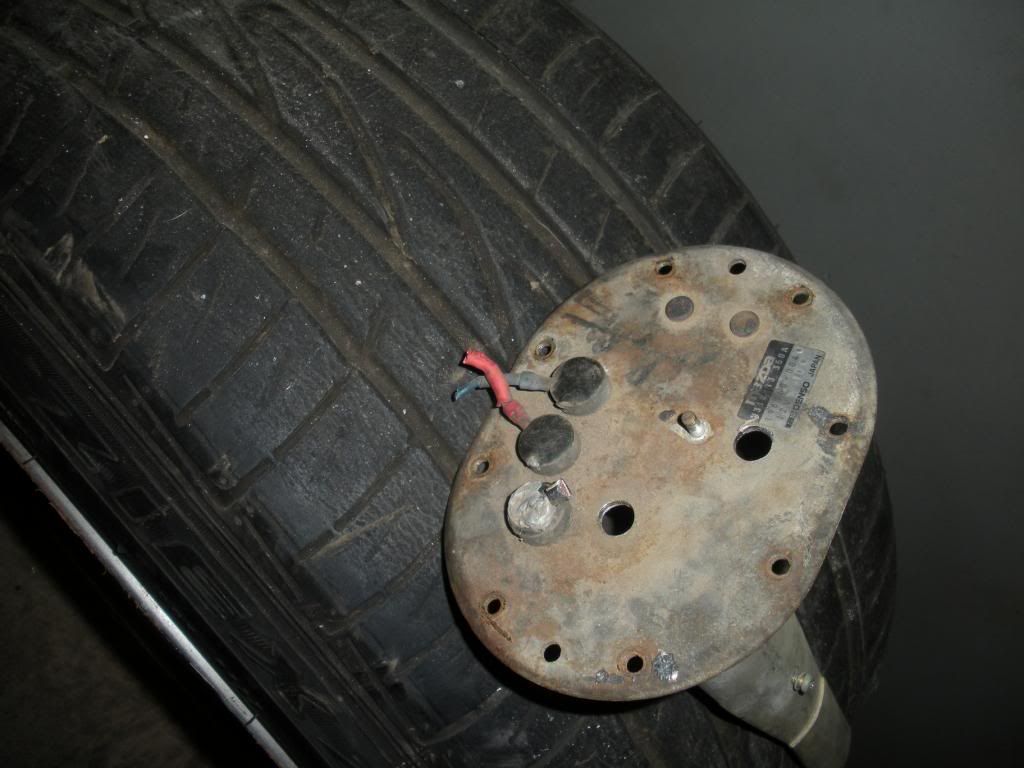
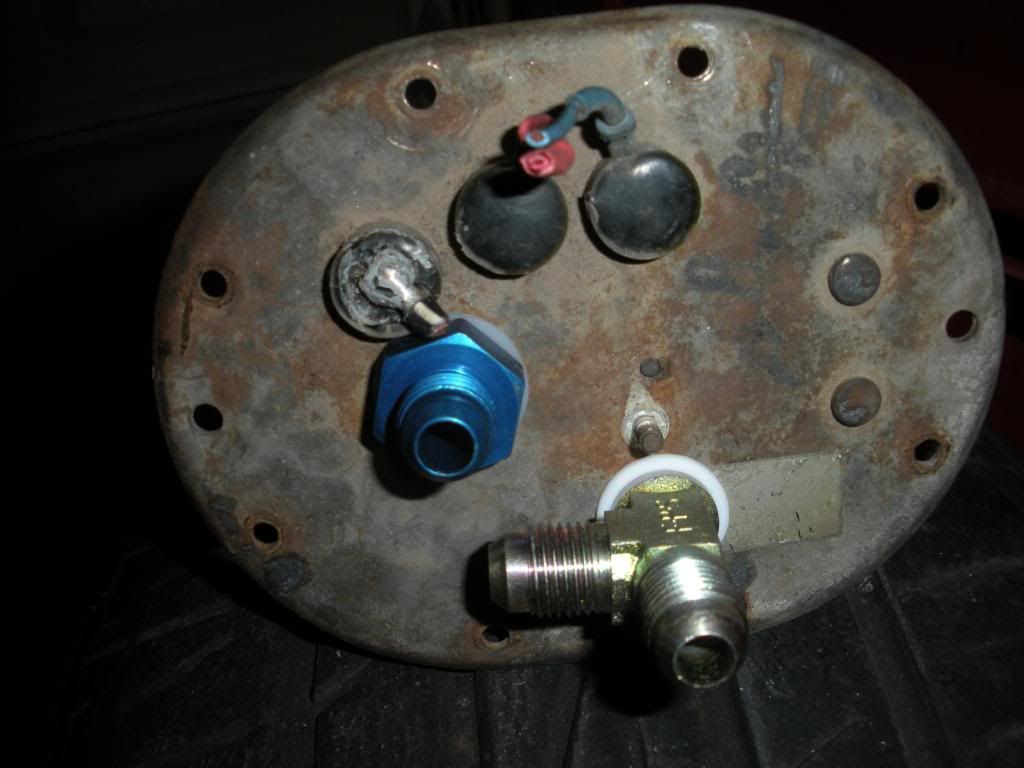
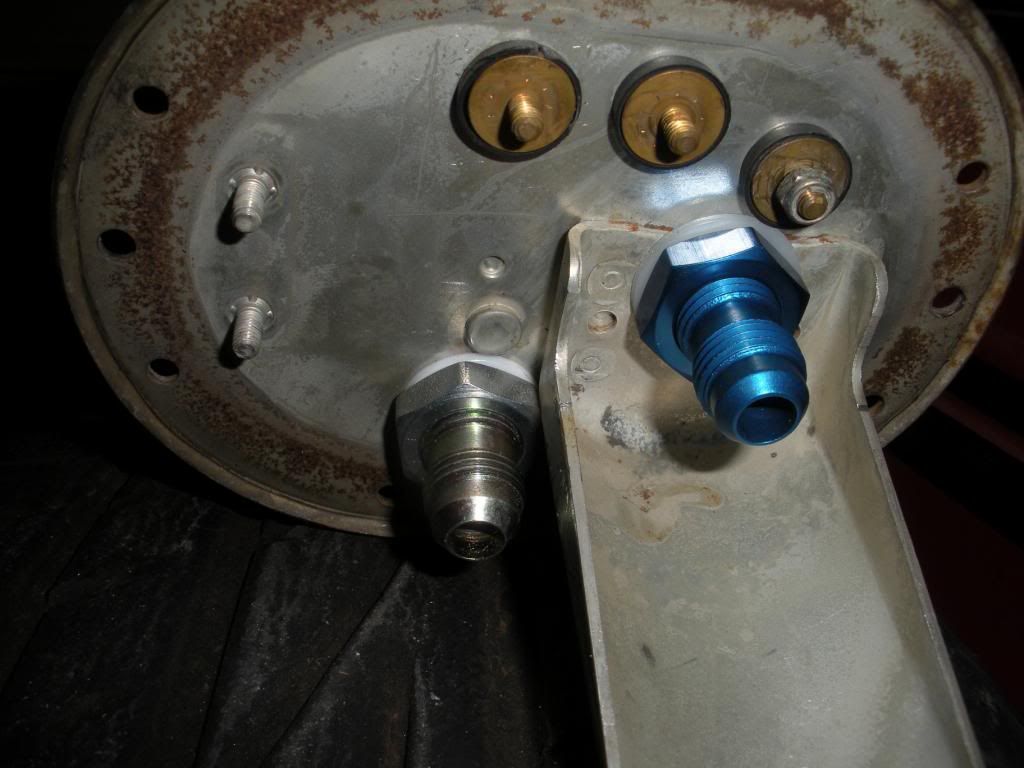
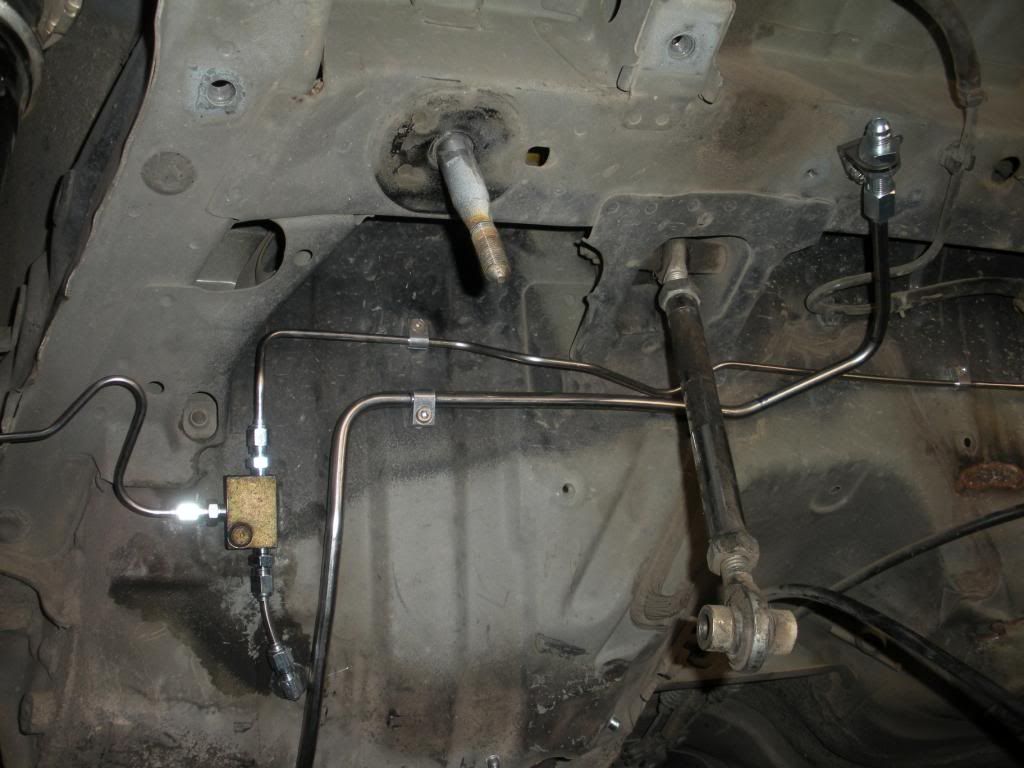
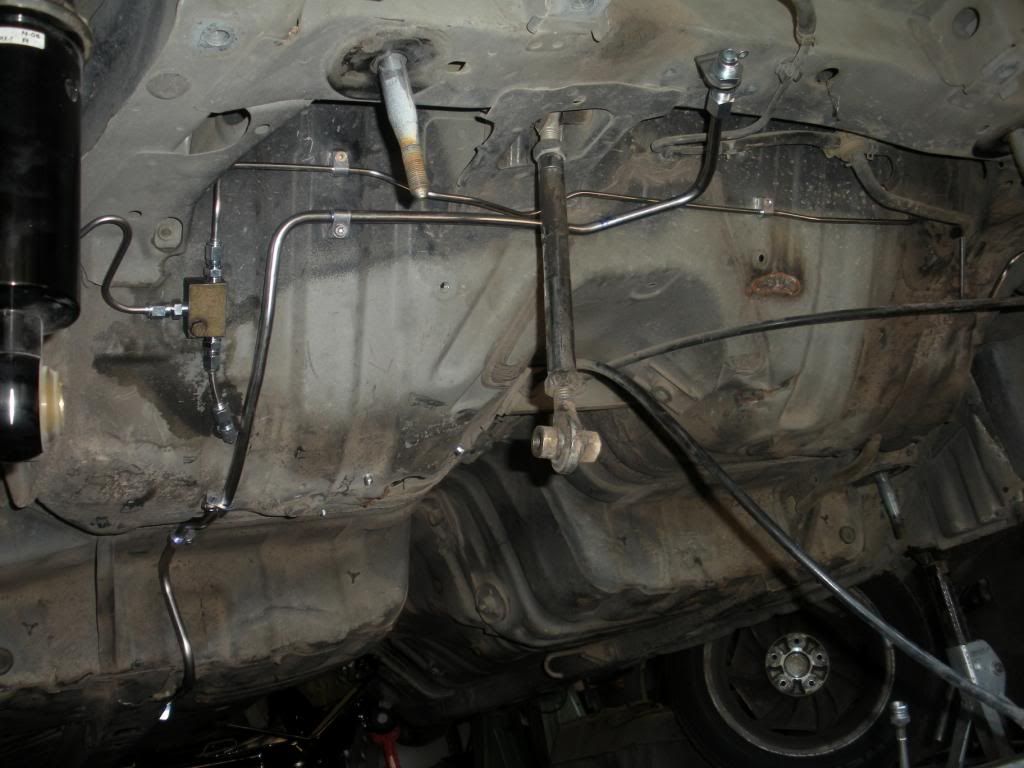
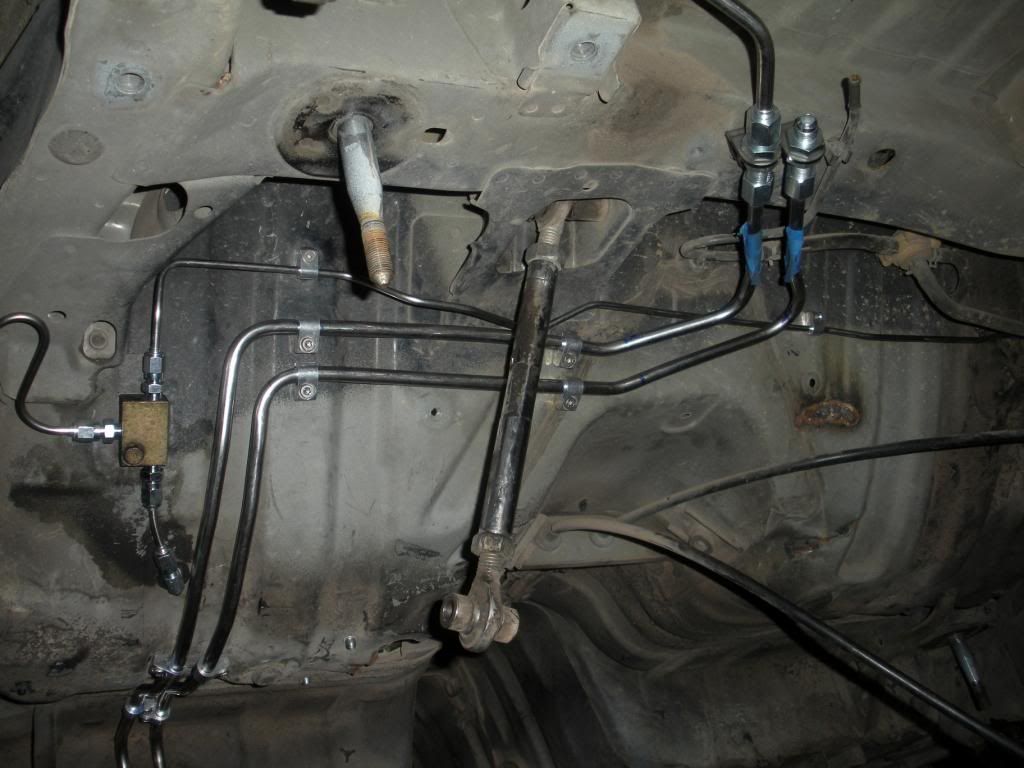
Installed the M10x1.0 to -3AN fittings in teh factory junction block.


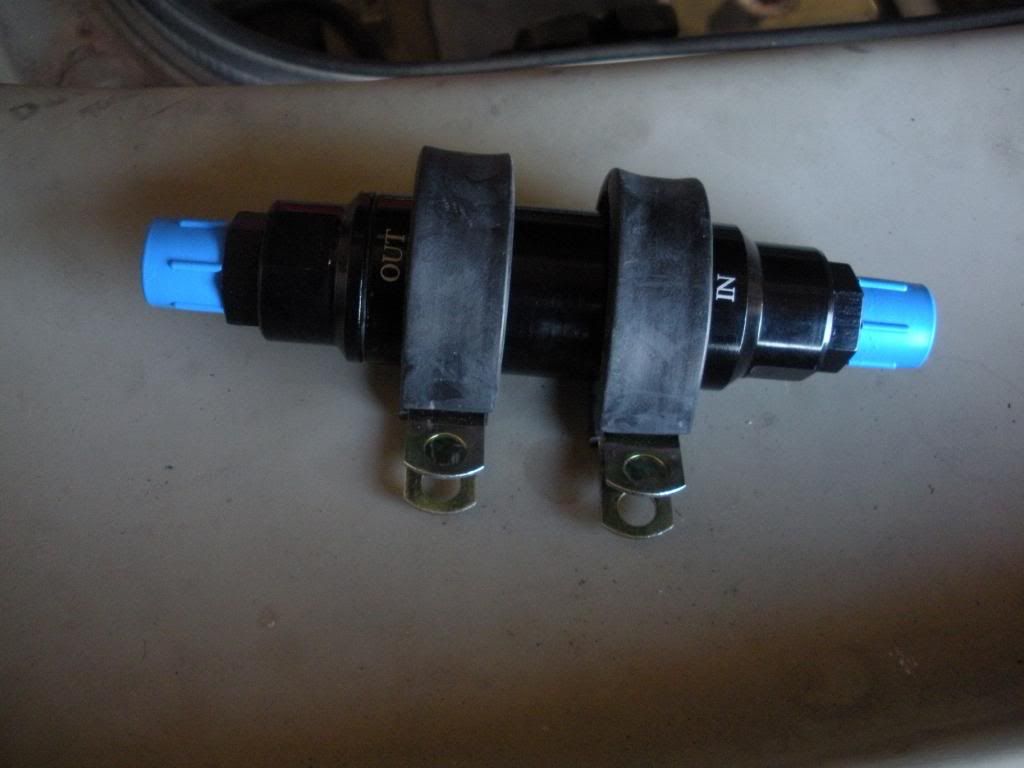
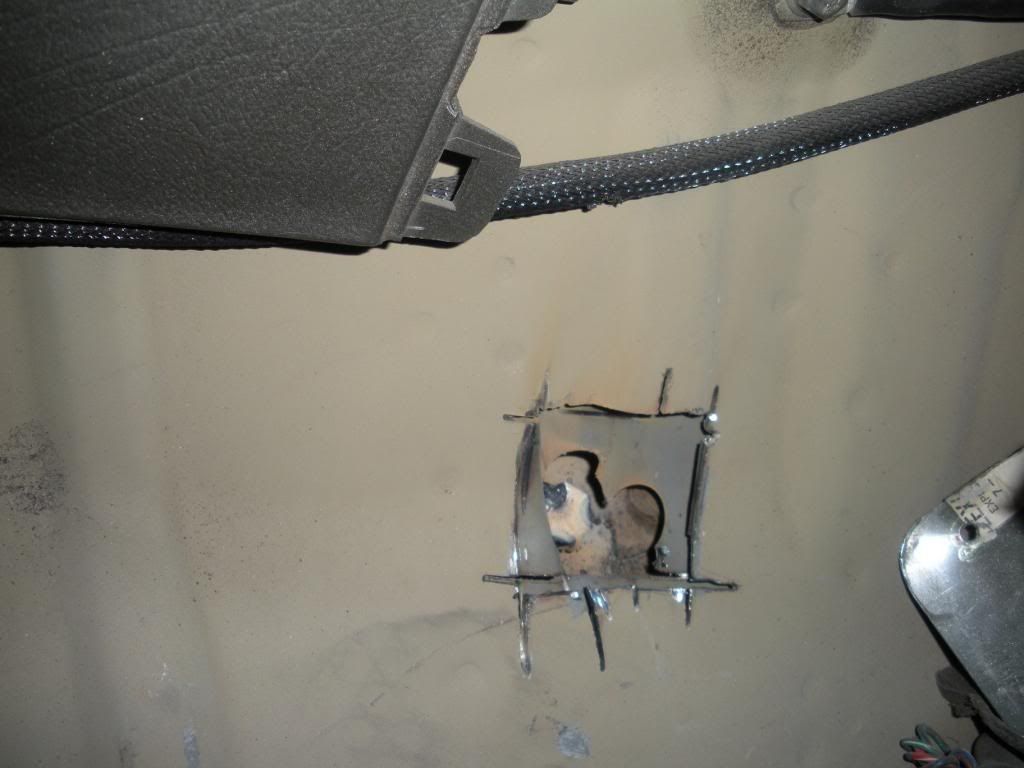
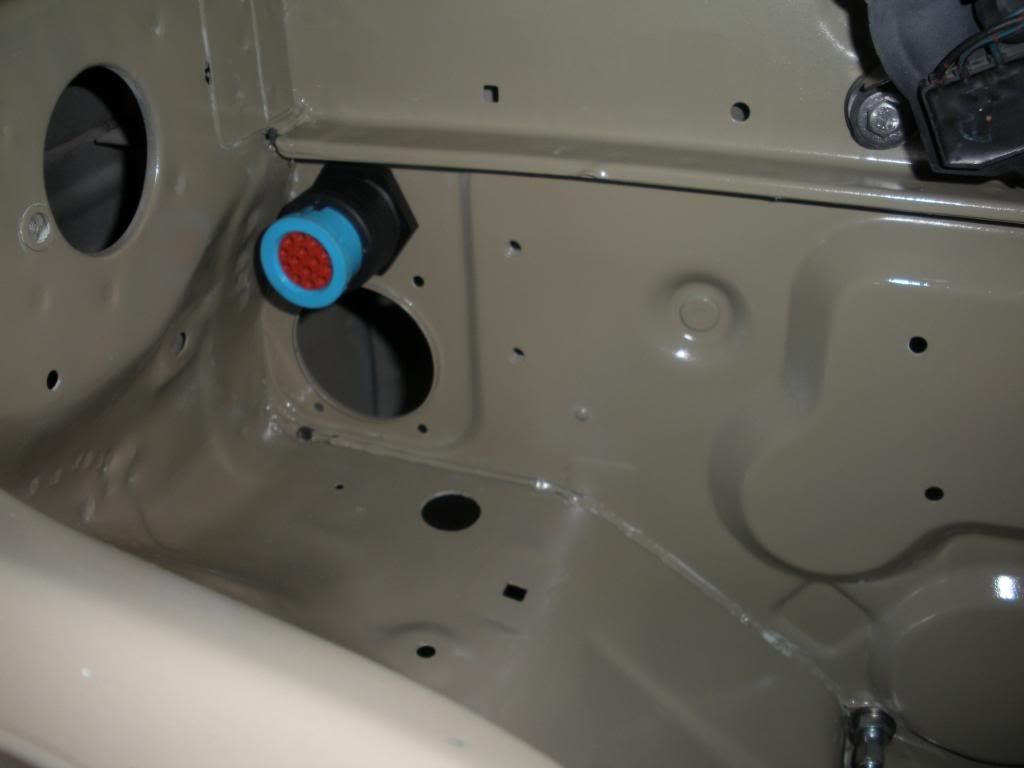
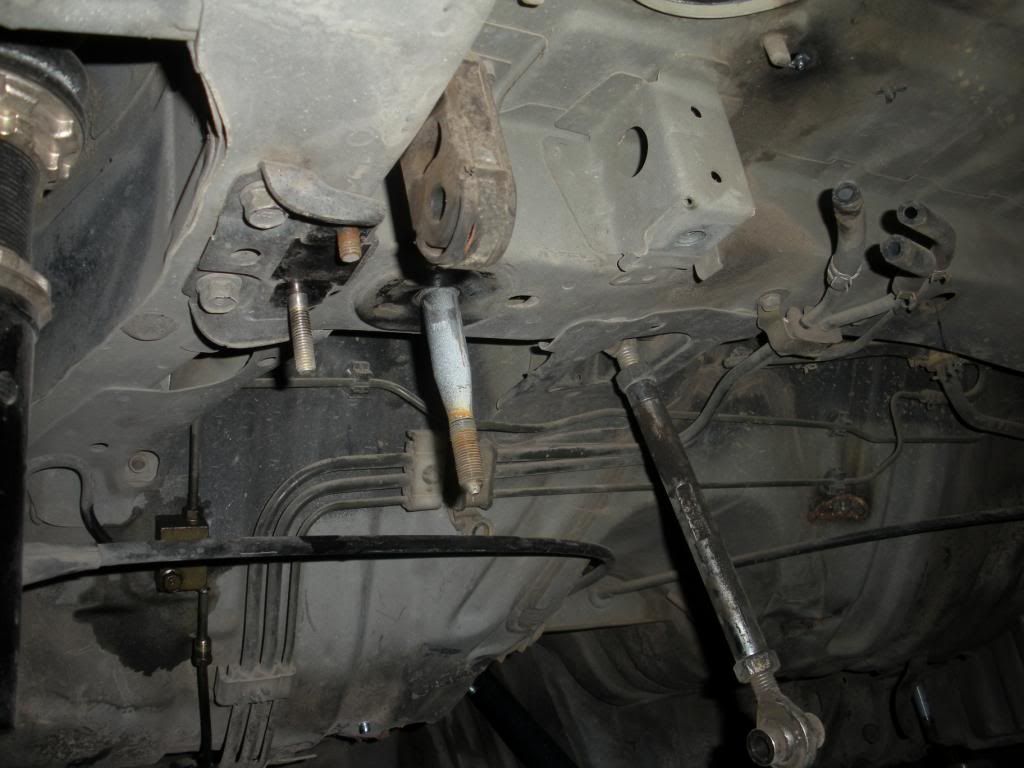
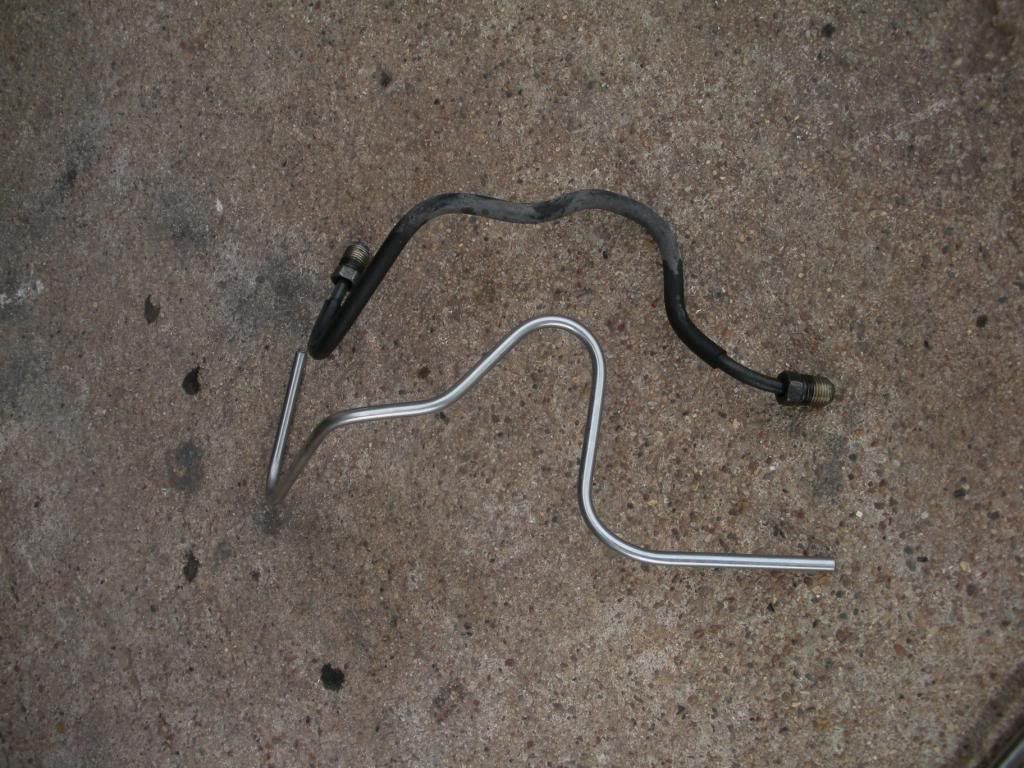
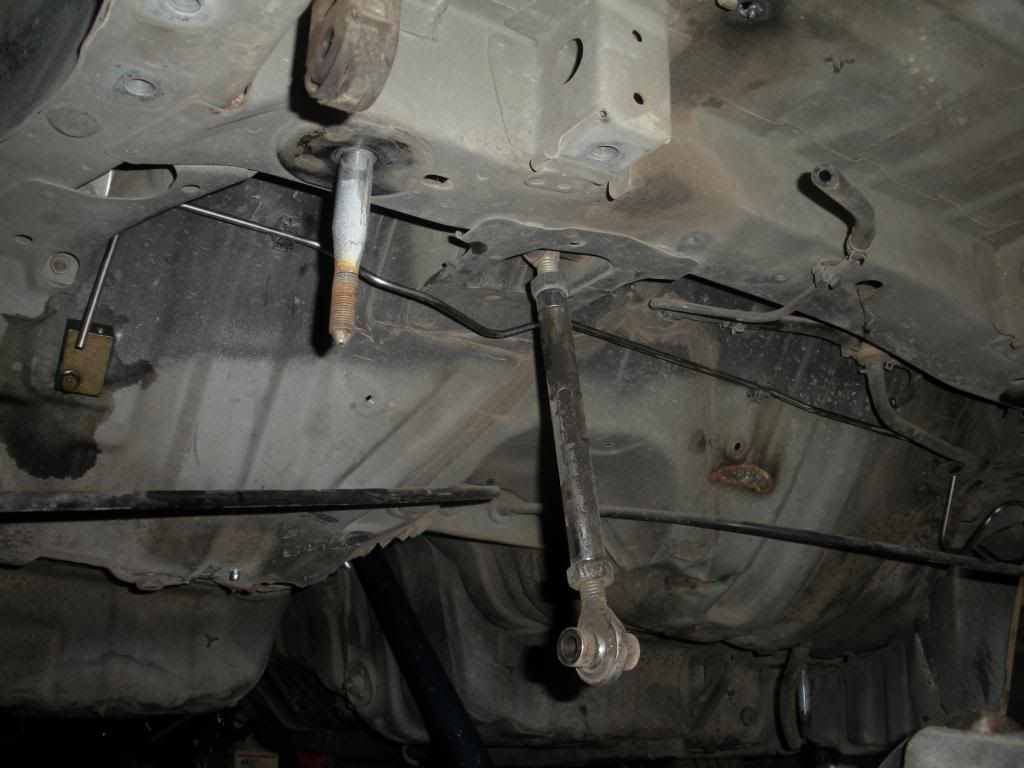
Added the bulkhead just below the junction. This runs between the junction and eventually the output of the hydro ebrake.


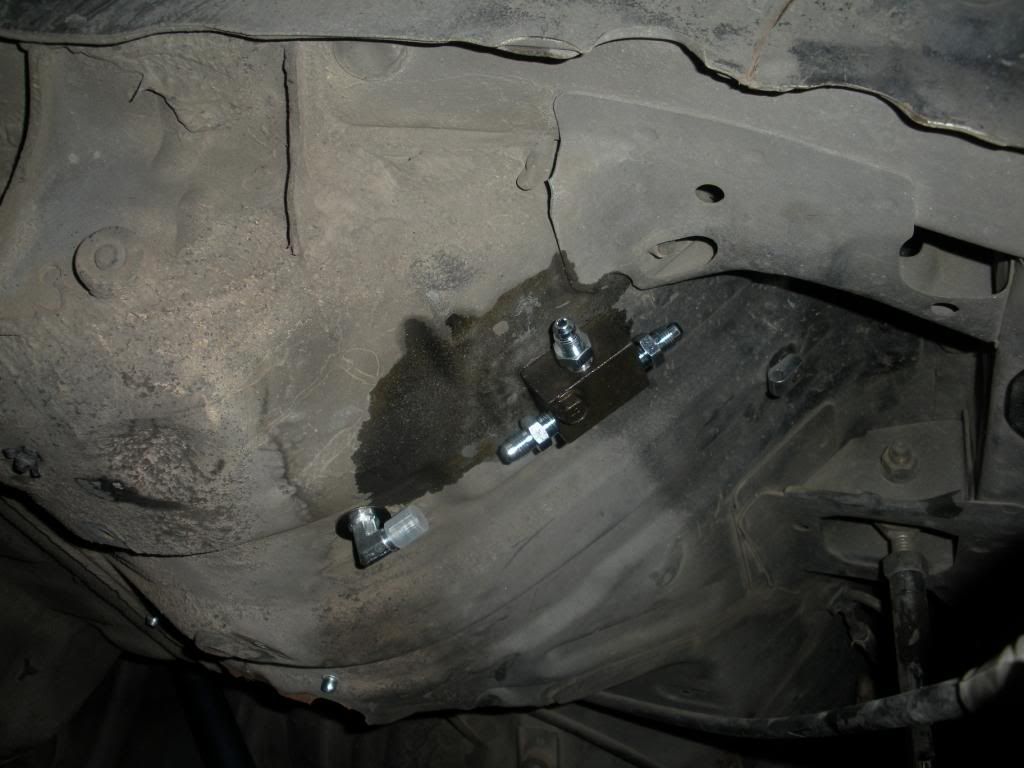
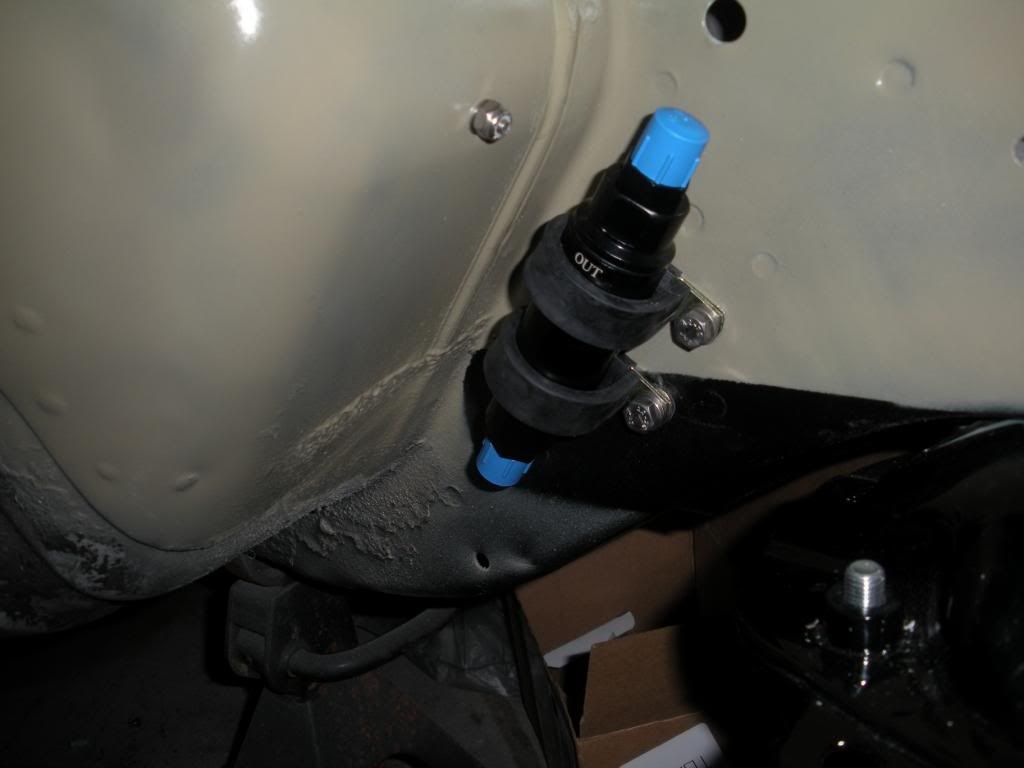
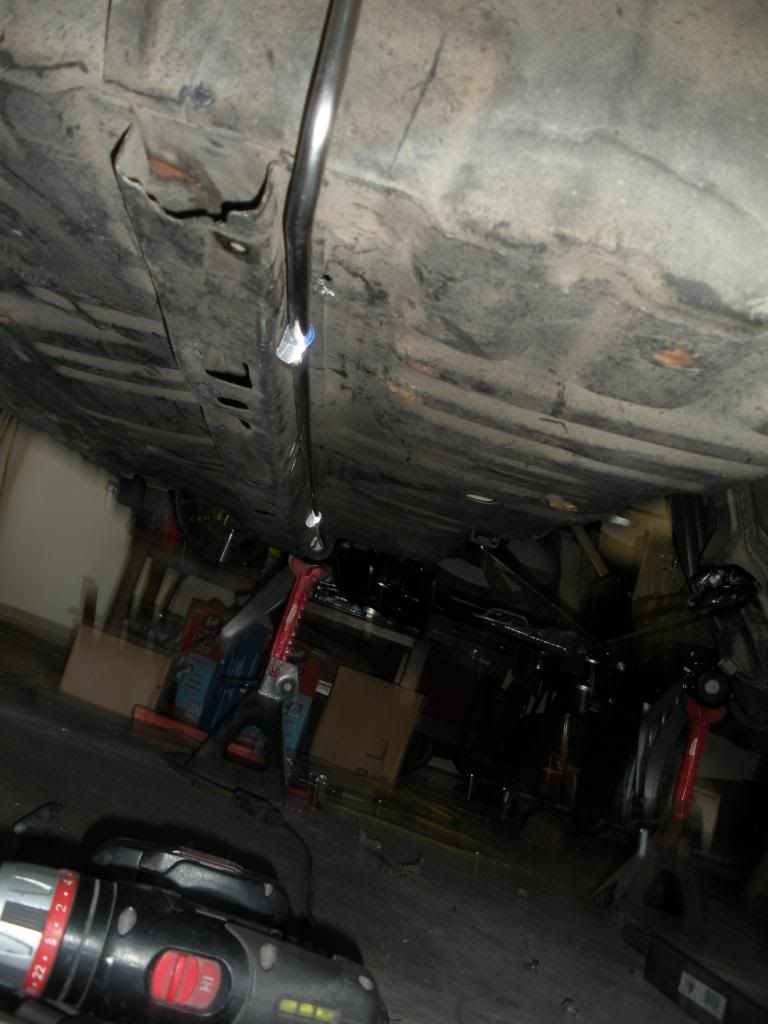
That's where it is in the inside (Driver's storage bin area).


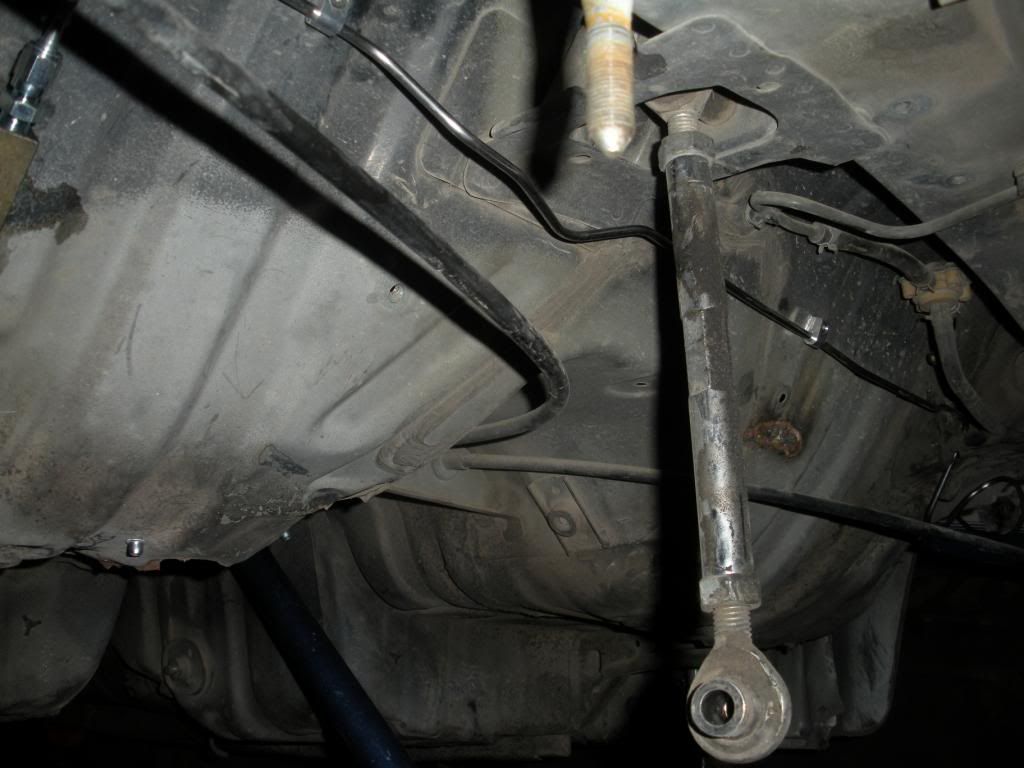
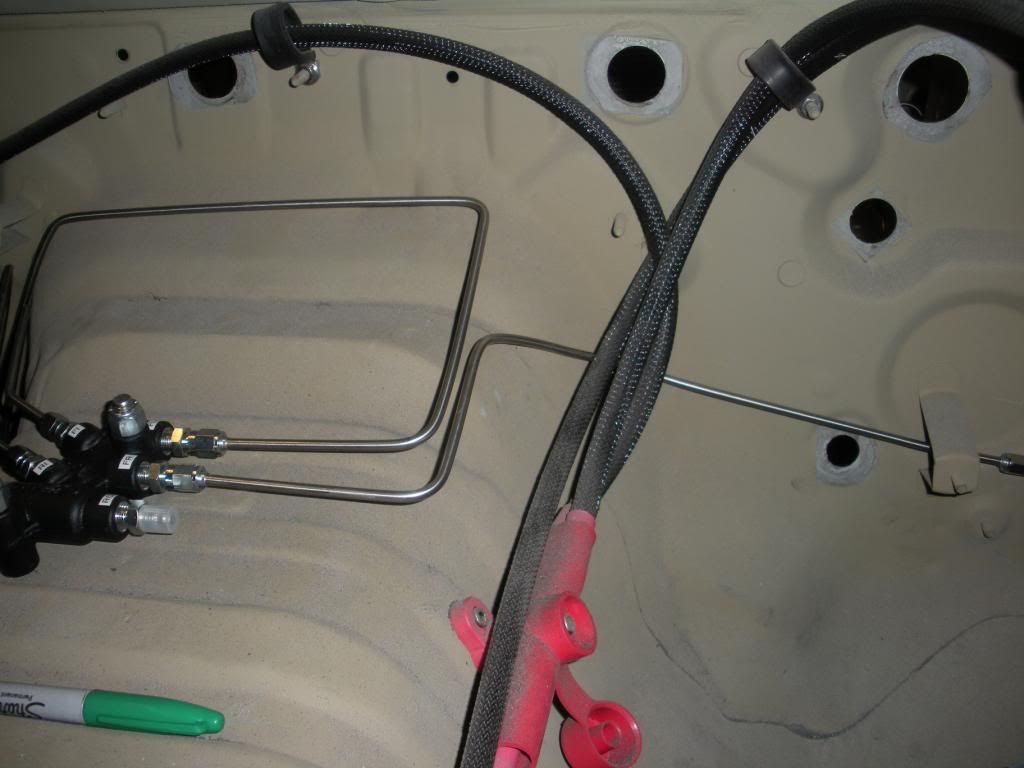
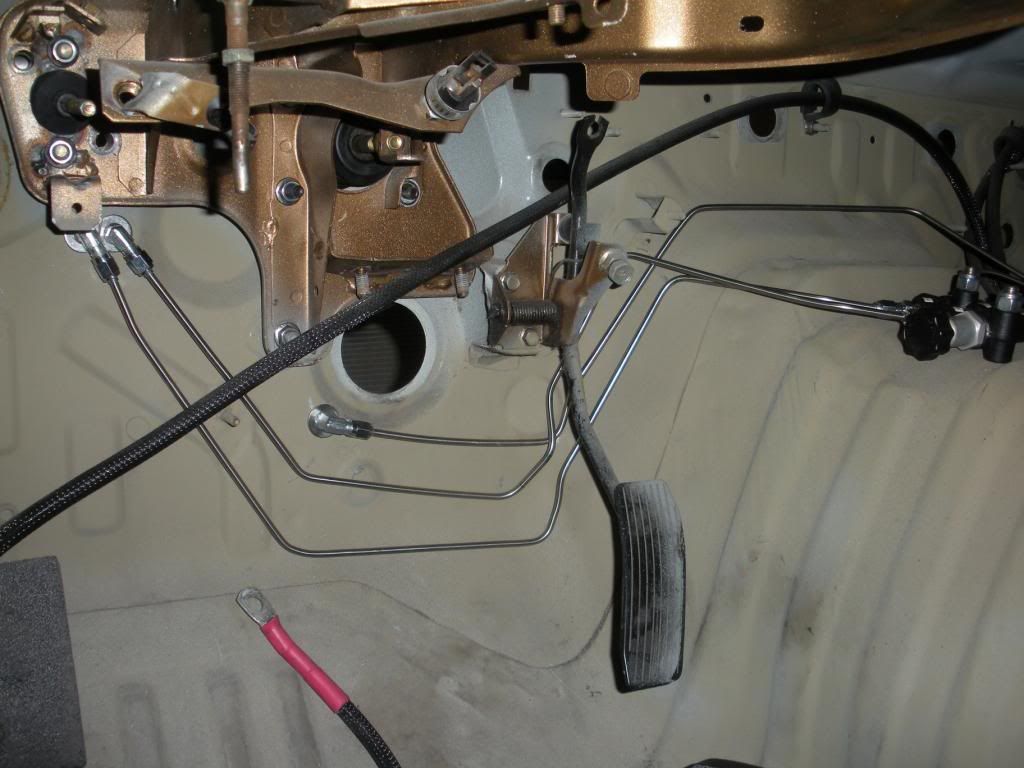
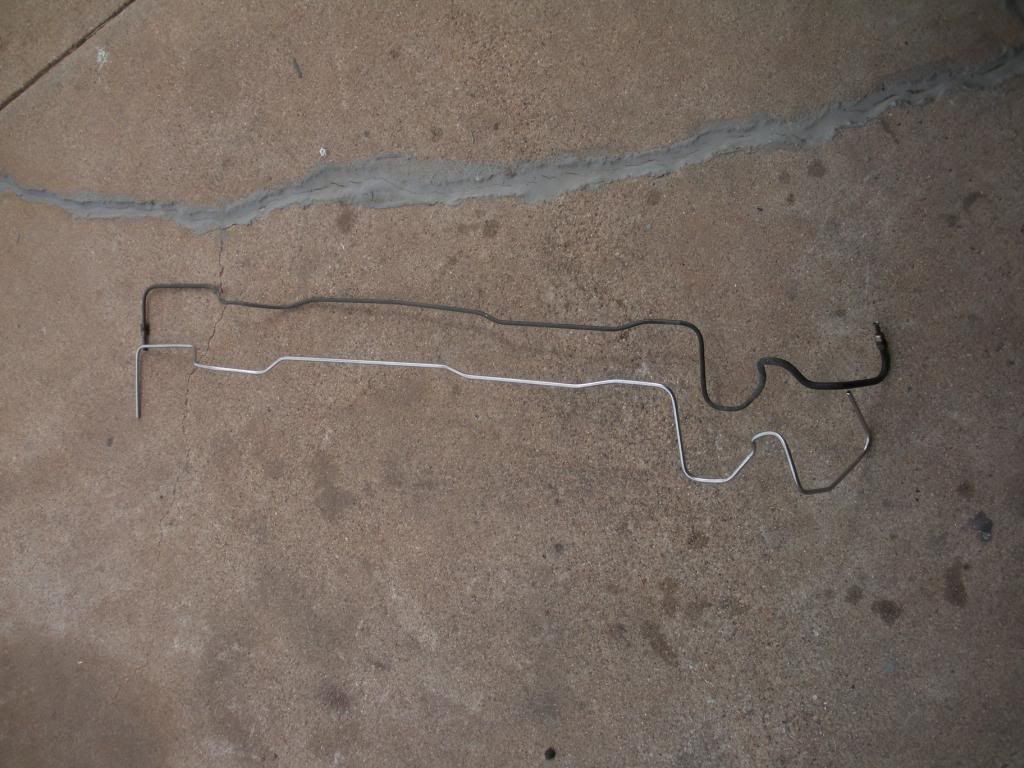
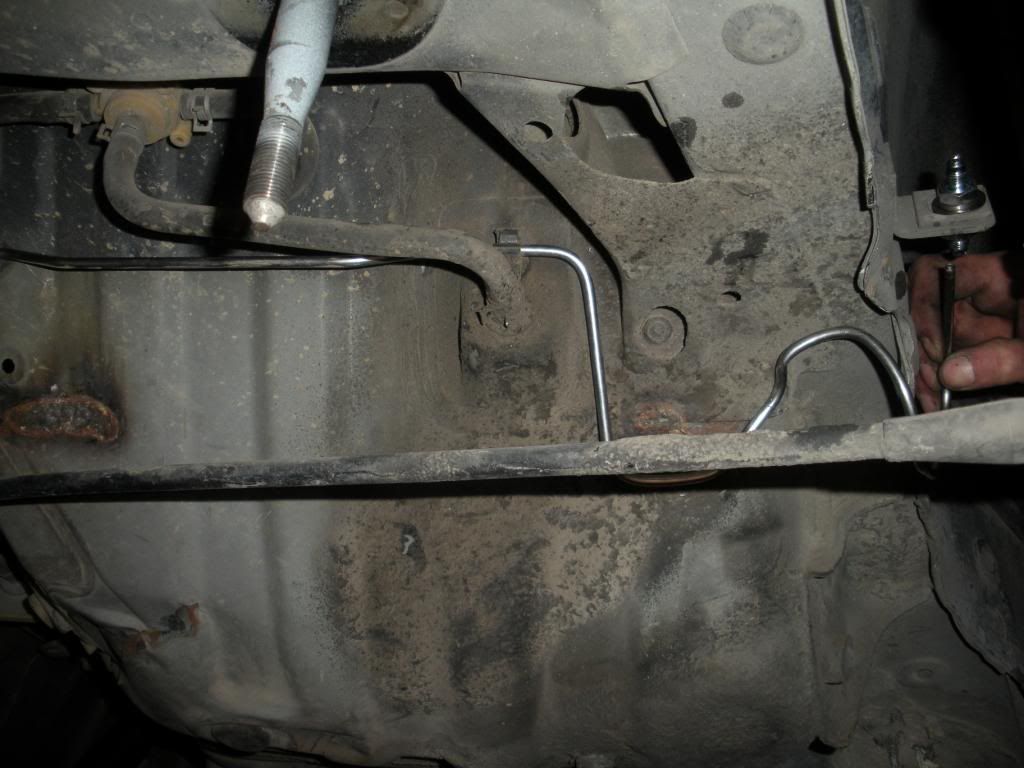
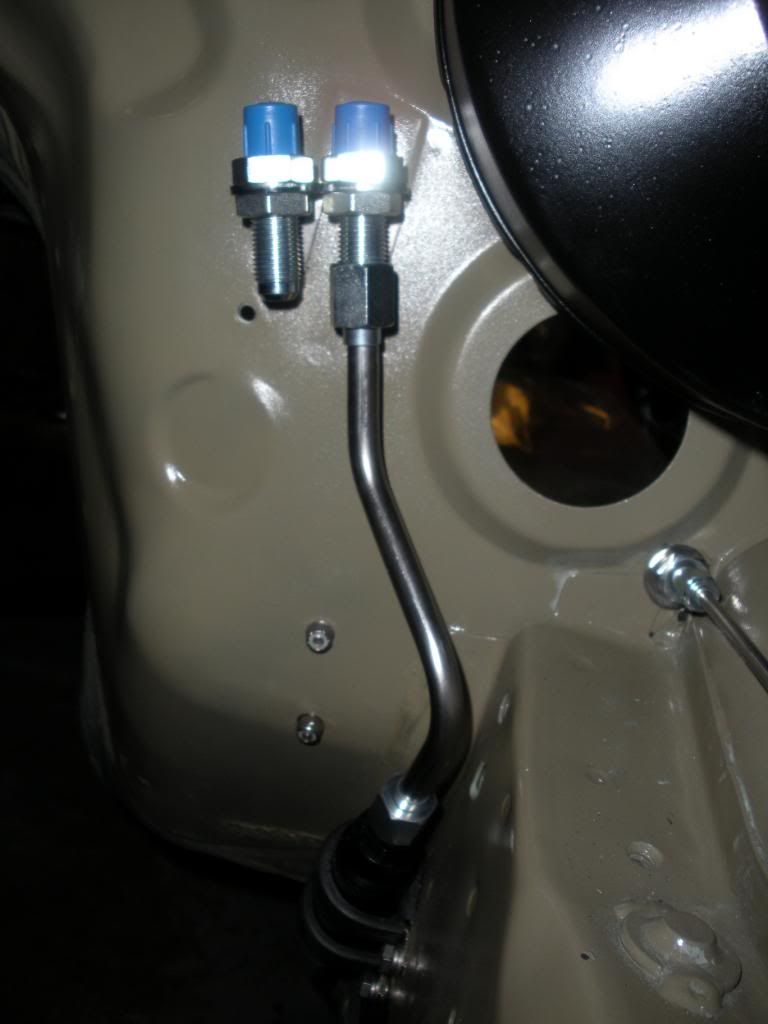
Finished up the left rear line.


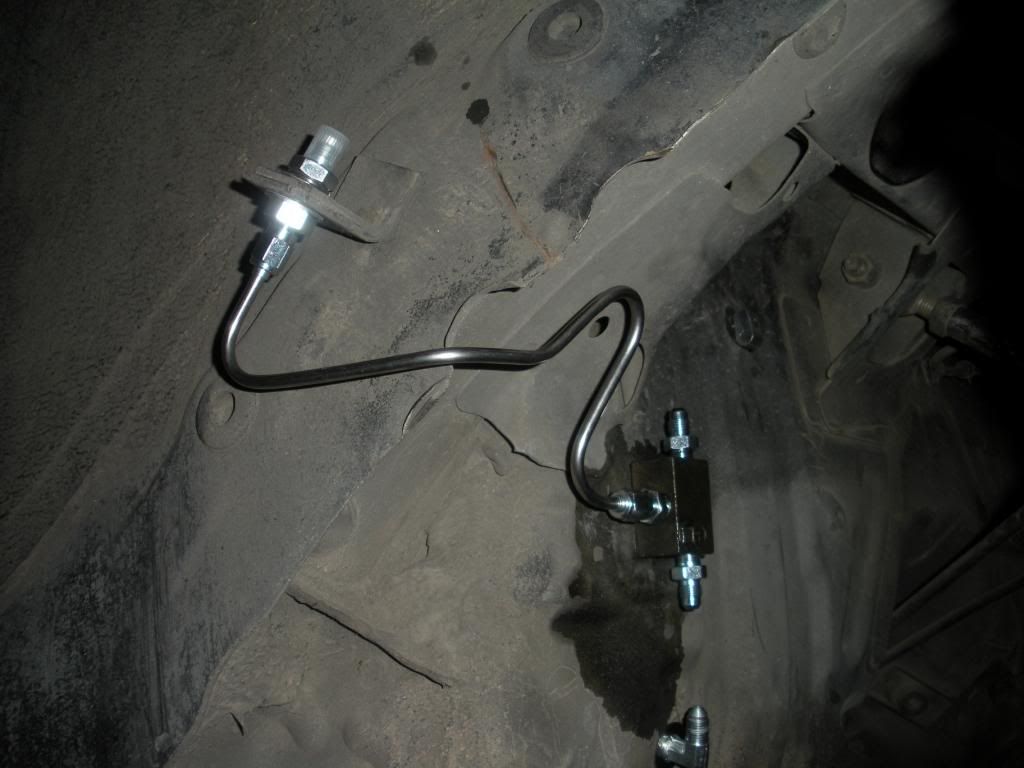
Right rear line finished.


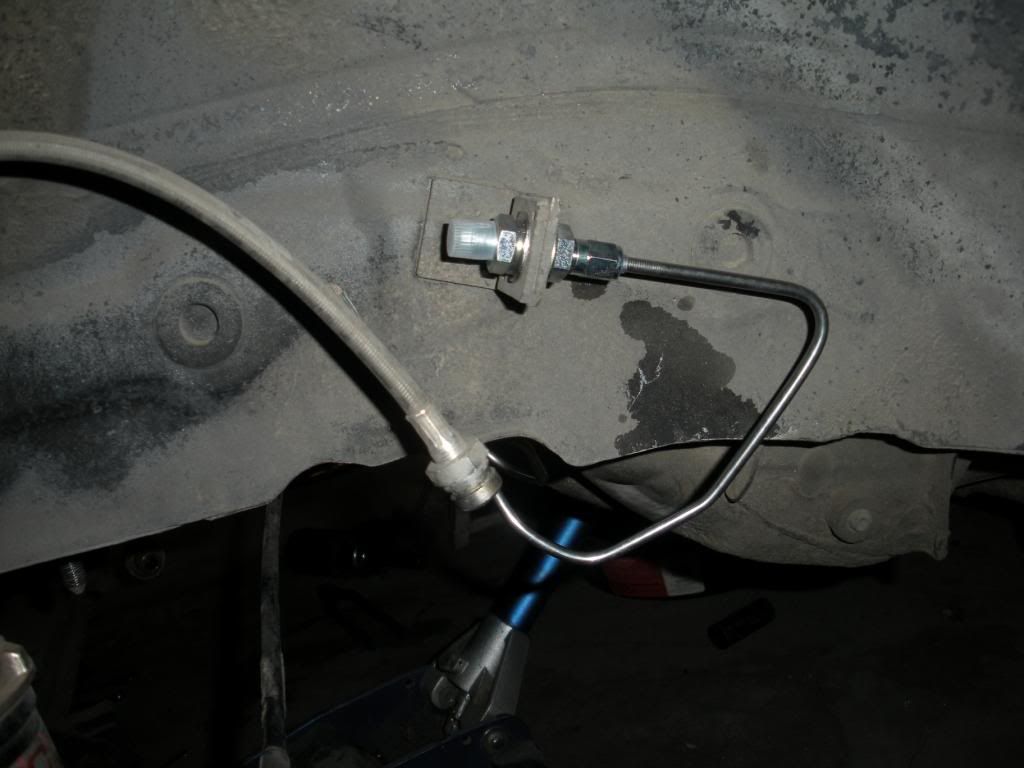
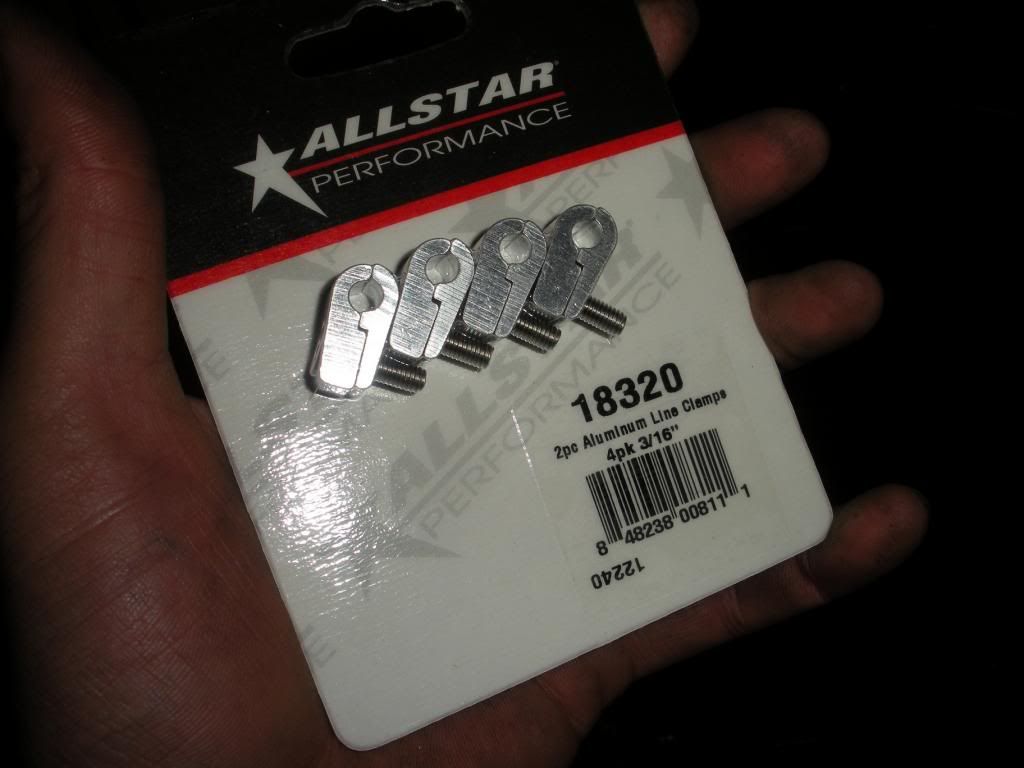
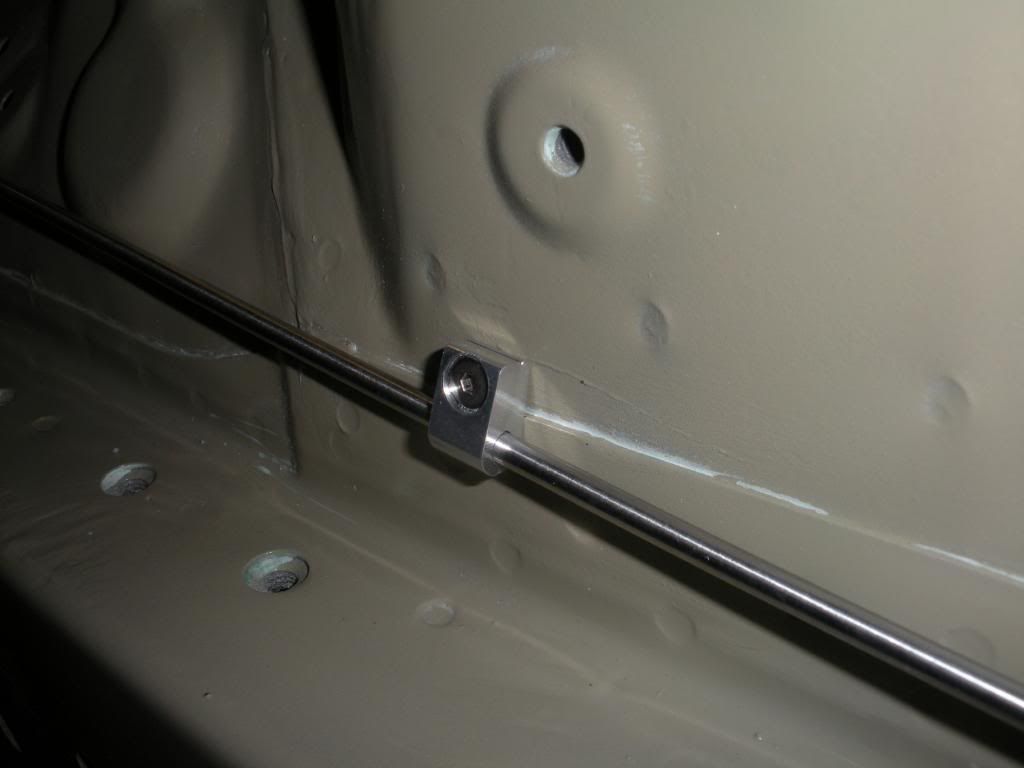
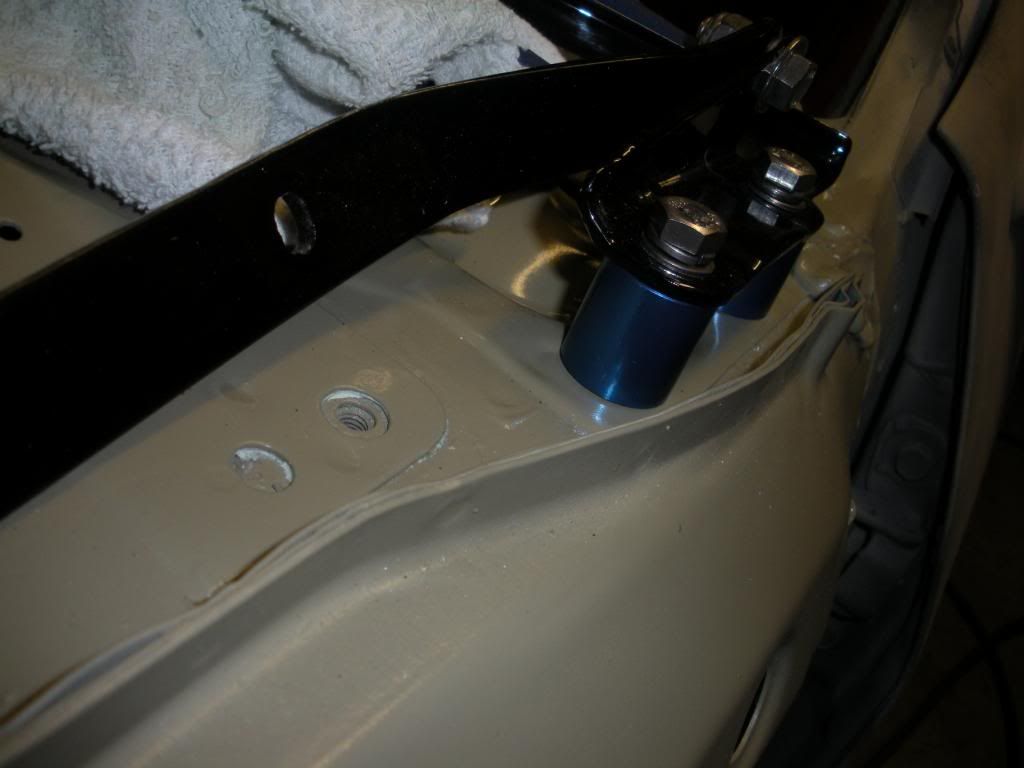
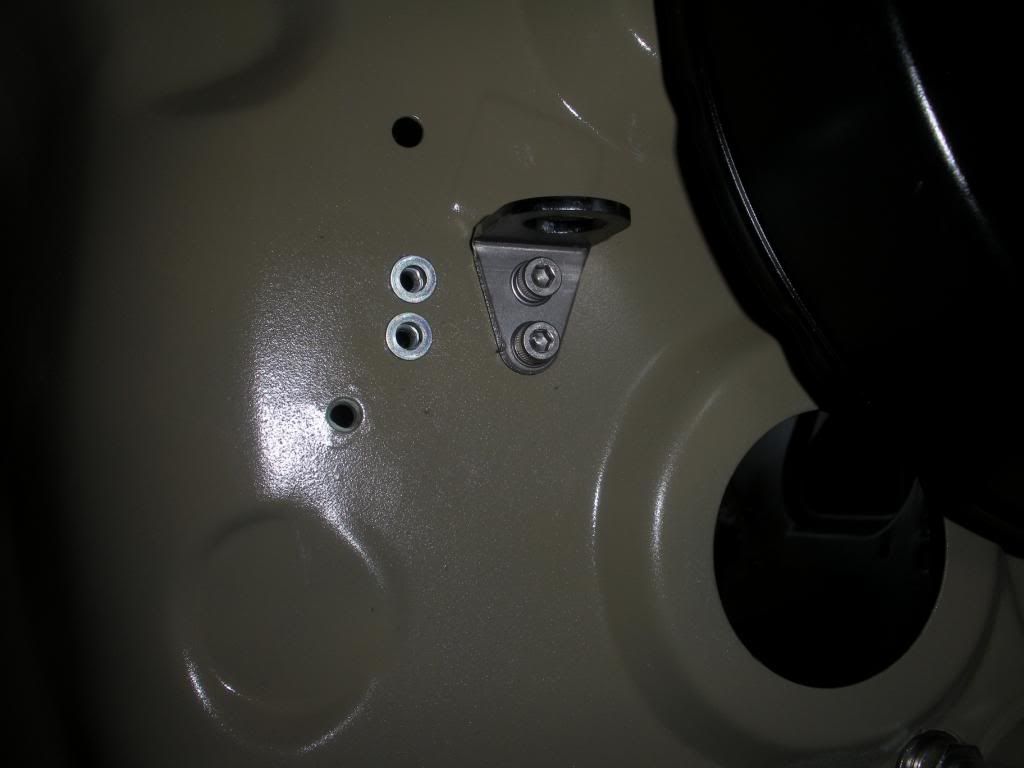
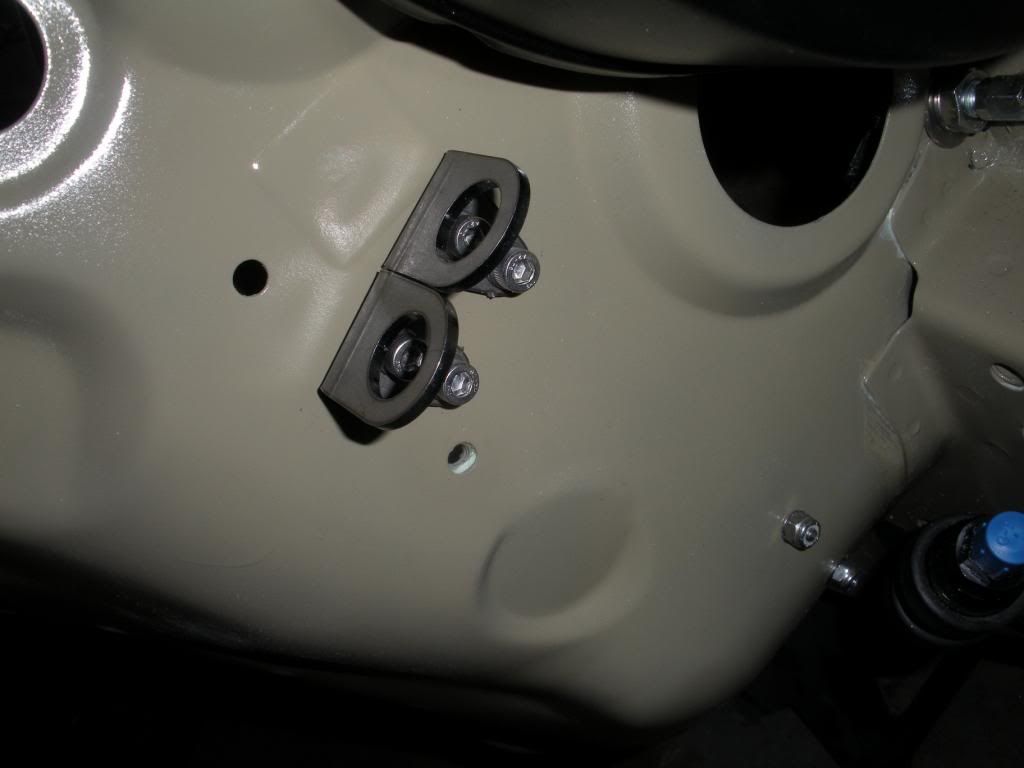
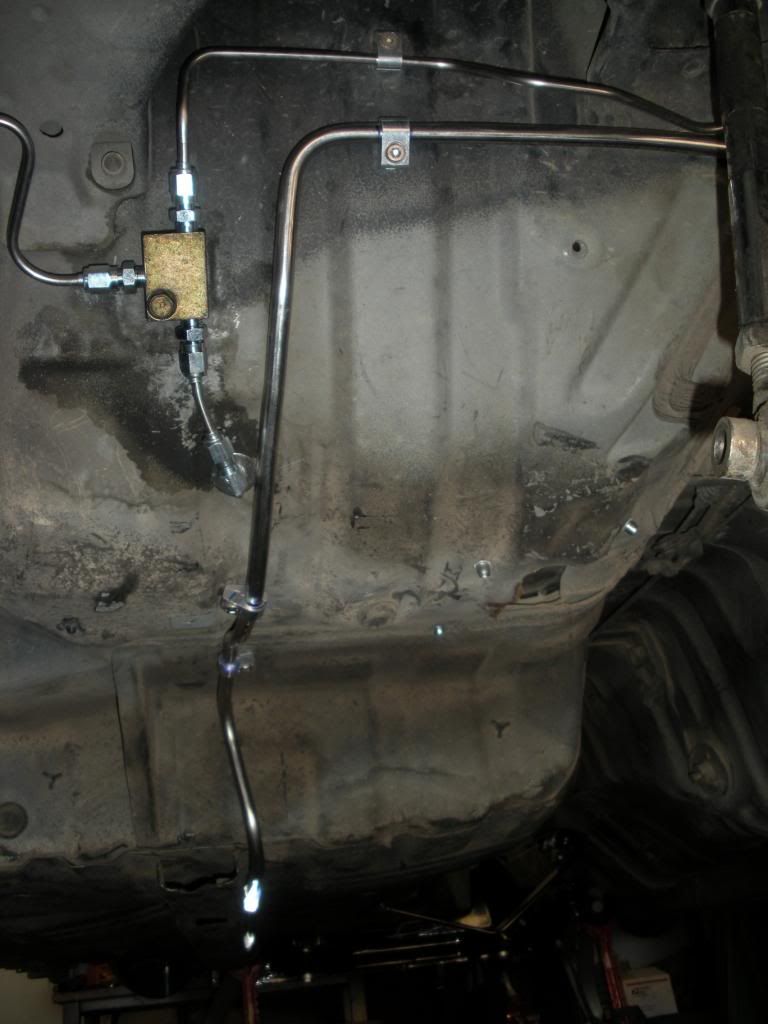
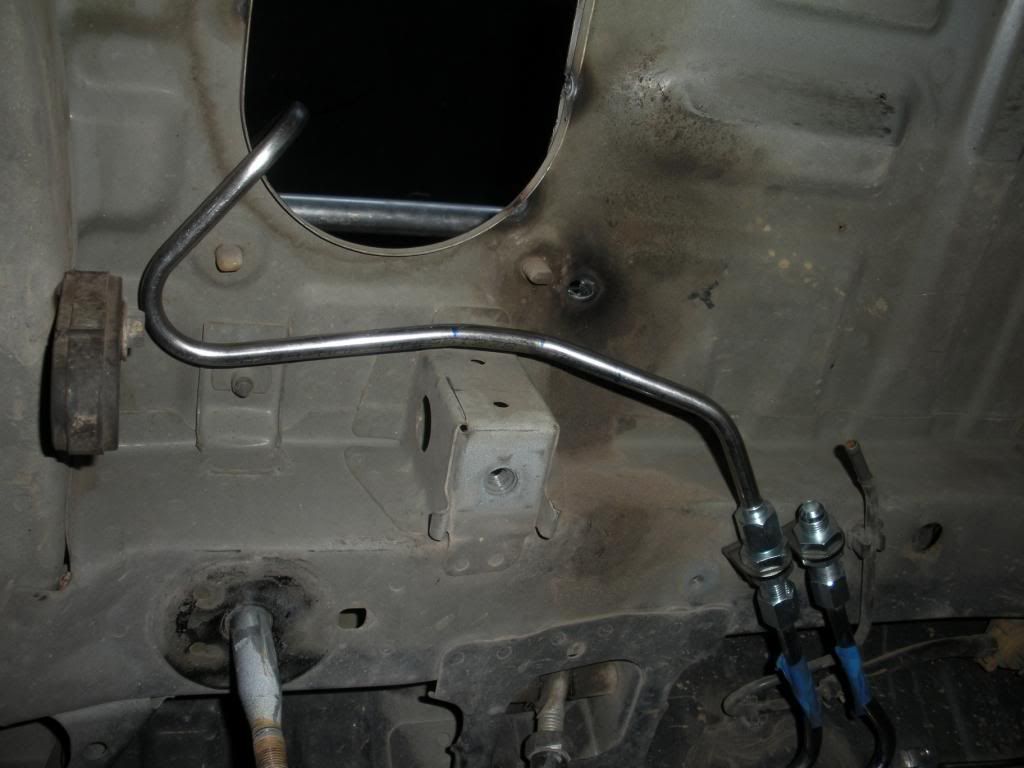
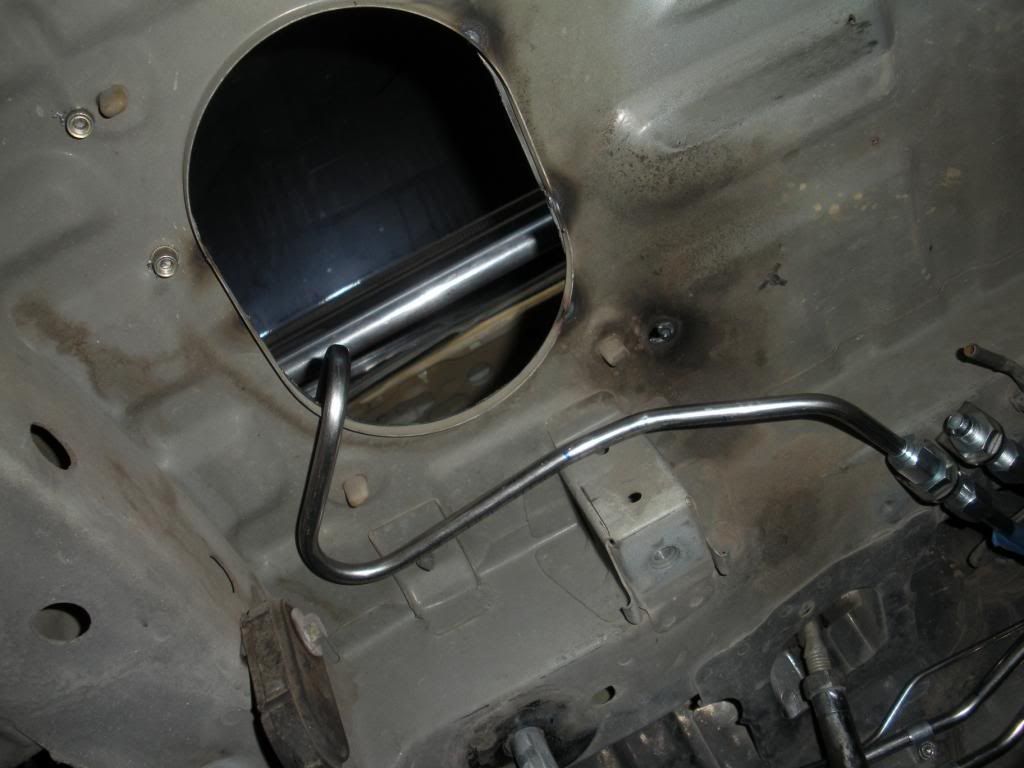
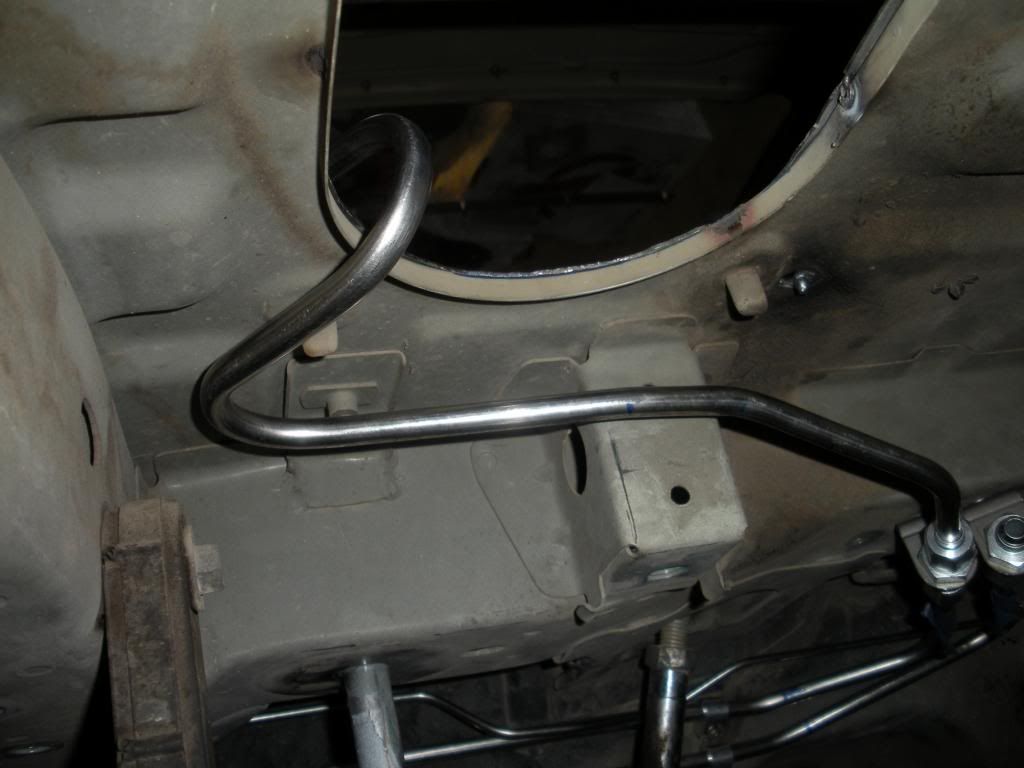
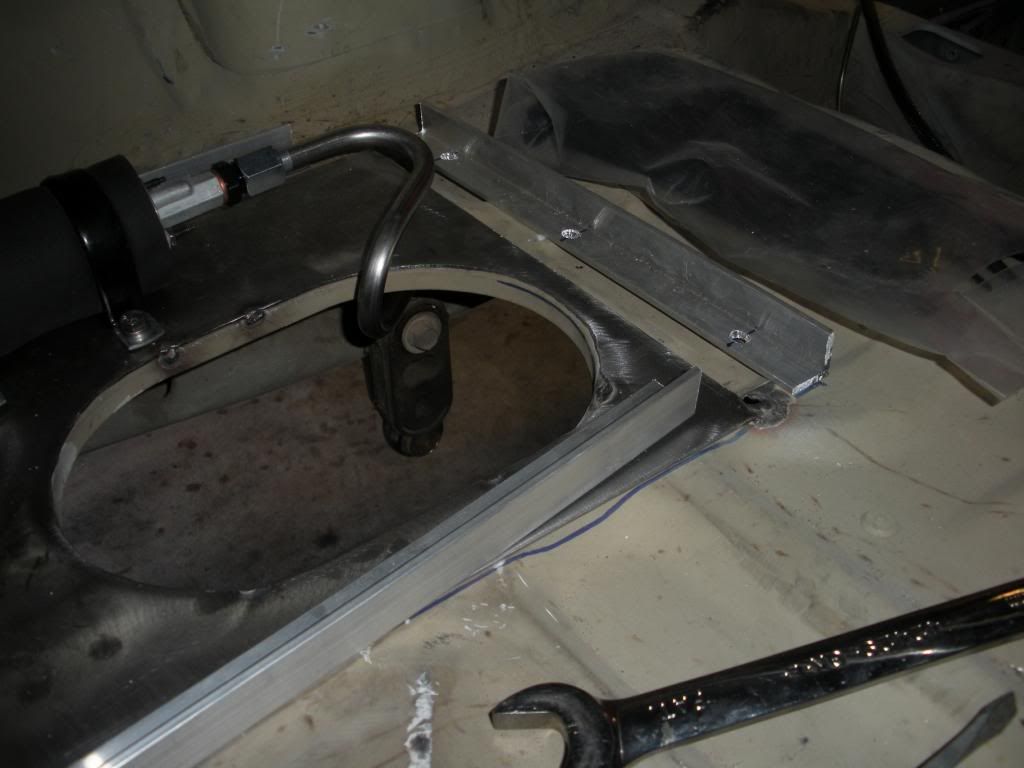
Installed the line clamps. I did reuse the factory plastic clamp in the right corner there, since it still worked fine. It also kept me from having to drill a hole through the first layer of trunk steel to find the inside of that little welded on bulkhead to get a nut on the backside. Also using a rivenut was out of the question do to space constraints. The tool can't fit in that awkward little corner.


Fits like factory, no biggie.


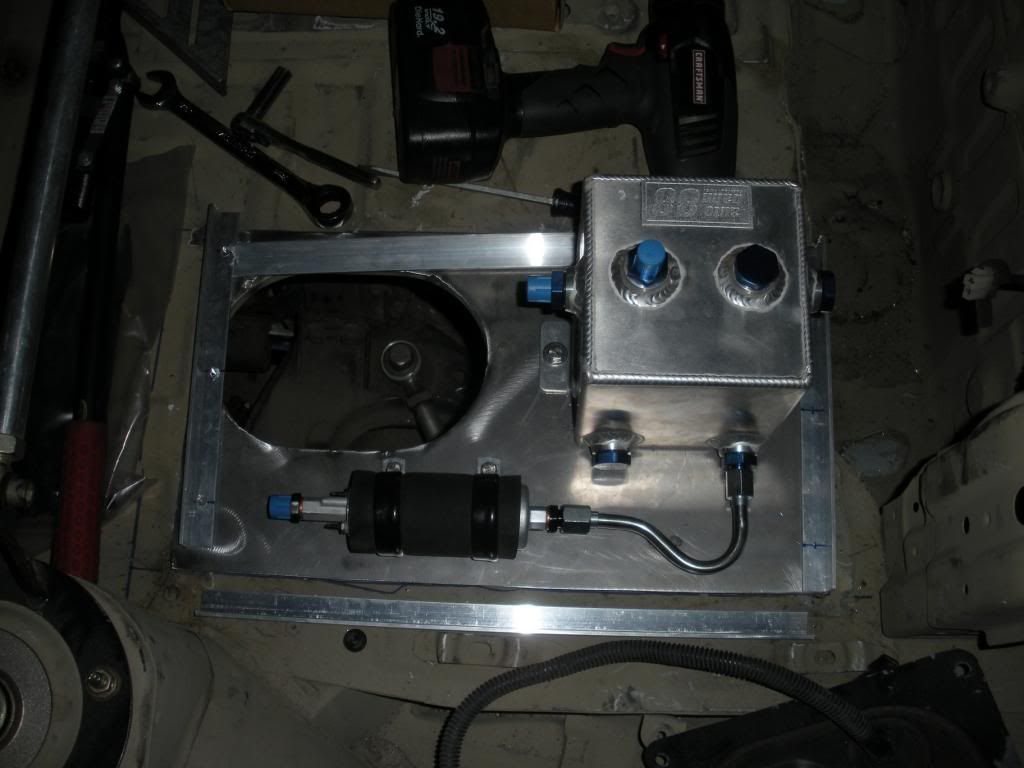
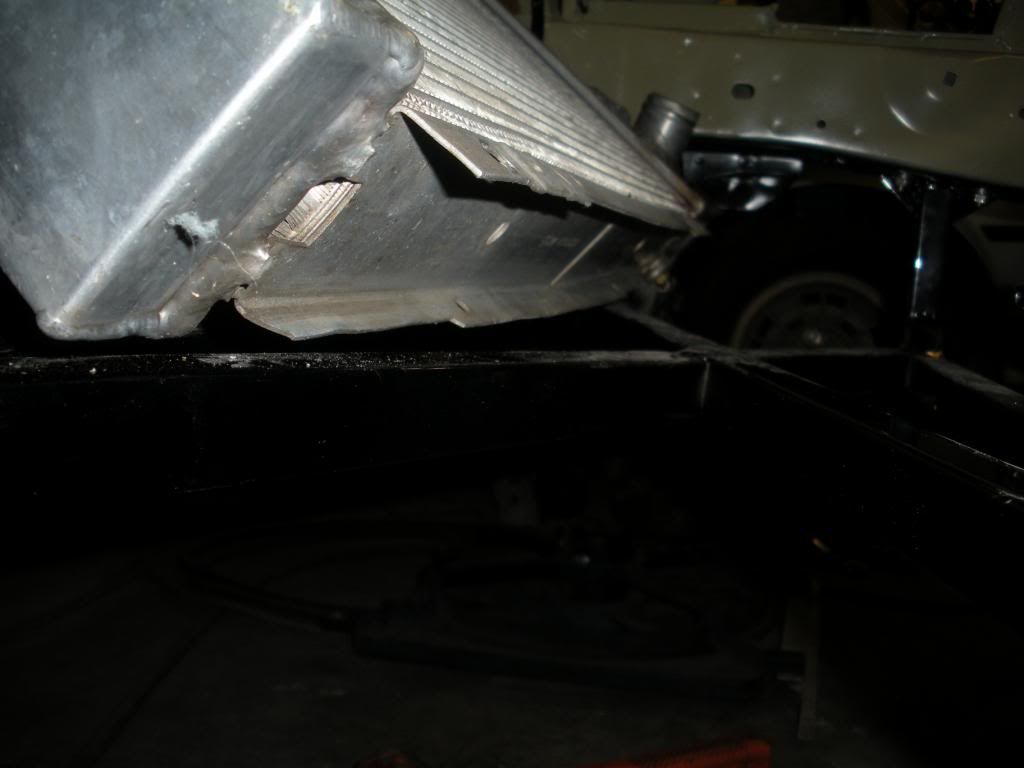
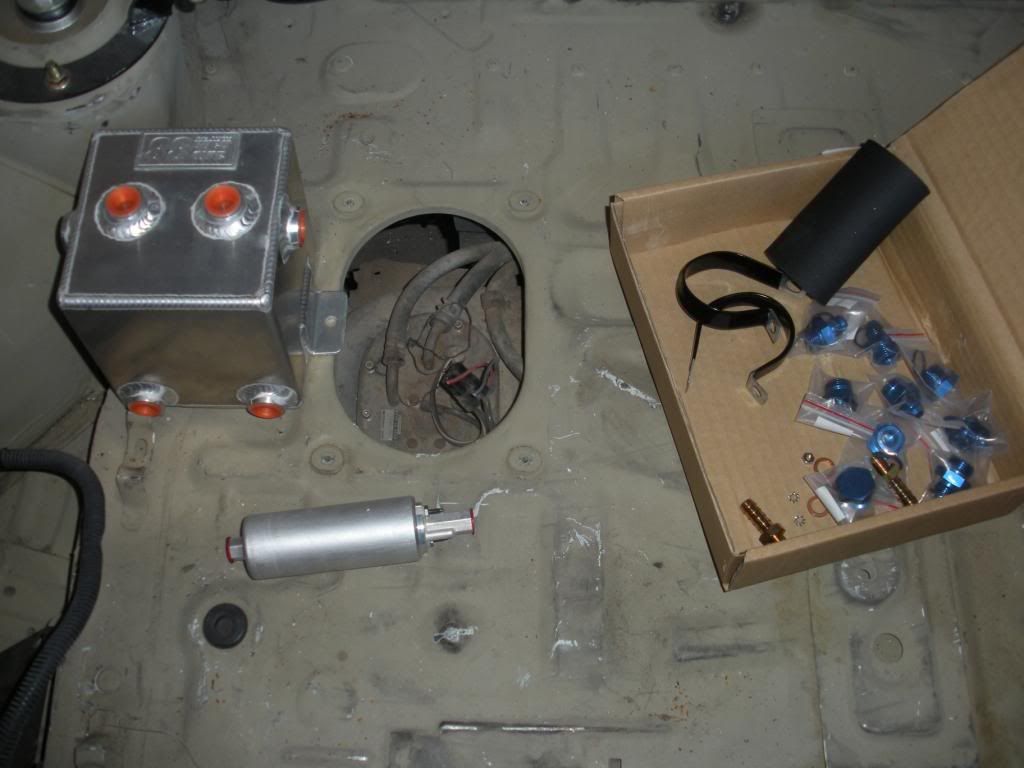
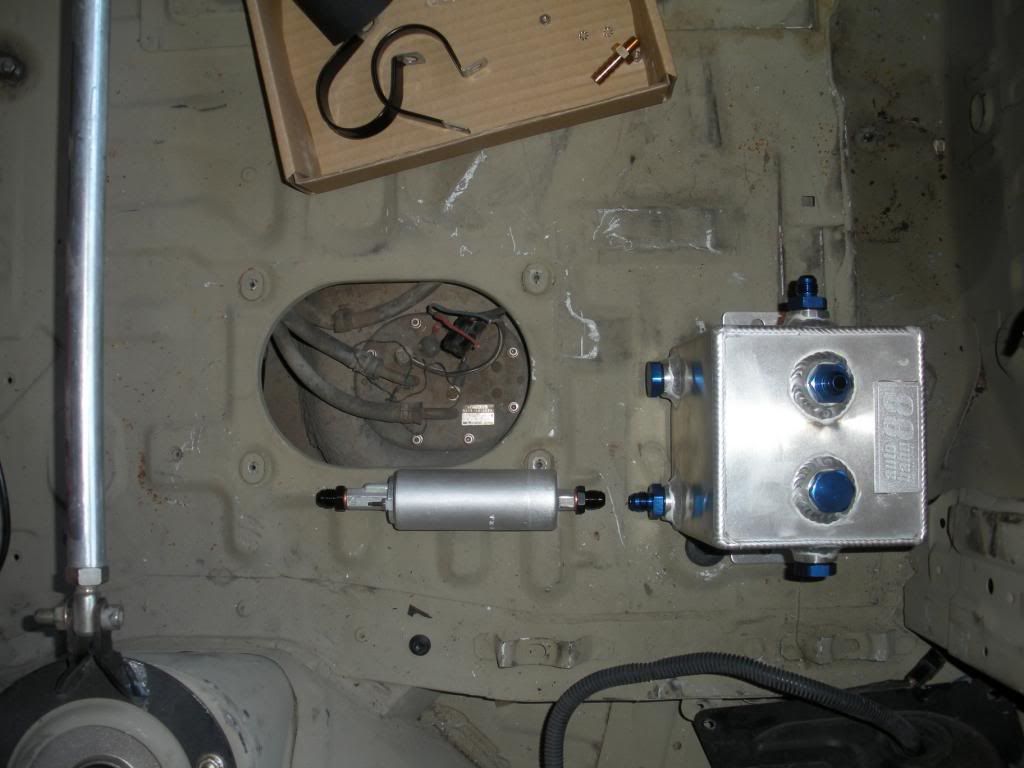
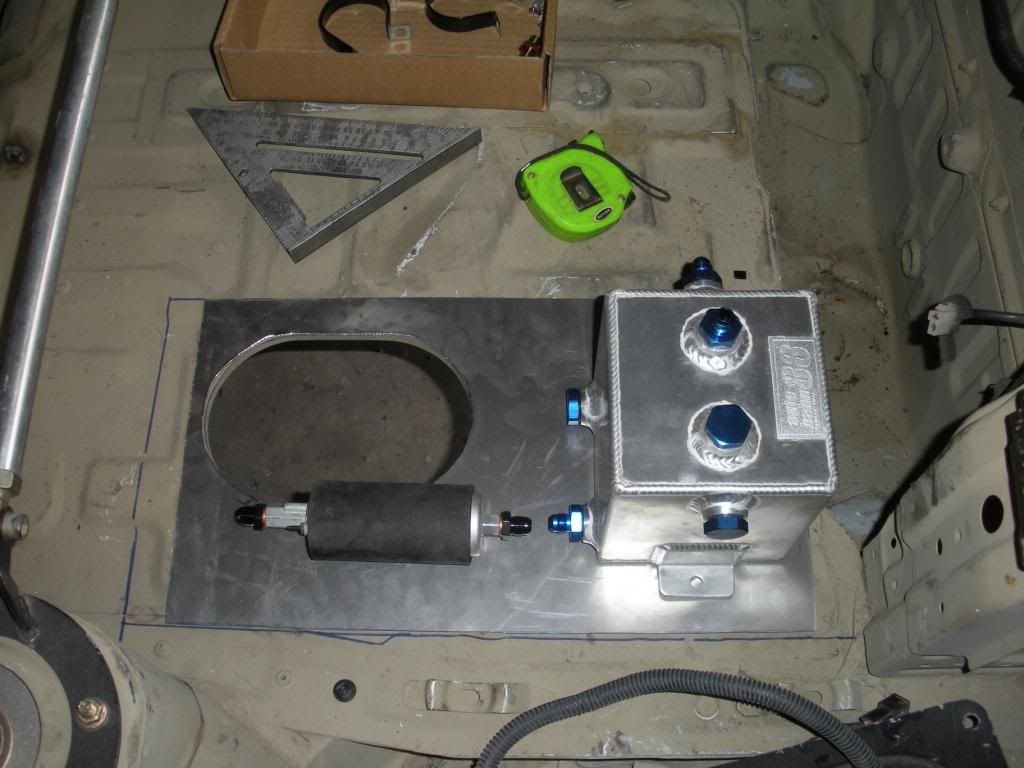
My new fuel filter. If it turns out to be inadequate in flow I'll just get a different one later. It's for fuel injection and supposedly flows fine for what i need. We shall see. It's only like $40 or something like that and has a replaceable element. Doesn't come with the -6AN fittings, you have to buy those seperately.


Had some 1-1/4" clamps left over from my wiring harness business, they fit pretty snug. You might even be able to get some 1-1/8" ones on if you wanted to try that hard.


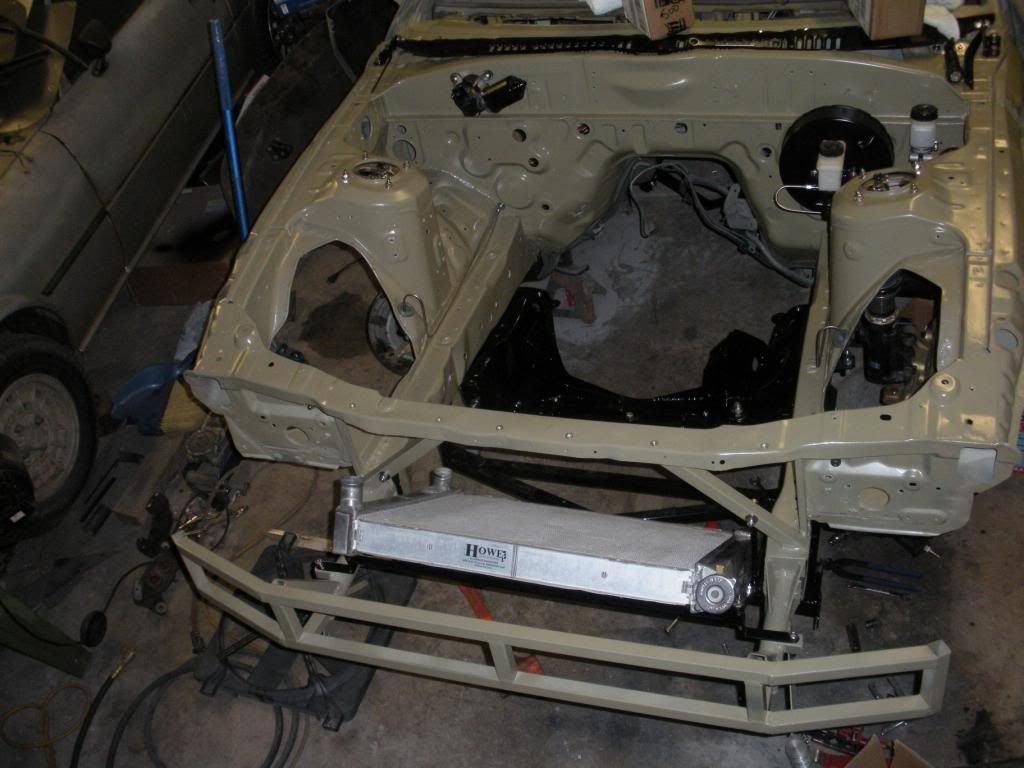
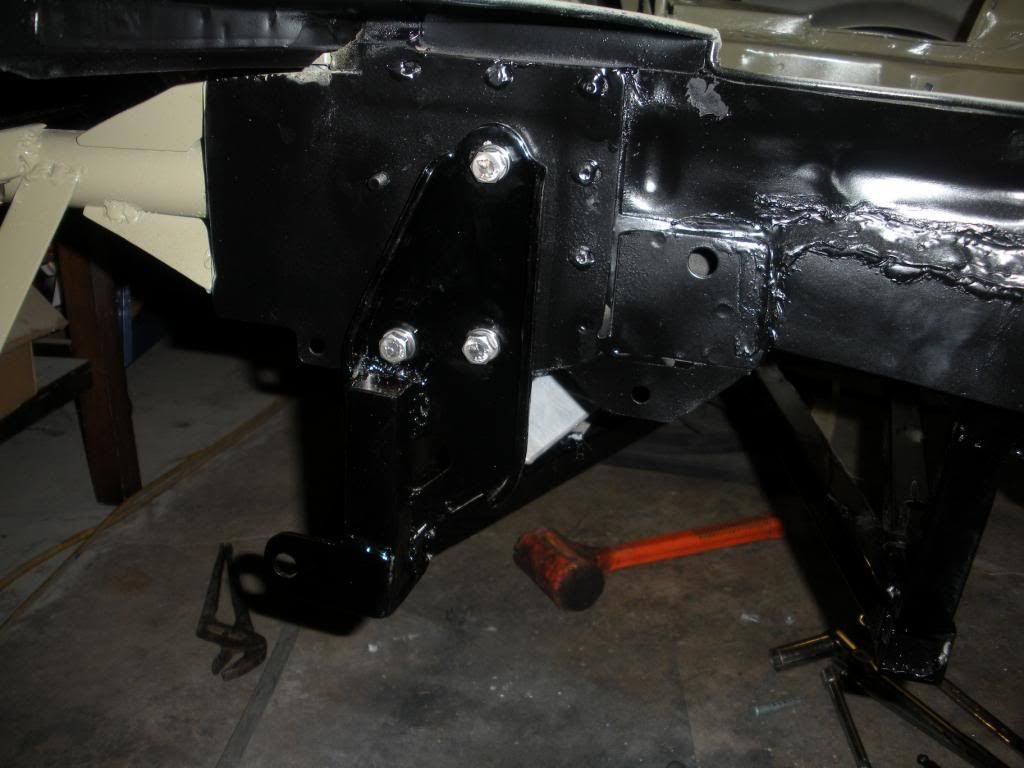
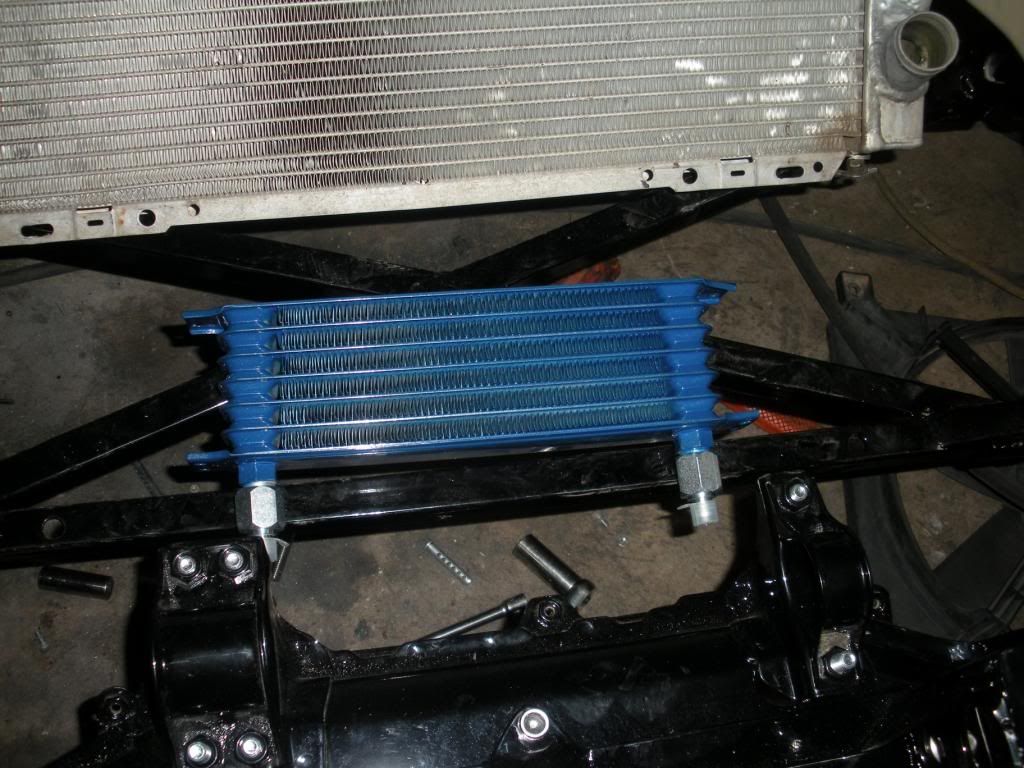
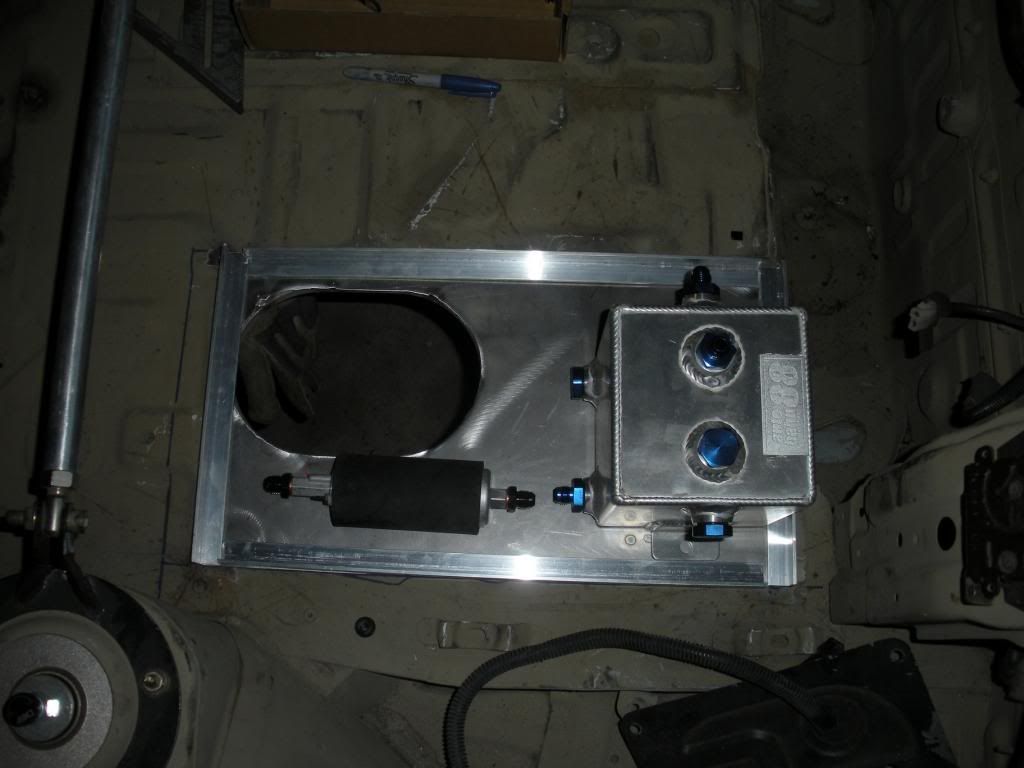
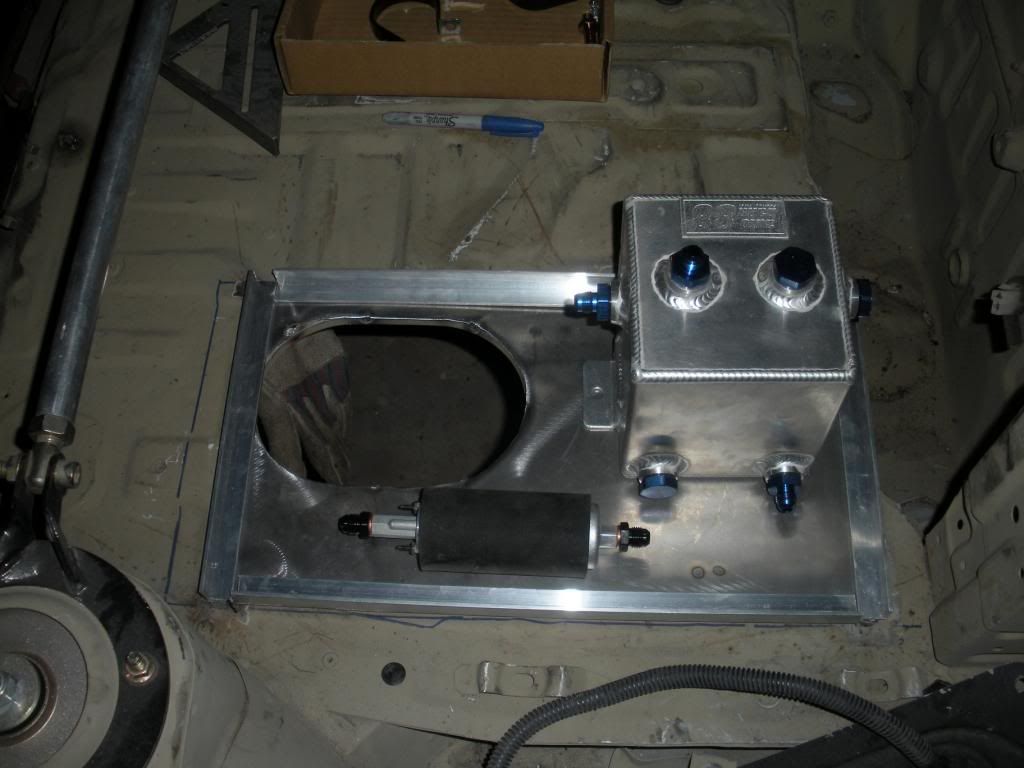
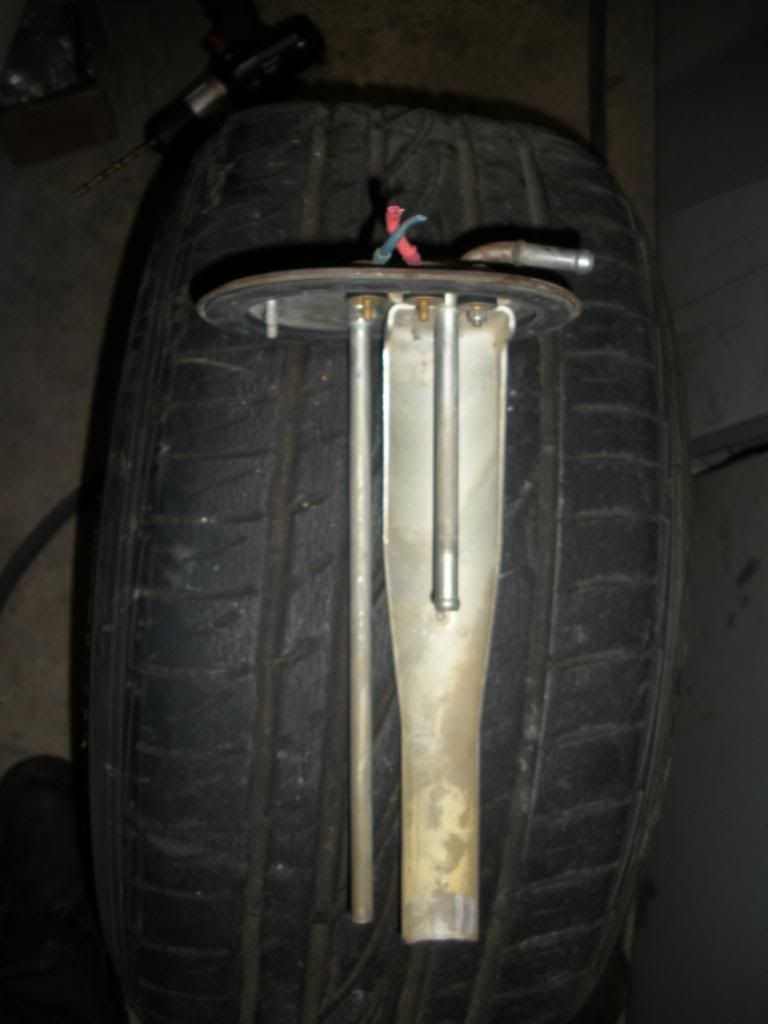
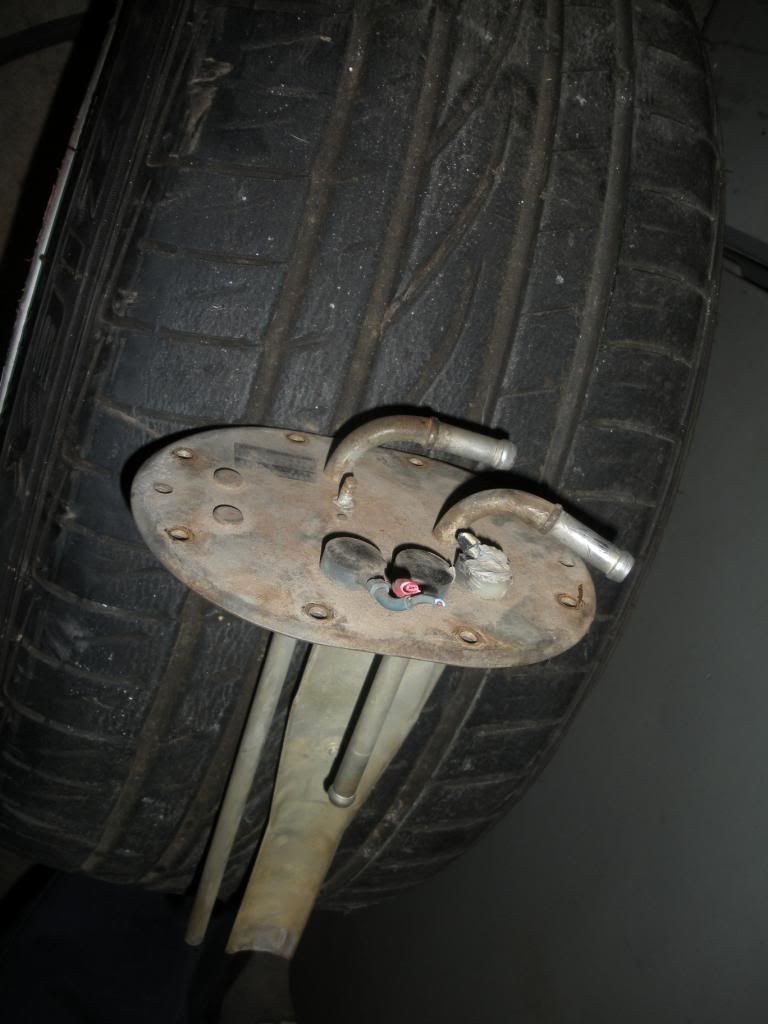
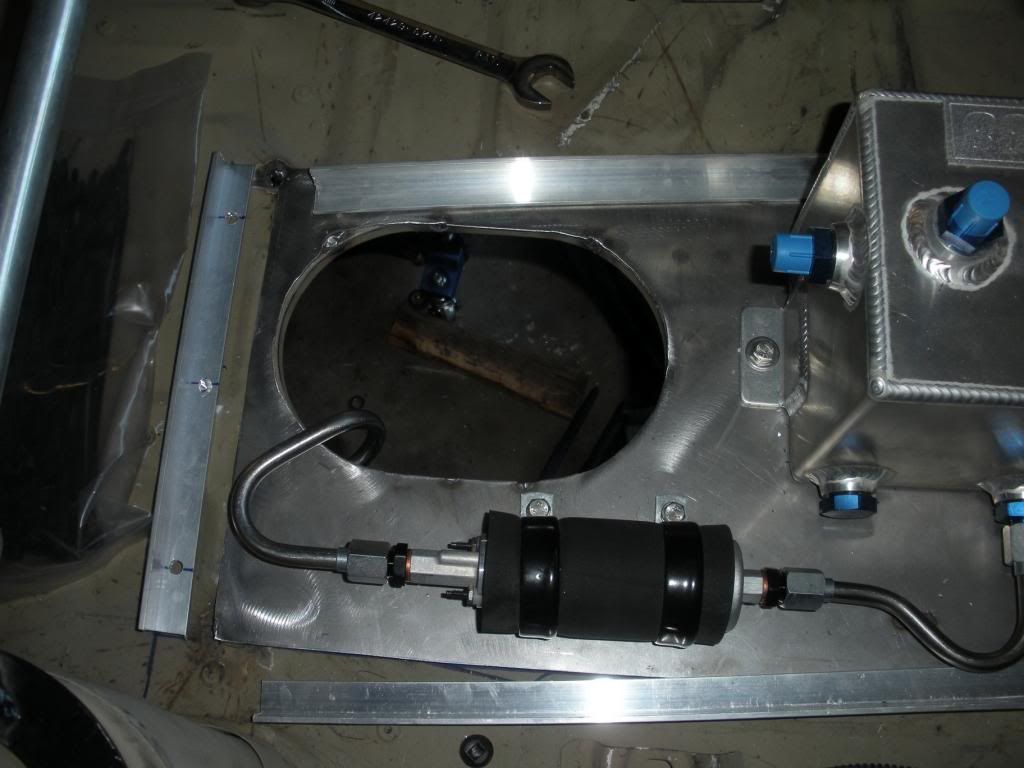
Mounted her up near the factory location. Reused one factory hole and popped a rivenut in the frame for the other hole. Should be plenty of clearance there for the steering shaft and header.


More rivenuts to mount the surge tank and second fuel pump. A bit of time was consumed on making that little humble looking hard line between them. Took a couple trys to get it right. It is the absolute smallest shape possible for both my tubing bender and my flaring tools (Imperial brand BTW). Just enough tube to grab with the sleeves pulled back all the way to be able to flare the ends. Probably could have just used a 90 degree long AN coupler or something but after failing the first attempt I decided it was going to happen whether it liked it our not.

StephenSheppard is offline   Reply With Quote
Old 03-11-2013, 11:37 PM   #42
StephenSheppard
Rotary Fan in Training
 
Join Date: Nov 2012
iTrader: (0)
Posts: 58
Rep Power: 12
StephenSheppard is on a distinguished road
Default

Got the fuel line parts in a while back and started in on that. Got it mostly finished up during a couple hours here and there after work and what not. Started in the engine bay close to the brake booster and mounted the bulkhead fitting brackets via rivenuts.


Here they are together


Withe the -6AN bulkheads threaded in hand tight for now while I'm building everything. I'll add lock washers later to keep them stationary.


Got this small section of the feed line finished up pretty quickly. On a side note everything above the bulkheads will be soft line to the fuel rails.


Started messing with my fuel pump housing and stripped it down, measured stuff to see if what I wanted was possible, and it is but just barely


I'm using a S4 housing since it's super easy to solder whatever gauge wire I like to the top of the pass throughs.


Next i cut the factory feed and return tubes off the housing.


Then drilled them out, to get a good starting point for what's next.


-6AN fitting for the feed out of the in tank pump. and a -6AN bulkhead "T" for teh two return hoses. Hopefully they will be able to share the same return tube. If this ends up causing an issue then I'll add a second tube and replace the "T" with a straight bulkhead. PTFE washers to help keep fuel inside. I'll probably cut a countersink on the top side of the housing in each hole so I can put a O-ring under each washer, which should keep vapor from escaping.


Just another angle. There is just enough room between the + terminal for the pump and the blue AN fitting for the feed. *wipes sweat from forehead


Here's what the bottom looks like at this point. As you can see the feed has a tiny issue. There's not a completely flat surface for the washer to seat against. This is the reason I'll be adding the O-rings.


A simple push-lok fitting and hose for the pump.

StephenSheppard is offline   Reply With Quote
Old 03-11-2013, 11:56 PM   #43
StephenSheppard
Rotary Fan in Training
 
Join Date: Nov 2012
iTrader: (0)
Posts: 58
Rep Power: 12
StephenSheppard is on a distinguished road
Default

The fuel level sender can still fit but just barely, here's a few pics of it.


Made the return dump tube out of some left over stainless tube.


Bought my self some new FTP lenses and bumper lenses. They look amazing when they are new btw.


Found this cost effective solution to the "rebuilding front calipers dilemma" Autozone $44 each with a $55 core each. They look awesome. I figured they would come painted black like most remanufactured stuff, but they are bare aluminium like they shoudl be. Pretty stoked about this.


Beautiful


They have all brand new hardware and springs and all that junk for that price.


Packaged up my cores and took them to my local store even though I bought the calipers online. Returned them and got my $110 credited back no issues at all.


Here's the rear section of the feed line, mostly done at this point. I may trim the length a bit at the bulkhead as it's a bit too tight and fiddly still.


Looks like it's touching that washer but it's not. In fact its not touching anything really except the brackets.


Still needs the rest of the clamps under teh belly of the cra. For now I just put enough on so I could get the hard part out of the way, which of course is the intricate bends at the rear of the car.


It's really hard to get a good picture of this area because the car is so close to the ground.


Here's the return line now.


This little piece of the feed line from the second pump to the bulkhead was a bit challenging. Took a couple tries to get it right. Here's some pics of it from different angles. It's completely suspended. at first I was going to use soft line but then I realized there was no point since the line goes from something mounted on the chassis to something mounted on the chassis.


StephenSheppard is offline   Reply With Quote
Old 03-12-2013, 12:25 AM   #44
StephenSheppard
Rotary Fan in Training
 
Join Date: Nov 2012
iTrader: (0)
Posts: 58
Rep Power: 12
StephenSheppard is on a distinguished road
Default

Also bought a couple things for the engine. A new oil pan and gasket set. Damn SBC stuff is retarded cheap. if I remember correctly this oil pan is like $35 lol


Bought this for maximum laziness lol. Some people say they drain slowly. If it's junk then no matter since the new oil pan came with a proper plug as well anyways.


Other stuff I already have but haven't taken pics of is a Brand new starter, a new alternator, a freeze plug kit for when I rebuild it, a mechanical fuel pump block off plate thing. And some otehr stuff I can't remember, just little stuff for now. I don't have anywhere to put anything big at this time besides in my house lol.


I order this little heater for the car from Summit as well. My buddy had one in his old Ford Falcon and then when he got rid of the car he put it in his Cressida drift car. It worked plenty good in the winter in both those cars, so I'm guessing the interior volume of a FC chassis should be fine with this size as well. they make a bigger one that costs a bit more. This one is like $144?? soemthing like that. Getting tired of freezing my ass off in the winter time. This is a blower and heater core all in one package.


The inlet and outlet are 5/8" the covers are on in the picture so it looks wierd.


As you can tell it's quite small. Works perfectly fine though. I think it's 12,000BTUs. i don't know check the summit site. Three speed fan.


Here's the front side, you can use flexible tubing to get the heat wherever you want. i'll probably just let it pour out under the dash everywhere and call it good.


Comes with powdercoated brackets, a small wiring harness, and a rotary syle switch. Pretty basic stuff.

StephenSheppard is offline   Reply With Quote
Old 03-12-2013, 07:56 PM   #45
StephenSheppard
Rotary Fan in Training
 
Join Date: Nov 2012
iTrader: (0)
Posts: 58
Rep Power: 12
StephenSheppard is on a distinguished road
Default

Finished up my power steering brackets finally, due to my Uncle in Canada bugging me about it and how the cooler would shake itself apart. Shit isn't going anywhere now. i can double as a bash bar at this point.


StephenSheppard is offline   Reply With Quote
Reply

Bookmarks


Posting Rules
You may not post new threads
You may not post replies
You may not post attachments
You may not edit your posts

BB code is On
Smilies are On
[IMG] code is On
HTML code is Off

Forum Jump


All times are GMT -5. The time now is 02:18 PM.


Powered by vBulletin® Version 3.8.4
Copyright ©2000 - 2024, Jelsoft Enterprises Ltd.
Hosted by www.GotPlacement.com
Ad Management by RedTyger