How to replace fuel filter and to retain resale and show condition;
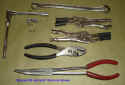
Tools needed;
·¼ inch ratchet – 3 inch extension – 10mm socket – optional 10mm uni
·option 3/8 ratchet with 12mm socket
·2 mini needle nose vise grips with fuel line covering jaws
·long nose 45° pliers
·standard pliers
·good light source
-small arms are really helpful
large image:
http://www.rotaryresponse.com/RCC/FfilterTools.jpg
1.lift car to stands
2.remove both gravel shrouds - 10mm
3.if extra braces are installed remove them – 12mm
4.clamp off both fuel lines with vise grips – as far from filter as possible
5.move spring clips away from filter using long nose and standard pliers
6.break loose fuel lines from filter by twisting to break tension – move lines as much as you can
7.use ratchet to remove 10mm mounting bolts through back of rear PPF
8.disconnect hoses completely from filter
9.remove filter from car remove mount (10mm bolt)
10.install mount on new filter
11.reverse procedure for install
12.start fuel lines on filter install spring clamps with pliers as best you can ( *do not replace with screw type clamps )
13.install 10mm filter mount bolts, tighten
14.finish install of fuel lines – push lines on as far as possible – install spring clamps with pliers
15.remove vise grips
16.perform fuel prime procedure
17.start car to check for leaks
18.install extra braces if equipped
19.install shrouds
20.lower vehicle
21.drive and enjoy
Hint with spring clamps, I take them off and use old retainers that came with new mazda clamps to keep them expanded to make it much easier to get the hoses and clamps in place, then use pliers to pull the retainer off.
*One reason the spring clamps are used is because they change tension with temperature changes, screw type do not. Also it is too easy to over tighten with screw clamps causing hose damage and eventual early failure causing leaks and in the engine compartment - fire.
hint with installing 10mm mount bolts, use a magnetic insert or piece of paper or cardboard to help hold the bolt in the socket. Also start the bolts without the ratchet attached, after they are in most of the way finish the tight with the ratchet.
Be prepared to drink some fuel when you remove it after taking the lines off, helps if you have a couple of rags ready. Just to really be safe wear some eye safety.
I recommend and use Mazda filters, just because I am a factory guy and I have never had an issue with one. You can get look alike replacements from just about any store, if I had to I would go with BAP.
I don’t like the idea why they did it that way and have cursed the engineer that came up with it but the filter is well out of harms way and in a cooler part of the chassis. I have never had a leak problem in all of the services done. And at least when we run a bottle of SI1 through the fuel system every year the Mazda filter holds up for quite a while. Even with all that I have gotten it down to a 15/20 minute job. (broke 10min with a ¼ inch air ratchet for the shrouds and brace only).
It does help if you have small arms or know someone you can con into making love to the diff while doing the job. Probably won't be your friend after. Being a contortionist doesn’t hurt. I have small hands and arms so I have an edge on a lot of techs. As a matter of fact when I worked for Chevy I was the one to be thrown into the truck to find water leaks or Hey Jay come over here and help with me with this dash wiring or could you get that bolt out or started for me. Of course I was apprenticing with the 6ft 8in 285 lb tech.
My issues with the relocation is that there are extra failure points added especially if someone is not experienced in doing modifications like that and the other is that the vehicle is not original. Most of my clients want to retain as much resale value as possible. The reason 95% of my mods are bolt on and we keep all the parts that come off so they get sold with the car.
This is why I will usually refer single conversions to people like Nick at R3, Arie, Cam or Kevin. If I did it I would be plumbing everything with stainless and AN fittings. I am not dissing the way, it is just not my way. I prefer having the vehicle stay as factory as possible. This is where some of the youngsters and I differ.


 Threaded Mode