 02-17-2015, 08:35 AM
|
#61 |
|
IT'S ALIVE!

Join Date: Dec 2009
Location: Richmond, VA
Posts: 811
Rep Power: 16  |
Worked on some more block-off plates last night since it's been so cold. Played with .025 in. Al and the leftover .063 in. ABS I had leftover from my door project.
Al plate for the radio delete:  ABS delete for the center console:  I made two of everything, even the Racepak plate. One out of Al and one out of ABS. I'm not sure which I want to use. The ABS is lighter and looks better, but I think that's just because it's black already. I'm leaning toward the Al because it's stiffer. I plan to mount USB ports for the display and Haltech in one of these panels so the extra stiffness is better. |

|

|
|
02-20-2015, 08:51 AM
|
#62 |
|
IT'S ALIVE!
Join Date: Dec 2009
Location: Richmond, VA
Posts: 811
Rep Power: 16 |
Roll bar is going to stay bolt-in. At least for a little while longer. Stopped by the shop on Wednesday and we worked out a plan.
I decided to go a different direction with the radio delete panel. I just sold my "1FASTT2" (?) gauge panel/pod, but not before I pulled a bunch of dimensions off it. Last night I decided I'd try to replicate it in .025" Al without the holes.   Not bad. Not perfect but okay considering I used only tin snips, a vice, some wood, and sand paper. Not a perfect copy because I couldn't recreate all the bends but it's stiffer than my previous idea and avoid permanently altering the radio surround. The current plan is to mount two USB ports for the display and ECU but I can add any combination of gauges, switches, and whatever in the future. |
|
|
|
|
02-20-2015, 08:54 AM
|
#63 |
|
Lifetime Rotorhead

Join Date: Apr 2010
Location: Elkton, MD
Posts: 874
Rep Power: 16 |
^Much better than previous version. Plus added benefit that you can R&R whatever you eventually mount to it just like you would the stock radio - just pull out the whole unit.
|
|
|
|
|
03-16-2015, 09:37 AM
|
#64 |
|
IT'S ALIVE!
Join Date: Dec 2009
Location: Richmond, VA
Posts: 811
Rep Power: 16 |
I finished some of my interior projects. Radio delete plate with USB ports for the Haltech and RacePak:
 That blank space in front of the console:  The switch is a double pole, momentary switch for the Racepak. Last is the instrument cluster: 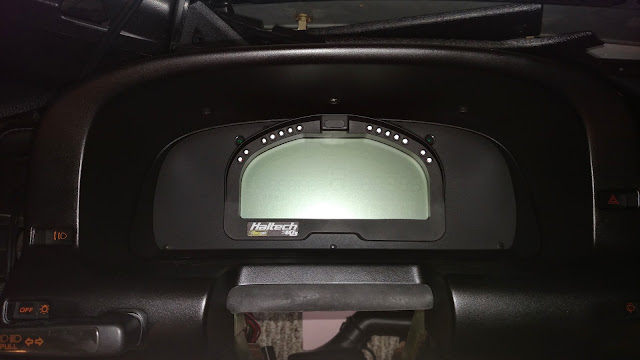 Can't really see but I shaved off the holes for the rear defroster, cruise control, and rear wiper. |
|
|
|
|
03-16-2015, 10:08 AM
|
#65 |
|
Mazda Lover

Join Date: Aug 2010
Location: Akron, Ohio
Posts: 319
Rep Power: 15 |
That's pretty slick.
__________________
 2004 Mazda6 V6 5-spd - still waiting on money for a motor 1991 Mazda RX7 NA 5-spd - my new DD with 145,000 miles |
|
|
|
|
03-18-2015, 07:15 AM
|
#66 |
|
IT'S ALIVE!
Join Date: Dec 2009
Location: Richmond, VA
Posts: 811
Rep Power: 16 |
Snapped a few pictures at the body shop. My project got pushed back so they've only just started working on filling in holes in the engine bay.
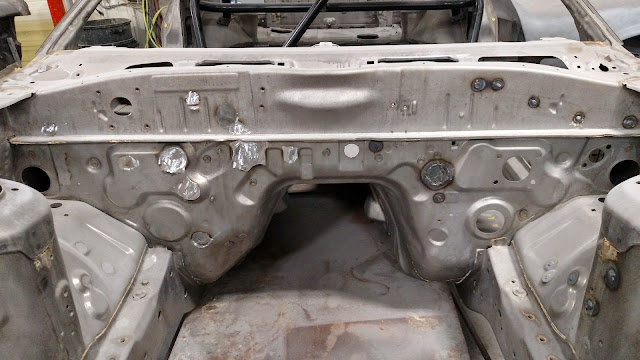 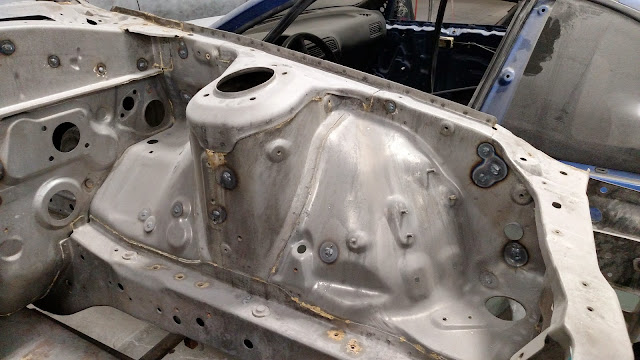  With the exception of most threaded holes, I had everything that's no longer needed shaved. Why leave the threaded holes? I figure it's best to allow for the most adjustability in the future. I'm not going for a tucked/shaved look anyway. |
|
|
|
|
03-18-2015, 03:27 PM
|
#67 | |
|
Rotary Tuner in Training

Join Date: Jan 2009
Location: Beaverton, OR
Posts: 69
Rep Power: 17 |
Quote:

|
|
|
|
|
|
03-19-2015, 07:54 AM
|
#68 | |
|
IT'S ALIVE!
Join Date: Dec 2009
Location: Richmond, VA
Posts: 811
Rep Power: 16 |
Quote:
|
|
|
|
|
|
03-27-2015, 10:44 AM
|
#69 |
|
IT'S ALIVE!
Join Date: Dec 2009
Location: Richmond, VA
Posts: 811
Rep Power: 16 |
Update on my silly bolt-in roll bar ideas:
3/16" plates are welded to the main bulkhead on two faces. I think this is one of the strongest points on the car and is inches away from where the rear sub-frame bolts.  Closer views:   Yes, the plates are on an angle because I didn't like how the bar sat with them being flat. |
|
|
|
|
03-27-2015, 03:44 PM
|
#70 |
|
Rotary Fanatic

Join Date: Aug 2013
Location: Antioch, Ca
Posts: 101
Rep Power: 12 |
Nice progress looking good, any idea when it'll be done?
|
|
|
|
|
04-28-2015, 07:19 AM
|
#71 | |
|
IT'S ALIVE!
Join Date: Dec 2009
Location: Richmond, VA
Posts: 811
Rep Power: 16 |
Quote:
The body shop is prepping for paint so they needed all the body parts. I stopped by yesterday to drop everything off and took some pictures: The body is sealed inside and out. 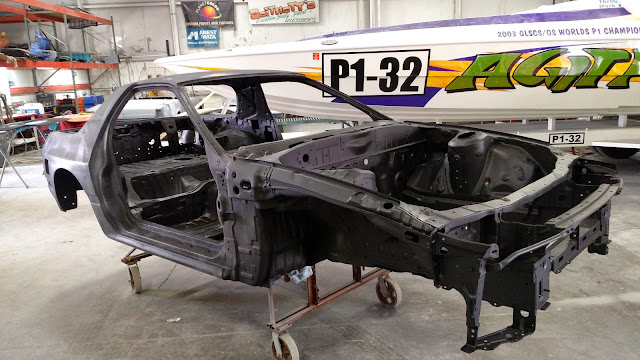 The engine compartment needs a little more seam sealer before any color is sprayed.  I had them bang in one area of the passenger's side of the transmission tunnel. I didn't like how close the Defined Autoworks exhaust manifold was to the body. This won't be noticeable under the carpet.  The shop recommended was bedliner on the bottom of the car. It's thicker and heavier but is MUCH more durable than traditional rubberized coating.  I'm not having the interior painted so it'll stay the dark gray/black of the sealer. This won't be noticeable with the interior put back together.  It's hard to tell from this angle the fenders have been rolled and pulled 1 in. This looks much better than the roll/pull I did on the red car.  The colors is going to be Magma Orange, color code LD2C. It's the VW/Audi color used on the Fahrenheit edition Golf GTi's. |
|
|
|
|
|
06-04-2015, 06:43 AM
|
#72 |
|
IT'S ALIVE!
Join Date: Dec 2009
Location: Richmond, VA
Posts: 811
Rep Power: 16 |
No real updates since last time. Got the intake and exhaust manifolds coated by Swain Tech since they sit so close to each other:
 I'm going to put a layer of high-temp. paint over the TBC on the intake manifold. Kid #2 was born back on 5/15 so not much time to work on anything. I did manage to find a couple hours yesterday to work on patching up the stock front wiring harness. Since I've removed so many wires I have to redo just about every stock splice. Replacing the crimp splices and covering with heat shrink tubing looks much nicer than covering everything with electrical tape... |
|
|
|
|
06-04-2015, 10:52 AM
|
#73 |
|
Professional Stick Poker

Join Date: Feb 2011
Location: Stafford, Ks.
Posts: 1,008
Rep Power: 16 |
Life does seem to get in the way of completing projects. Keep plugging away at it, we want to see this one when you get her done.

__________________
1988 N/A SE 2+2, dead stock and staying that way.  1979 SA22C stock? Not so much. http://rotarycarclub.com/rotary_foru...ad.php?t=15585 |
|
|
|
|
06-04-2015, 12:52 PM
|
#74 | |||
|
RCC Addict
Join Date: Mar 2008
Location: Honolulu, Hawaii USA
Posts: 1,813
Rep Power: 19 |
Quote:
Everything else should be put on the backburner for such reasons! Quote:
And I believe you're building a "race car"...? Secure your wiring as much as possible. If you don't like drilling more holes into the car - understandable - to add wiring clips, then you can always use glued or adhesive anchors. This minimizes the shaking and vibration of the wiring, which WILL eventually fail at one point. Concentrate especially at connectors and plugs which add more mass to increase the shaking and vibration and are natural fail points. -Ted
__________________
reted_2000@yahoo.com Technical Advisor FC3S Pro http://fc3spro.com/ Quote:
|
|||
|
|
|
|
06-17-2015, 03:24 PM
|
#75 | |
|
Rotary Fanatic
Join Date: Aug 2013
Location: Antioch, Ca
Posts: 101
Rep Power: 12 |
Quote:
That SwainTech coating supposedly works very well, but it wouldn't hurt to add a physical heat shield between the header and the LIM also. Sorta like the ones RB makes for the carbureted 12A's. |
|
|
|
|
 |
| Bookmarks |
|
|


 Linear Mode

