|
|
#106 | |
|
Reliable Source
Join Date: Nov 2008
Location: Michigan/Illinois
Posts: 336
Rep Power: 17  |
Quote:
Let me know when you are doing that because I need to get my rx8 stat gear machined too, prob couldn't hurt to have them both done at the same time, maybe help split the cost. Do you have a stock rear stat gear for them to setup the chuck/mockup the bit for? |
|
|
|
|
|
#107 | |
|
IT'S ALIVE!
Join Date: Dec 2009
Location: Richmond, VA
Posts: 811
Rep Power: 16  |
Quote:
 I wasn't able to get good measurements of the groove myself so I left them the stock stationary gear to use as a setup. The groove is approximately .100" wide by .060" deep. I plan on using a little RTV in addition to the o-ring so a little error shouldn't be that big of a deal. I also picked up the input shaft. Fortunately it looks like the turned out correctly. Modified Miata input shaft on bottom, stock RX-7 on top:  A quick check shows the overall length and spline length to be a little longer than the RX-7 shaft but I verified the dimensions with Mazdatrix's recommendations and I trust they know what they're doing so everything should work. The fiberglass body parts were delivered yesterday too (busy day). Shine Auto vented hood:  The hood is latched in above picture but not bolted to the car. It lines up fairly well but I'm going to have to lower the latch quite a bit it seems. I'll be picking up some hood pins somewhere along the way. It's a true vented hood: 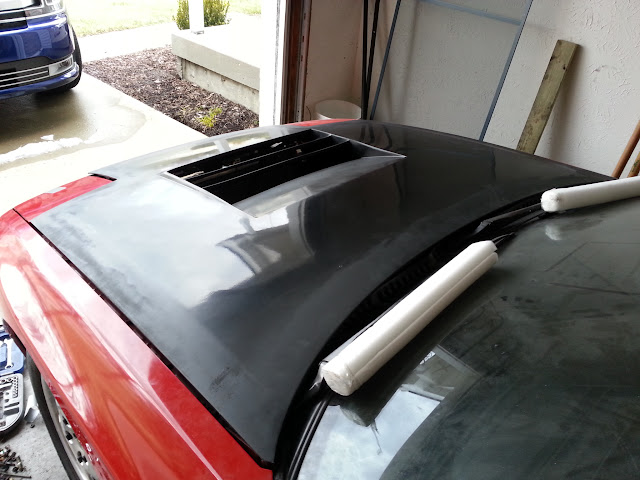 I'll be tying the vent into some kind of post-radiator fan ducting eventually. Shine Auto Fenders:  It's a pretty subtle flare but should be enough to cover the wider wheels and tires:  I've got family visiting this weekend so I won't be able to work on the car too much. The immediate plans are to reassemble the transmission and to mock up the body parts to verify fitment. I'll leave the final fitting and painting to the professionals. I'll be picking up a fender roller early next week to work on the rears. |
|
|
|
|
|
#108 |
|
IT'S ALIVE!
Join Date: Dec 2009
Location: Richmond, VA
Posts: 811
Rep Power: 16  |
Got bored last night and decided to mock up the driver's fender and hood:
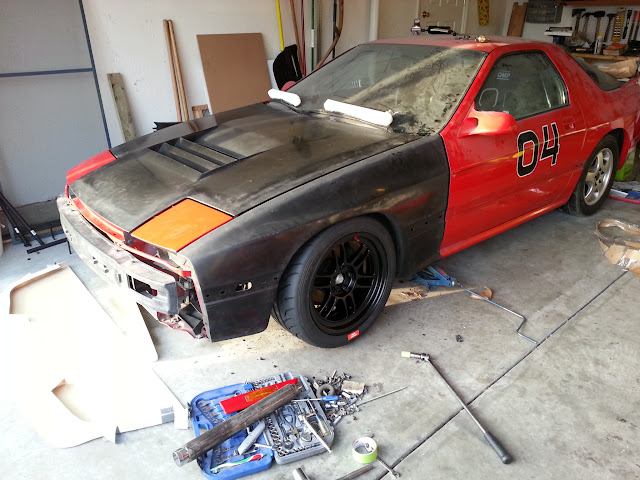  Any doubt I had taking this direction with the car has been squashed. This is actually making me consider painting the car black now. Plenty of room with the new wheels and tires though. There's definitely going to some fitting involved but I only plan on getting it "close" so I can install the splitter and work on the radiator ducting. I'll let a body shop deal with the final fitting. |
|
|
|
|
#109 |
|
IT'S ALIVE!
Join Date: Dec 2009
Location: Richmond, VA
Posts: 811
Rep Power: 16  |
Busy weekend. I decided to spend more time painting (due to warmer weather) but I still got to work on the body. I got the passenger's side front fender off and mocked up the fiberglass one:
 I rolled and pulled the #$%^! out of the rear fenders:   Overall it's a ~1 inch pull, which is a lot more than I thought was needed. The roll/pull isn't perfect but it's "good enough" for me. This isn't going to be a show car. I chipped the hell out of the paint but I don't care because I've decided to repaint the car once the bodywork's done. Friday night and Saturday morning were dedicated to scrubbing the transmission housings some more. After the rear fenders were rolled I attacked the transmission and brake booster with high temperature paint. The end result(s):    The transmission is just sprayed with "aluminum" but I decided to paint all the misc. brackets and panels black for a little contrast. I decided not to try to fill in any of the pitting (had some Bondo handy) on the booster. I was hoping the paint would fill the pits in a little better, but oh well. Three layers each of primer, paint, and clear should keep it from rusting again for a while. Here's a shot with the new wheels on front/back. I need to raise the front and lower the rear some, I think. It's hard to tell because the new fenders lowered the arch.  I still need to drill the mounting holes in the fenders and work on the hood but I don't know when I'll get around to that. Next weekend is going to be dedicated to reassembling the transmission. |
|
|
|
|
#110 |
|
IT'S ALIVE!
Join Date: Dec 2009
Location: Richmond, VA
Posts: 811
Rep Power: 16  |
This came in yesterday along with an engine rebuild DVD, intake manifold gasket, and clutch alignment tool:
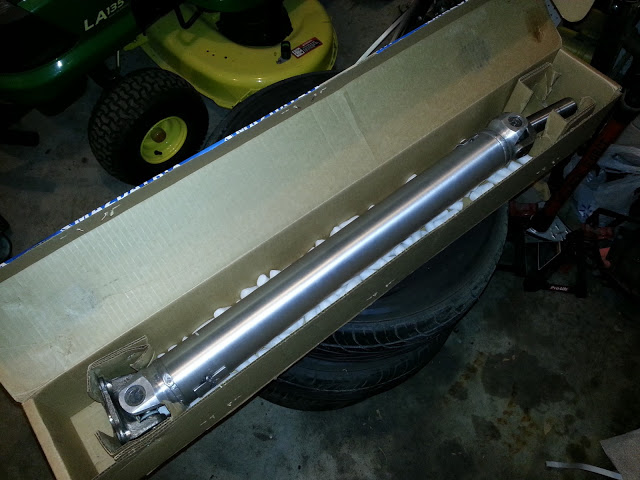 Aluminum driveshaft. Why? Because I could. I know the stock driveshaft isn't overly heavy but it was relatively cheap and less rotating mass is always a good thing. Also new u-joints... I started reassembling the transmission. I only got the bearing plate reassembled because taking measurements and keeping everything as clean as possible takes time, which I don't have much of when I can only work after the baby's asleep.  I know this part is going to give me a hard time this weekend. I don't understand why Mazda would design a transmission where the bearings are driven in from one side but the shafts are driven into the other side. It seems like this is just asking for the bearings to get all knocked out of place during subsequent reassembly. If anyone has any tips regarding reintalling the main and countershafts I'm all ears. I already plan on trying to heat up the bearing inner races (hopefully without melting the seals) and freezing the shafts. |
|
|
|
|
#111 |
|
Dedicated Rotorhead
Join Date: Nov 2008
Location: Cincinnati, OH
Posts: 92
Rep Power: 17  |
Hey, if you need an extra hand building your engine, I'd be glad to come over and lend a hand. I know how cumbersome it can be to try to assemble the motor by yourself. Let me know, I'd like to see this engine and wheel/tire setup you've put together.
__________________
DGRR 2013. |
|
|
|
|
#112 |
|
IT'S ALIVE!
Join Date: Dec 2009
Location: Richmond, VA
Posts: 811
Rep Power: 16  |
I didn't know there was was anyone else in the Cinci area. I've seen very few rotary cars out here. I'll keep you in mind as I'm sure I'll need help at some point. This is my first rebuild afterall.
|
|
|
|
|
#113 |
|
S4 Owner
Join Date: Jun 2008
Location: Tottenham, ON, Canada
Posts: 48
Rep Power: 0  |
Just a note my guess is the Miata has a helical reverse gear because of the projected audience that would buy the car. They were probably avoiding complaints from customers from excessive noise in reverse.
EDIT- not even excessive noise, its normal in a manual car they just dont understand that.
__________________
1985 Mazda RX7 GSL 13B, Holley etc 1997 Mazda MX6 LS - DD lowered on 17s |
|
|
|
|
#114 | |
|
IT'S ALIVE!
Join Date: Dec 2009
Location: Richmond, VA
Posts: 811
Rep Power: 16  |
Quote:
I only managed to get the mainshaft reassembled over the weekend. I spent entirely too much time looking for vice jaw pads and material to make a bearing driver. Apparently no one sells vice jaw pads locally so I used some 3M 1/4" rubber tape I had lying around. I ended up using 1-1/4" galvanized pipe with the threads cut off as a bearing driver. It turns out the ID is actually closer to 1.40". At least 1.37" is needed to clear the clutch splines on the mainshaft. Clean parts:  Assembled mainshaft:  Everything is cleaned and ready for the next step but life got in the way yesterday. I'm taking pictures of every step along the way. I plan using the pictures in reverse to make a how-to thread. |
|
|
|
|
|
#115 |
|
S4 Owner
Join Date: Jun 2008
Location: Tottenham, ON, Canada
Posts: 48
Rep Power: 0  |
Well the whole reason is cause of the massive torque in reverse, but reverse isnt used as much as the other gears so you'll be fine lol. It really doesn't matter IMO.
__________________
1985 Mazda RX7 GSL 13B, Holley etc 1997 Mazda MX6 LS - DD lowered on 17s |
|
|
|
|
#116 | |
|
IT'S ALIVE!
Join Date: Dec 2009
Location: Richmond, VA
Posts: 811
Rep Power: 16  |
Quote:
I was able to get the mainshaft and countershaft installed last night, which is the one task that most worried me. Getting the countershaft out was a PITA so I was worried installing it would be just as bad.  I tried to line up the gears as best as possible. I'm not sure why Mazda made it so the teeth on the countershaft don't line up nicely with the teeth on the mainshaft . 1st is a bit offset but 2nd, 3rd, and 4th are close and those will be the most used. Main bearings stayed in place:  I used my 1-1/4" pipe to support the bearing as the countershaft was tapped in. I had to remove the reverse idler gear and cage to do this. The whole process is definitely a two-person job. I had my wife hold the bearing plate on the pipe and support the mainshaft while I worked on the countershaft, ensuring everything was lined up. I decided to call it a night after installing the reverse pinion and gears.  There's not much more left: 5th/reverse clutch hub, 5th gear, some washers/spacers, and the rear bearings and this level of the assembly is complete. |
|
|
|
|
|
#117 |
|
IT'S ALIVE!
Join Date: Dec 2009
Location: Richmond, VA
Posts: 811
Rep Power: 16  |
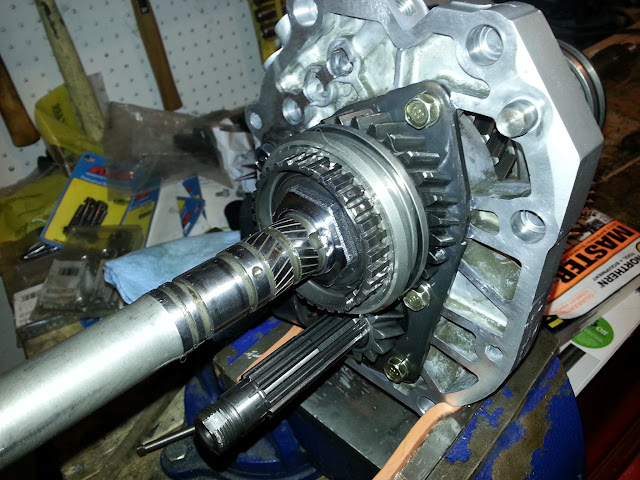
Naturally I didn't get as much done as I wanted. It's hard to make progress when you only have ~1 hour to work and you get stuck on something. The 4X mm nut that goes behind the hub gave me issues. The FSM says to shift the assembly int 1st and reverse simultaneously to keep the mainshaft from rotating but because the reverse pinion on the countershaft is helical and unsecured it pops out of position allowing the mainshaft to spin. Eventually my wife came up with a solution to use a small wormgear hose clamp to hold the reverse pinion in place. Torqued to ~140 ft-lb (FSM calls for 94-174 ft-lb) and staked in place:
 With the delays due to the mainshaft nut I was only able to install 5th gear and the thrust washer behind it:  All that's left on the mainshaft are a couple of c-washers and their retainer, the rear bearing, another set of c-washers and their retainer, and finally a c-clip. After that a spacer, the 5th gear pinion, rear bearing, and nut are installed on the countershaft and this part of the assembly is complete. |
|
|
|
|
#118 |
|
IT'S ALIVE!
Join Date: Dec 2009
Location: Richmond, VA
Posts: 811
Rep Power: 16  |
Long post ahead. I've made a ton of progress on the transmission since I last updated this.
Installed the rear bearings and finished the gear/shaft assembly last week. Getting everything ready for the next level of assembly:  Shift rods, clutch forks, etc. installed. Ready to install the intermediate housing: 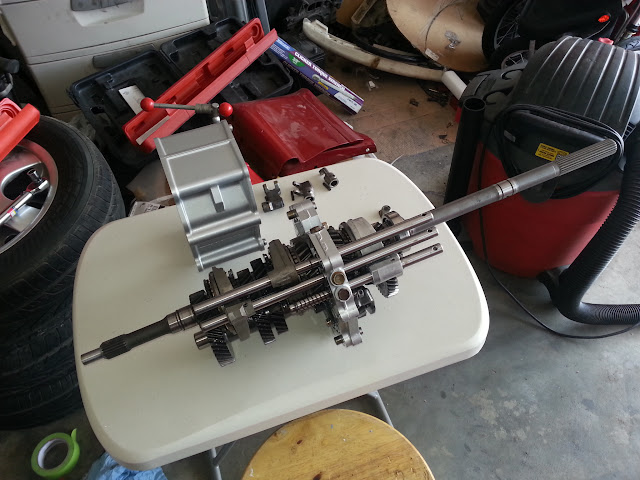 Intermediate housing on, shift rod ends installed, and speed drive gear in place Ready to install bell and extension housings.  Bell and extension housings assembled.  Front bearings installed...  ...and covered.  Finished... 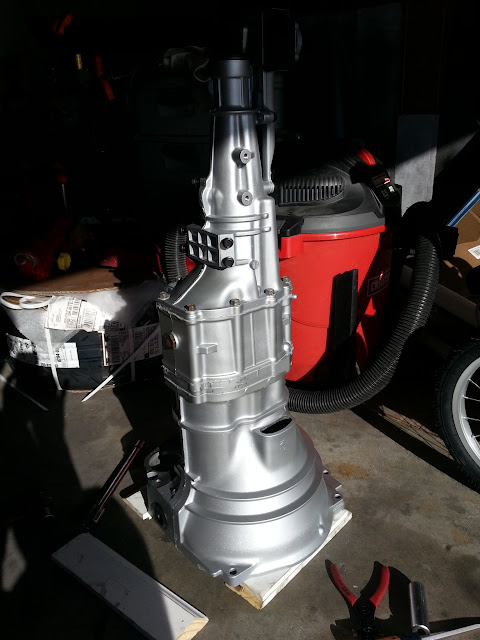 ...or so I thought. After the silicone cured I decided to slap on a stock shift lever and test out the gears again. I quick row from 1-5 to neutral and everything checked out. Wetn to test reverse I found I couldn't get it to engage. I checked the other gears again and all were locked out. A quick spin of the input shaft told me it was already in reverse! I pulled the extension housing (and all it's pieces) off and discovered somehow I managed to shift into reverse while going from 5th to neutral. This morning a quick internet search showed this is quite common in Miatas and RX-7's though I'd never heard about it. Apparently this spring:  on the front of the 5th/reverse shift rod puts a good amount of force in the reverse direction. Shifting too quickly from 5th into neutral or too slowly from reverse into neutral seems to be the primary causes although some have reported this is worse with worn shifter bushings. I'm guessing what happened to me was when I released 5th gear into reverse (didn't 'guide' it) the force of the spring boosted the forward momentum of the rod, which somehow carried it into reverse at the precise moment I moved the selector rod into neutral. It probably didn't help that I had only 1/2 the shifter bushings installed and that the transmission was vertical so gravity was acting in reverse's favor. What's most annoying is there is a fix that can be done without removing the extension housing involving a screwdriver through the reverse switch port. Had I waited a few hours I would have discovered this and not had to remove the extension housing and associated pieces. Now I get to scrape off all the silicone and go through that process again. Either way, the transmission is essentially done so it'll be time to move onto the next task soon. Last edited by infernosg; 04-22-2013 at 11:10 AM. |
|
|
|
|
#119 |
|
IT'S ALIVE!
Join Date: Dec 2009
Location: Richmond, VA
Posts: 811
Rep Power: 16  |
Wow, so a little over a month since my last update. Life got in the way for a few weeks but I've made some progress. The biggest issue I'm having is with the forums actually. I can't do my usual early morning and lunchtime browsing because for some reason my work network has flagged the forums as a malicious/fishing website (other forums are okay). Any idea admins?
Anyway, got the transmission straightened out. Realized I was missing the lower shifter bushing - the one that fits in the selector rod control end. Freaked out for a bit until I realized MMR sold a delrin replacement. Picked that up along with some motor and transmission mounts:  As other people have found the bushing needs to be milled/ground down from 19 mm to ~17 mm to clear the return spring. In it's final home:  Transmission selects gears super smooth now. Can't wait to get it on the car. Shifting away from the transmission now, I finally got my 929 MC. Waited >2 months for a Dorman unit from Amazon. Gave up after it kept getting delayed so I picked up a Raybestos unit from RockAuto. 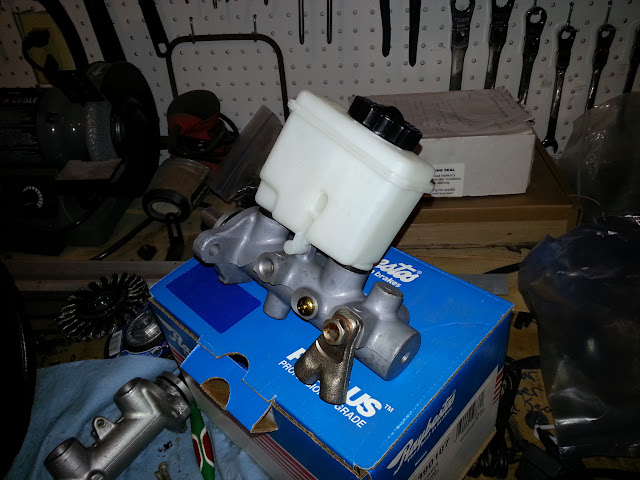 Definitely a "universal" casting. Too bad the "OEM" unit (Beck Arnley) was over $250! Got to work getting the 929 MC and booster on the car. 929 MC (right) versus stock N/A S5 FC (left):  And after much bending of break lines and trimming of the BPV bracket everything on the car:  Next everything comes off so I can paint the BPV and bench bleed the MC. The most exciting update is after nearly a year of waiting my Defined Autoworks header arrived!  I couldn't contain my excitement so I quickly mocked up the engine with exhaust and intake manifolds:  Notice something?  Yeah... Intake runners are ~1/16" away from the exhaust runner for the trailing rotor. In fact, the intake has to be installed first to even get the exhaust manifold on! Definitely looking into TBC/ceramic coatings now for both the intake and the exhaust. I'm also considering getting the intake manifold flange milled down .100" or so to give some extra clearance. I really want to squeeze a heat shield in there. With that "sorted" I decided to mock up the exhaust on the car. I installed the delrin mounts so everything was in its final position and went at it:  It's a pretty tight fit at the passenger's side of the transmission tunnel. The stock heat shield has to go and even then it requires some finesse to get it installed. TBC/ceramic coating is going to be vital. Good thing I know some guys with connections to Cerakote... That's it for now. Once I get the brakes finished the car will go off to get an exhaust made. Here's where I could use some advice. I really want to go with a single exit to keep overall weight down. Just through eyeballing it looks like I'll be able to fit a presilencer/muffler or two mufflers in series with this setup. Logan at Defined recommends Borla XR-1 mufflers but I'm wondering if two of them in series would be enough to keep noise down. I'm not concerned about volume myself but I don't want to be black flagged on track so sound intensity needs to be <92 dB. The other options I'm considering are Racing Beat presilencer -> Power Pulse muffler or two Power Pulse mufflers in series. Last edited by ZGN; 10-02-2013 at 07:33 PM. |
|
|
|
|
#120 |
|
RCC Addict
Join Date: Feb 2008
Location: VA
Posts: 1,812
Rep Power: 19  |
Personally, I don't care for the XR-1 muffler. Lately, everything has been magnaflow with no issues and lifetime warranties. Use a thicker 14ga exhaust tubing with an RB presilencer and good magnaflow performance muffler and it should be plenty quiet for track officials. I know the 14ga is heavier, but an NA rotary with thin exhaust is going to get noticed...
Everything else looks great BTW.... should be a great ride when your done. |
|
|
 |
| Bookmarks |
|
|