|
|||||||
| RX-7 1st Gen Specific (1979-85) RX-7 1979-85 Discussion including performance modifications and technical support sections |
 |
|
|
Thread Tools | Display Modes |
|
|||||||
| RX-7 1st Gen Specific (1979-85) RX-7 1979-85 Discussion including performance modifications and technical support sections |
 |
|
|
Thread Tools | Display Modes |
|
|
|
|
#1 |
|
Respecognize!
Join Date: Jul 2008
Location: Δx = ħ/2Δp
Posts: 3,190
Rep Power: 21  |
Having just completed installing the RE SPEED Big Brake kit i figured i could explain the run down on its installation.
For starters i would like to say, i love this kit. I might have too buy several of them just to make sure that in case of something happening, i will still have a few. Its simple to install if you have the right tools. I happened to have a torch which made it cake. Required Tools: 12mm Socket 14mm Socket 17mm Socket Brake Cleaner Oven or good torches. Torches are best Larger pliers to hold stupidly hot adapter piece 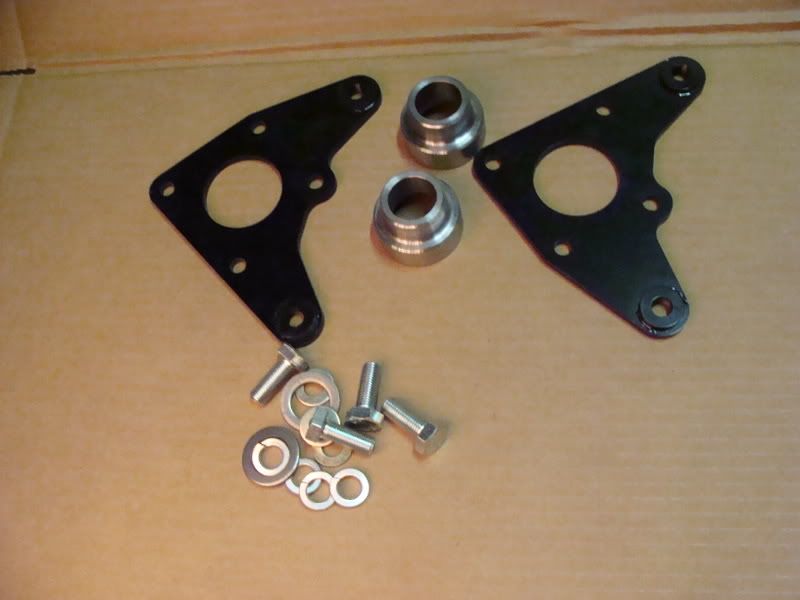 I wont go into details on removing the original parts since that is clearly explained in a variety of manuals or can be figured out rather easily. So i will start at the point of having just the spindle, cleaned and ready. But you can expect the lower caliper bolt to be located behind the bottom strut mount. So you will have to removed both bolts from this and the tie rod in order to get it moved out of the way. You'll see what i mean. The new kit will not have this issue. 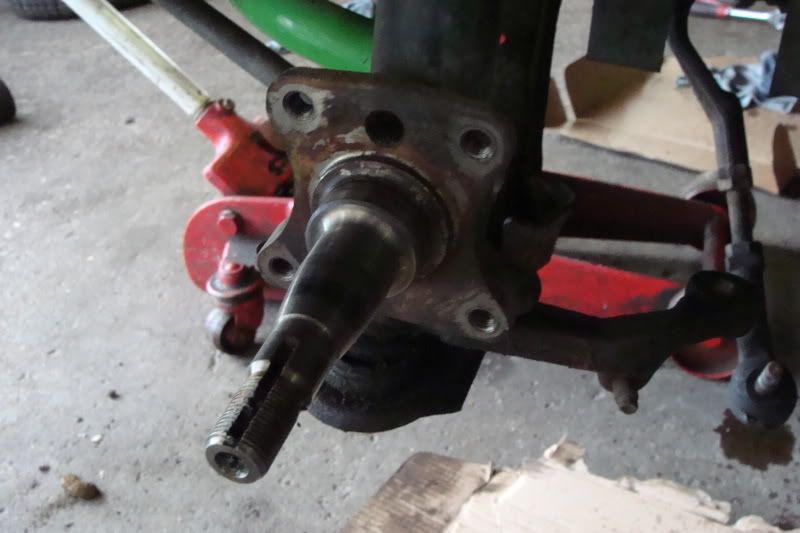 As you can see above, this is the 84-85 spindle. Bare of the rotor/hub assembly which are a single piece. The dust shield and caliper mount is also a single unit. Everything removed can be seen in the photo below: 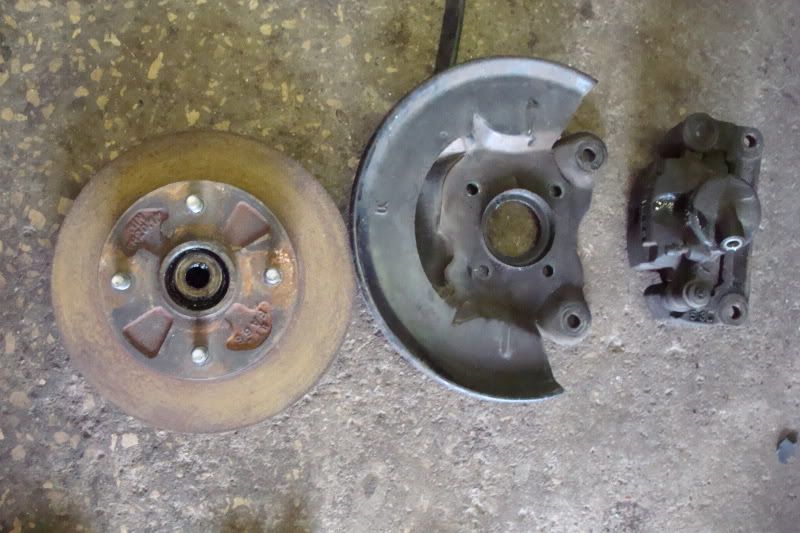 What you will need to complete the swap is essentially all of the FC parting parts. This includes the calipers, rotors, hubs and optionally, the dust shield. You will also need wheels what will clear. Stock FC wheels do not clear. They are nearly one inch off. 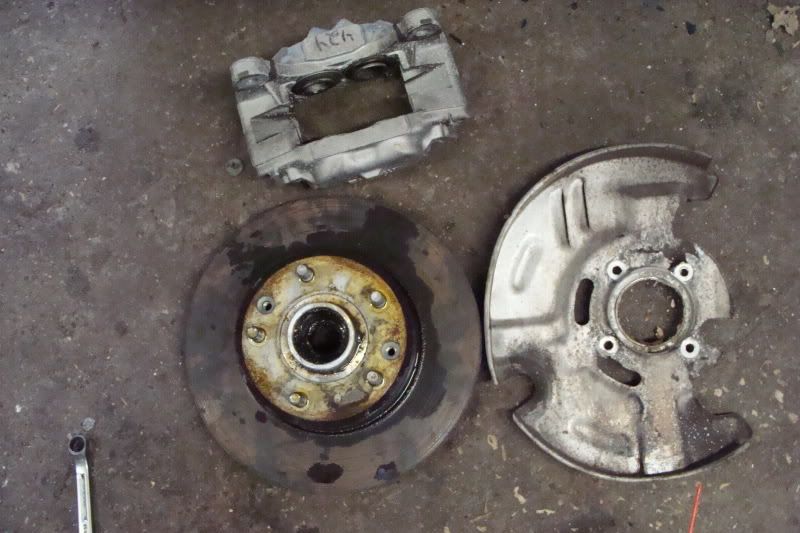 Now you are ready to start installation. First, make sure to clean the spindle off of grease with brake cleaner. Bearing grease is nasty so have several rags available. You will also want to completely clean off the two adapter pieces supplied in the kit. First, follow the instructions regarding test fitting to see if the spindle is undersized. This is very important. Neither of mine were undersized. The adapters are fitted at a very tight tolerance. Installation is done by heating them to expand the piece so that when it cools, it becomes one with the spindle. To do this i used a Oxy/Act. torch. I did one side at a time to ensure i gave full attention to everything. I heated up the pieces for only maybe a minute. Once the material starts turning blue, its far more than ready to go on. Don't go melting it or anything. Once heated up considerably, I use a larger pair of pliers and gently pick it up and slide it on. Lightly hold it in place for a few seconds to ensure it stays. 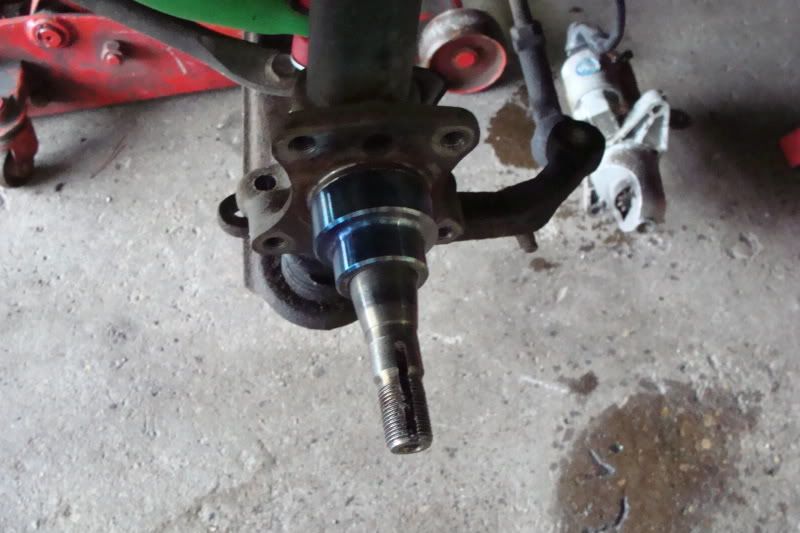
__________________
For current updates and event coverage check out Follow on Twitter! @WhizbangRally Whizbang Rally's Webpage | Facebook |
|
|

|
|
|
#2 |
|
Respecognize!
Join Date: Jul 2008
Location: Δx = ħ/2Δp
Posts: 3,190
Rep Power: 21  |
Now for the bracket installation. There are two ways to install it. One would put the caliper forward of the spindle, the other behind. Behind required the use the of the roll center blocks, else it will contact the steering arm. I opted for forward of the spindle since i did not have said piece. Also the welded on threaded parts should be facing the rotor. Else the spacers really wont make too much sense. In the picture below this is how the bracket more or less should look. But you can see that i have it wrong with the welded pieces facing in towards the engine...
To attach the bracket the original 14mm bolts from your FB will be used. 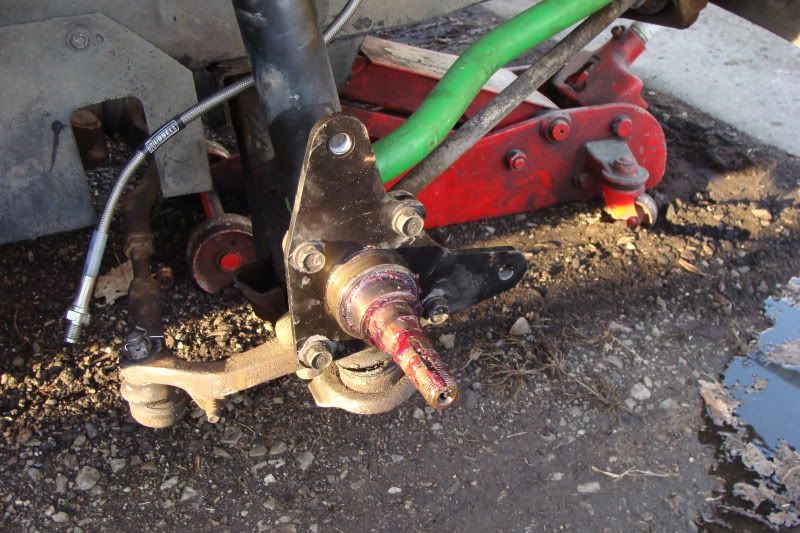 Now the rest is generally easy. Attach the hubs. Grease everything properly. If your bearings are worn, now is the best time to replace them. From here the rotor can go on. Finally Attach the calipers. The gold spacer will be used at the top. I had some clearancing issues with my kit that was an abnormality but was resolved by just changing the spacers around to clear. Once the caliper is attached you can add your pads, springs etc. I would recommend the use of caliper lube on the two pins to ensure they move properly and do not seize. Below is the setup completed. 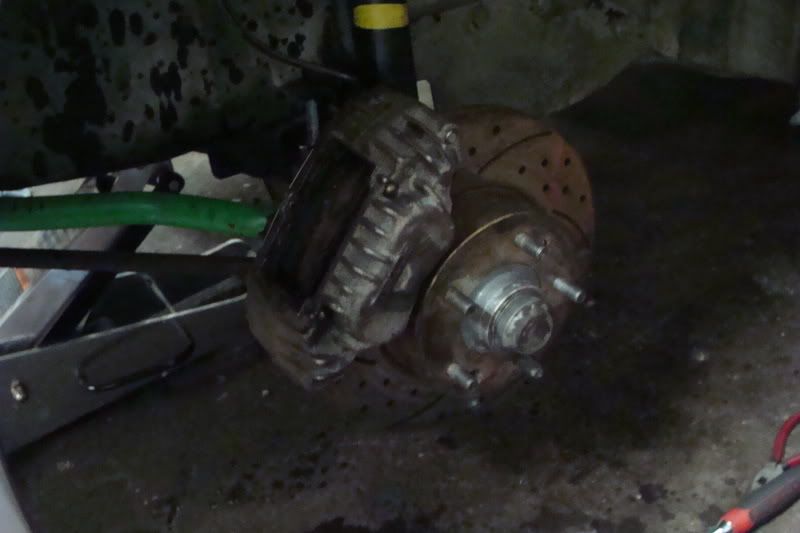 Next is the brakes lines. There are several options to work with. You could use the 2nd gen two piece lines, and make a new hard line portion, buy the better fitting RE Speed ones or use the FB ones with some extra bends. I had a stainless FB line from Russell already in use, so i reused them. Came out fine without much work. Finally bled the brakes out. End results? Well i can't drive the car yet BUT the brake pedal feel is OUTSTANDING!!!!\ Now for your wheels, stock FC wheels will not clear!!! You need about a 1" spacer for that to work. You will also need a 15" rim to clear the calipers. I am going to use a set of 0 offset 15x8.5 wheels i have once i get tires on. Clears by a lot, but will need fender flares. 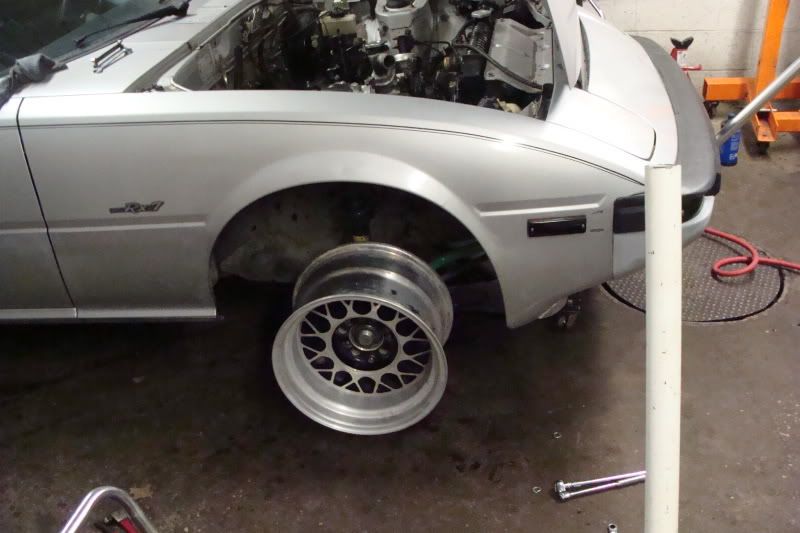
__________________
For current updates and event coverage check out Follow on Twitter! @WhizbangRally Whizbang Rally's Webpage | Facebook Last edited by Whizbang; 03-19-2009 at 05:35 PM. |
|
|

|
|
|
#3 |
|
RCC Contributor
Join Date: Feb 2008
Location: Grand Rapids, Michigan
Posts: 530
Rep Power: 18  |
Can't see the pictures from this computer, but I'll check it out when I get back to my place. I'm sure, as always, that you have done an outstanding job.
 .
__________________
"Learn from the past, or it will become your future...." '85 GS 12a + LSD/Sterling carb/Respeed coilovers/Respeed front swaybar/Respeed adj. rear spring perches/Illuminas/Bilsteins on rear AutoX vids @ http://www.youtube.com/user/Kentetsu1 |
|
|

|
|
|
#4 |
|
Pirate
Join Date: Mar 2008
Location: Central IL
Posts: 1,323
Rep Power: 19  |
What was the issue with the FC hubs? I just replaced my front bearings so i may be able to help.
__________________
Rotaries:They are NOT that complicated! |
|
|

|
|
|
#5 | |
|
Respecognize!
Join Date: Jul 2008
Location: Δx = ħ/2Δp
Posts: 3,190
Rep Power: 21  |
Quote:
Regardless, this is not something you should do with a small time frame. 
__________________
For current updates and event coverage check out Follow on Twitter! @WhizbangRally Whizbang Rally's Webpage | Facebook |
|
|
|

|
|
|
#6 |
|
Rotary Fanatic
Join Date: Mar 2008
Location: Boostville
Posts: 193
Rep Power: 18  |
I installed this kit and it is awesome. Re-Speed did a great job designing it.
I have pics as well and did not use a torch to heat it up. I put them in the oven for about 5 mins and then litely tapped them in place with a rubber mallet and large socket I had. Good luck completing the install. L8R |
|
|

|
|
|
#7 |
|
ZOMG WTF BBQ!!!
Join Date: Mar 2008
Location: Mobile, Al
Posts: 280
Rep Power: 18  |
I just came across a doner FC. I'm gonna favorite this and try it in the future
|
|
|

|
|
|
#8 |
|
Rotary Fan in Training
Join Date: Feb 2008
Location: Dandridge, TN
Posts: 76
Rep Power: 0  |
Re-Speeds kit is spot on and a great upgrade for the FB, and for those guys that dont want to change wheels (4 lug to 5) simply substitute the FC 5lug hubs for the 4 lug, get a set of blank rotors, and have the 4 lug pattern drilled for them.
Though one word of caution: FC spare tires (the multispoke enkei's) + 4pot caliper = little clearance for fingers. I happened to be checking for fitment and bearing noise when the wheel 'sucked' my right hands middle finger between a spoke and the caliper. Spent the next 4 months regrowing the completely ripped off fingernail. |
|
|

|
|
|
#9 |
|
ZOMG WTF BBQ!!!
Join Date: Mar 2008
Location: Mobile, Al
Posts: 280
Rep Power: 18  |
I'll do this then and leave my backs alone
|
|
|

|
|
|
#10 |
|
Rotary Fanatic
Join Date: Mar 2008
Posts: 167
Rep Power: 18  |
I just finished helping Sam, DJ55B from the "evil forum" install his front BBK. Went on fairly smoothly and certainly brings his car to a halt in a hurry. They will also look fantastic once he gets those Ford Ranger wheels off there. Parts fit great and one day I'll be getting the front and rear kits too.
|
|
|

|
|
|
#11 |
|
ZOMG WTF BBQ!!!
Join Date: Mar 2008
Location: Mobile, Al
Posts: 280
Rep Power: 18  |
Did you do the back brakes?
|
|
|

|
|
|
#12 |
|
Respecognize!
Join Date: Jul 2008
Location: Δx = ħ/2Δp
Posts: 3,190
Rep Power: 21  |
nope
__________________
For current updates and event coverage check out Follow on Twitter! @WhizbangRally Whizbang Rally's Webpage | Facebook |
|
|

|
|
|
#13 |
|
ZOMG WTF BBQ!!!
Join Date: Mar 2008
Location: Mobile, Al
Posts: 280
Rep Power: 18  |
Are you gonna leave them like that or do you have a kit for them? I'm thinking about doing this later
|
|
|

|
|
|
#14 |
|
Respecognize!
Join Date: Jul 2008
Location: Δx = ħ/2Δp
Posts: 3,190
Rep Power: 21  |
since the SE rear already is vented, ill probably leave it. If i later decided i need to get more out of my brakes, ill look into it
__________________
For current updates and event coverage check out Follow on Twitter! @WhizbangRally Whizbang Rally's Webpage | Facebook |
|
|

|
|
|
#15 |
|
ZOMG WTF BBQ!!!
Join Date: Mar 2008
Location: Mobile, Al
Posts: 280
Rep Power: 18  |
Are you running two different rims?
|
|
|

|
 |
| Bookmarks |
|
|