|
Rotary Tech - General Rotary Engine related tech section.. Tech section for general Rotary Engine... This includes, building 12As, 13Bs, 20Bs, Renesis, etc... |
Welcome to Rotary Car Club. You are currently viewing our boards as a guest which gives you limited access to view most discussions and access our other features. By joining our free community you will have access to post topics, communicate privately with other members (PM), respond to polls, upload content and access many other special features. Registration is fast, simple and absolutely free so please, join our community today! If you have any problems with the registration process or your account login, please contact contact us. |
|
Thread Tools | Display Modes |
|
08-28-2015, 11:48 PM | #1 |
Rotary Fan in Training
|
Zero clearance side seals round 2. (If you don't mind Barry)
I genuinely though Ted forgot the italics in his comment here until I saw it was actually closed. Not sure why you wouldn't want documentation of long term runner that someone has tested in one place? (I will say mods/admin on other forums encourage keeping tech stuff in one place)
So, seems this is a goer. I would like to do this when I eventually get around to building one or other of my engines, the 12a will have to come apart for clearance/lighten/balance anyway as there was still vibes with what was sold to me as the correct series auto counterweight (will do the measuring check etc again but I want to port it anyway, will send to spinny bits to Freaky or Wilkins to machine) with after-market flywheel and there was an issue with leaking intake crossover o-rings/gasket filling housing with coolant too so I'm guessing it could be a bit messy inside. If you don't mind me asking Barry do you cut them with a fine diamond disk with a dremel style thing or is it more like a milling bit. I guess I'm curious as to whether there is a tight or open radius under the side seal and how hard it would be for me to replicate it, given sending you seals/rotor from Aus would be cost prohibitive and I'd like to try it myself anyway. Is there enough length in generic side seals to do this effectively? Last edited by Slides; 08-29-2015 at 08:56 PM.. |
08-29-2015, 07:17 AM | #2 | |
destroy, rebuild, repeat
|
why do you knotch only one side of the corner seal.. why not both, or are the side seals not long enough?
Quote:
|
|
08-29-2015, 08:04 AM | #3 | |
Rotary Fanatic
|
Quote:
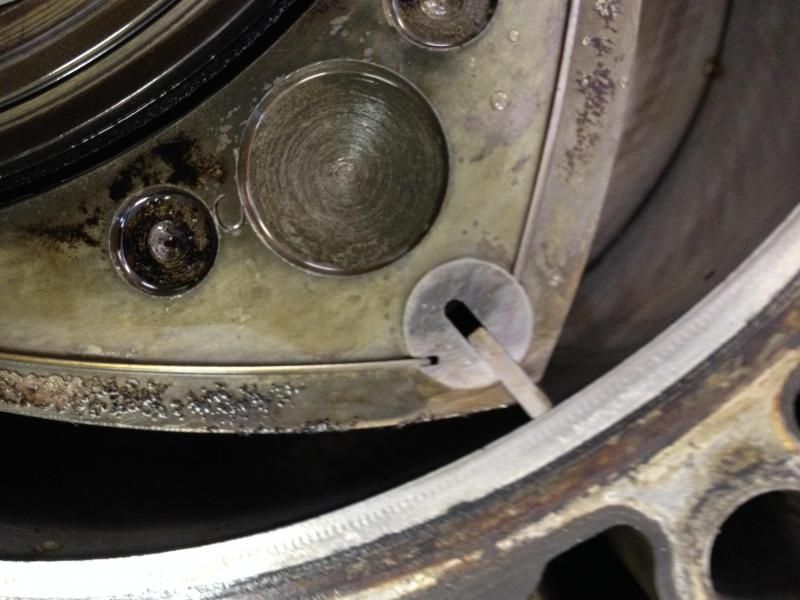
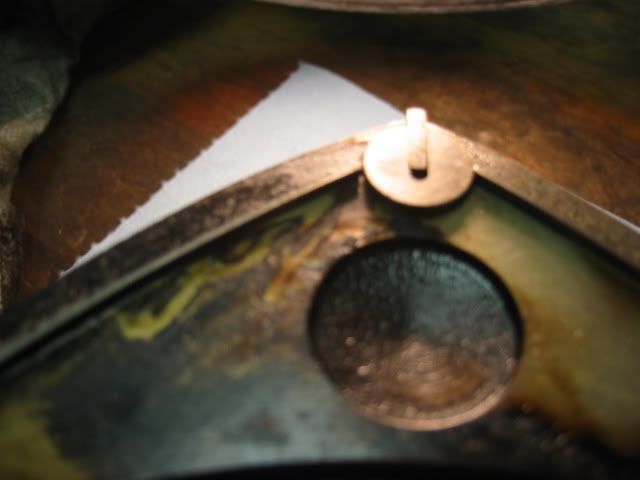
My thought is that using one cut is half the fitting and half the possibility of binding an apex seal. I have the side seal push on the uncut flat side and the normally gapped open side is in the labyrinth cut. An additional feature is that on final assembly build.... the apex seal to corner seal alignment is perfect... just slide them in. That said... if you want to do both, do both. Barry |
|
08-29-2015, 07:34 AM | #4 |
Rotary Fanatic
|
Slides,
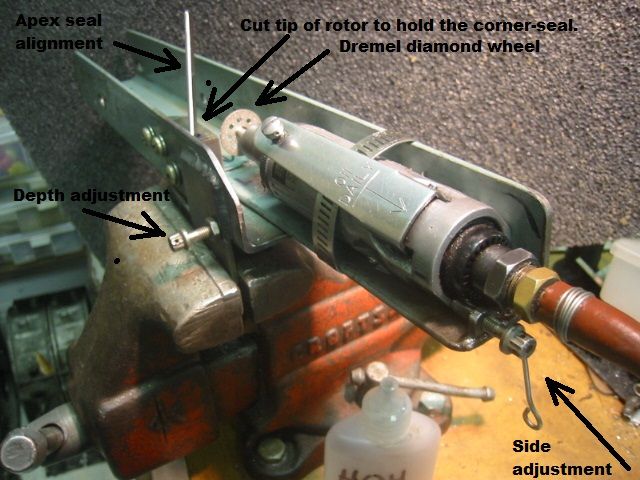
The Dremel diamond disk blade #545 is made to cut on a 7.344" arc. The frame is angle iron. Notice the stop screw for depth and the adjustment for width. On the width adjustment 90º =.008" with a 10-32 screw thread. The apex seal shown, is stuck in the fixture to rock the corner seal to its full travel. Use water to extend the life of the cutter. The seal holder is made from one corner of an old rotor and tapped/screwed to the angle. If you were closer geographically it might be worth sending them to me and I would cut them for you for free. On second thought it would be better for you to make the tool and provide the service for others over there. I can send you more pictures if needed. Barry |
08-29-2015, 08:00 AM | #5 |
Rotary Fan in Training
|
88Turboii, it is redundant work cutting both sides of the corner seal, you only need to cut the one at the leading edge of the side seal as the rotation of the rotor against the side plate will maintain the gap tight at the trailing end, thus you only need the "labyrinth" at the leading end of the side seal to allow seal expansion without gas bypass.
Thanks for the detailed reply Barry. Perhaps just one photo from 180 degrees of the existing one so I can see how much of the rotor you have used and the way it approaches the seal. I think I will try to put a jig together, as it happens I already have a diamond bit which looks pretty close (although I would make sure I had several of correct thickness before starting) and dremel style tool although I might not be pulling the motor for a while, I suspect I may have to make a career change to get cash flow happening (I'm hoping I don't have to sell one of the 7s in the mean time). I would certainly make any jig or tool I put together available to other rotary community members here, I have happily volunteered my time to help forums members (rotary and otherwise) with various bits and pieces before. I have learned a bit about air cooled porsche motors in the last few weeks, getting intake and head studs out isn't always fun, and they can run without head gaskets Last edited by Slides; 08-29-2015 at 08:06 AM.. |
11-05-2015, 05:08 PM | #8 |
Don Mega
|
There is some real dumb and wrong assumptions state above ^
The side seal is NOT constantly forced to one side!@ IF it were it would never wear a path into BOTH corner plugs as it does in reality! A true ZERO BLOW BY design like I have made needs to be recessed into both corner plugs and not some ghetto cut off wheel doing a straight edge cut leaving a sharp edge too! that will not only seal like total crap but cause a very large stress raiser in the corner plugs = very poor idea. If you look at the rotor path you will see the side seal rocks back and forth in the side seal groove on each minor dimension of the rotor housing points, thus it slams from one side to the other in the side seal groove! it needs to be recessed into BOTH, so not only is the clearance NOT zero as in the un thought out claims by others who have butchered this mod, but its also not the correct way to do this either as shown above. Here is how its done right! below. This to work properly needs a bespoke material side seal and corner seal, as the stock parts are failure prone as is. There is clearance to all parts! and needs to be done by not an engine builder wannabe but by toolmaker/fitter/turner who have precision parts fitting qualifications and experience, NOT GOOGLED!@ ZERO BLOW BY RICE RACING
__________________
www.riceracing.com.au Worlds best Apex Seals Coil on Plug Water Injection ECU Calibration Last edited by Barry Bordes; 03-09-2016 at 11:29 AM.. |
03-09-2016, 11:28 AM | #9 |
Rotary Fanatic
|
p
[QUOTE=RICE RACING;320079]There is some real dumb and wrong assumptions state above ^ The side seal is NOT constantly forced to one side!@ IF it were it would never wear a path into BOTH corner plugs as it does in reality! Peter you are incorrect. Anyone who has disassembled a rotary has seen that you have blow-by on only one side of the corner seal. If you see wear on both sides you have set the side seal too tight and the corner seal may fail... (along with pinching the apex seals and adding high wear to the side plates) You had problems in that area before with NRS corner seals... maybe that was the problem. The rotor can only go one direction... and parts of it may sweep faster or slower, but all portions are always going forward... rethink your position. A true ZERO BLOW BY design like I have made needs to be recessed into both corner plugs and not some ghetto cut off wheel doing a straight edge cut leaving a sharp edge too! that will not only seal like total crap but cause a very large stress raiser in the corner plugs = very poor idea. If you look at the rotor path you will see the side seal rocks back and forth in the side seal groove on each minor dimension of the rotor housing points, thus it slams from one side to the other in the side seal groove! it needs to be recessed into BOTH, so not only is the clearance NOT zero as in the un thought out claims by others who have butchered this mod, but its also not the correct way to do this either as shown above. Here is how its done right! below. This to work properly needs a bespoke material side seal and corner seal, as the stock parts are failure prone as is. There is clearance to all parts! and needs to be done by not an engine builder wannabe but by toolmaker/fitter/turner who have precision parts fitting qualifications and experience, NOT GOOGLED!@ QUOTE]
__________________
GOD the Incomprehensible Obvious (www.frksj.org) |
03-09-2016, 03:09 PM | #10 | |
RCC Addict
|
Quote:
You might find it surprising, and most of us live in reality... Under less than ideal conditions, seals can resonate back and forth. I.E. under pre-ignition and / or detonation If you can guarantee that your engine will never see such conditions, then you would be right. -Ted |
|
03-14-2016, 02:59 PM | #11 | |
Rotary Fanatic
|
Quote:
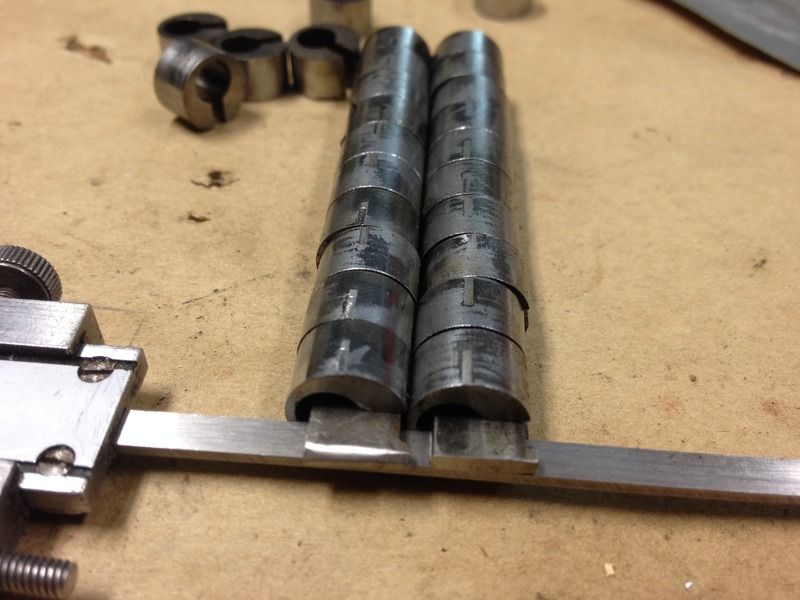
I was under the impression that you had disassembled many engines..... Certainly you should have observed what is depicted below. On the left side you see the wear from driven side seals... on the right observe that there is a ghost of wear ..... no wear whatsoever. Barry |
|
11-06-2015, 09:20 AM | #12 |
Waffles - hmmm good
|
__________________
1980 GS stockport, Fat Nikki, RB Dual Facetfuel pumps, Holley regulator, RB Street port exhaust, 2GDFIS, MR2 MK I electric fans, 2G strut bar, relayed fans, lights and fuel pump, LEDs Project Fat Nikki Budget 12A rebuild Video setup < $30.00 |
03-09-2016, 12:50 PM | #14 |
Test Whore - Admin
|
Easy Cheeby..... technical discussions are aight
__________________
-The Angry Stig- DGRR 2009, 2011, 2012 & 2013 - Best FC DEALS GAP!! WOOHOOOO!!!!! 2015 Audi S4 - Samantha - Zero Brap S4 2004 RX8 - Jocelyn - 196rwhp, 19mpg fuel to noise converter 2000 Jeep Cherokee Sport - Wifey mobile - Now with 2.5" OME lift and 30" BFG AT KO's! So it begins 1998 Jeep Cherokee - 5 spd, 4" lift, 33" BFG's - Rotary Tow Vehicle 1988 'Vert - In progress 1988 FC Coupe - Gretchen -The attention whore BEAST! I'm a sick individual, what's wrong with you? I'm pure Evil I'm still insane, in the best possible way. I think Brian's idea of romance is using lube. Your rage caused the meteor strike in Russia. The Antichrist would be proud of his minion. You win with your thread. Most everything It's a truck with a steel gate on the back. Just a statement of fact Motec M820, AIM dash, ported 13B-RE Cosmo, 6-spd trans, 4.3 Torsen, custom twin wg fully divided mani, Custom 4" split into 2x 3" exhaust, Custom HMIC, Custom custom custom custom I like to welder stuff.... No Bolt-ons allowed. Dyno'ed @ Speed1 Tuned by me - 405rwhp on WG.... WM50 cuming soon. -Angry Motherf*cker Mode ENGAGED- |
03-09-2016, 03:23 PM | #15 |
Test Whore - Admin
|
Boost vac boost vac boost vac boost vac..... see where I'm going with that?
__________________
-The Angry Stig- DGRR 2009, 2011, 2012 & 2013 - Best FC DEALS GAP!! WOOHOOOO!!!!! 2015 Audi S4 - Samantha - Zero Brap S4 2004 RX8 - Jocelyn - 196rwhp, 19mpg fuel to noise converter 2000 Jeep Cherokee Sport - Wifey mobile - Now with 2.5" OME lift and 30" BFG AT KO's! So it begins 1998 Jeep Cherokee - 5 spd, 4" lift, 33" BFG's - Rotary Tow Vehicle 1988 'Vert - In progress 1988 FC Coupe - Gretchen -The attention whore BEAST! I'm a sick individual, what's wrong with you? I'm pure Evil I'm still insane, in the best possible way. I think Brian's idea of romance is using lube. Your rage caused the meteor strike in Russia. The Antichrist would be proud of his minion. You win with your thread. Most everything It's a truck with a steel gate on the back. Just a statement of fact Motec M820, AIM dash, ported 13B-RE Cosmo, 6-spd trans, 4.3 Torsen, custom twin wg fully divided mani, Custom 4" split into 2x 3" exhaust, Custom HMIC, Custom custom custom custom I like to welder stuff.... No Bolt-ons allowed. Dyno'ed @ Speed1 Tuned by me - 405rwhp on WG.... WM50 cuming soon. -Angry Motherf*cker Mode ENGAGED- |